Showing posts with label sides. Show all posts

Thursday, May 17, 2012

Grilled Corn on the Cob


Welcome back to my food blog! I apologize for being MIA the past few months, but there was just so much going on in my life that this was put on the back burner temporarily. Thanks for sticking with me!  In other news, I got a Nikon D3100 dSlr camera soon after my son was born last summer. I still didn't really know how to use it, other than Auto, so I have been attending workshops to learn my camera. Recently, I got a new lens for my first Mother's Day! I absolutely LOVE it; it's way better than the standard one my camera came with. Anyways, I hope you enjoy the improvement with the picture quality as much as I do.

Back to the food...

Corn on the cob is something I typically make at least 2-3 times per week in the summer time. I even freeze it on the cob for those middle-of-the-winter cravings. Everyone has their own way of grilling corn on the cob and I wanted to share my very easy and quick version. I've pre-boiled them, soaked them and this is by far the easiest and yields the best results.

Grilled Corn on the Cob
Adapted from: Kelly's Kitch original
Serves: 2-4

2-4 corn cobs, shucked
foil

Wrap the shucked corn, individually, in a piece of foil wrapping it like a burrito and sealing well. Simply grill on the top shelf (if you have one) or on medium heat for 8-10 minutes, flipping halfway. The corn will stay very hot if you keep it wrapped in the foil, so be sure to open it up about 5 minutes before you'd like to enjoy.

Also, we love buttered corn and growing up my mom would slather a ton of butter on a slice of bread and we could roll the corn cob on that to melt the butter. I highly suggest this!

Tuesday, December 20, 2011

Mashed Potatoes


I've never really had a go-to mashed potato recipe, unless you call a box a "recipe." I was so sick and tired of taking the time to make instant mashed potatoes (that by the way are disgusting anyways), when I could have made them fresh in the same amount of time. My motivation to find the perfect recipe was jump-started by my mother bringing over bags of potatoes. What else could I do but make mashed potatoes and potato salad (recipe to come soon-ish.. hey, I'm being honest). These are so quick and the only time-consuming part is chopping the potatoes, but what else are you going to do while the water starts to boil?!

Mashed Potatoes
Adapted from: Kelly's Kitch original
Yields: 4-6 servings

6-8 medium-large russet potatoes, peeled and diced
1/4 cup shredded cheese, cheddar
2 Tbsp sour cream
2 tsp garlic powder
1/4 cup milk
4-6 Tbsp butter, depending on taste, at room temperature

Bring a large pot of water (1/3 of the way full) to a boil and add potato dices. Boil on medium-high until softened and a fork can easily pierce the potato all the way through. When potatoes are done cooking, drain in a strainer and return to the pot. Add cheese, sour cream, and garlic powder. Beat with hand beaters on low speed until cheese is melted and potatoes are the right consistency.

While beating, slowly add the milk a little at a time until potatoes are at the consistency of your preference. Do NOT over-beat the potatoes to get every single chunk out because they will become too starchy. Add the butter one tablespoon at a time with the beater and taste after each addition. Add more or less depending on your taste. Serve immediately.

Friday, September 9, 2011

Charred Corn Salad


Even though summer is coming to a close, I usually stock up on fresh corn on the cob for the winter. There is a local grower who I frequently purchase from at the farmer's market and their corn is substantially better tasting than any I've ever had before; hands down. I love fresh corn in the winter and the frozen and canned corn just isn't the same. Most of you are probably thinking I'm a little crazy for thinking this kind of corn is better, but when you bite into that juicy wonderful cob .. you know. Anyways, I saw this recipe on my new favorite show, Kelsey's Essentials, and just had to try it out. It looked amazing, but it tastes even better! This would be a great addition to any late summer hurrahs. Or it has made a wonderful side dish for my lunches lately. :)

Charred Corn Salad
Adapted from: Kelsey Nixon (Cooking Channel)
Yields: 4-6 servings

3 ears of corn, shucked
1-2 Tbsp canola oil
salt and pepper, for seasoning
3/4 cup packed, fresh basil leaves
1 clove garlic, grated
1/8 cup cider vinegar
1/8 cup extra virgin olive oil
8 oz cherry tomatoes, halved (almost a full 10-oz container)
1/4 small red onion, chopped

Preheat a grill pan, grill or broiler on high heat. I chose the broiler and it took a while, but it was a good alternative to grilling since it's so cold outside. Brush or rub the corn cobs in the canola oil and season with salt and pepper. Place the corn on the grill until charred, about 2-3 minutes, on each side (longer if using the broiler). Once the corn has charred, set aside to cool. Once cooled, stand each ear up inside of a wide, shallow bowl. Cut the kernels off of the cob with a sharp knife. Keep kernels in bowl and set aside.

Meanwhile, combine basil and garlic in a blender or food processor and pulse until it starts to chop up a little. Add vinegar, continue pulsing, and slowly add in the olive oil. Continue to pulse until mixture is smooth. Note: There will be small pieces of basil; this will not completely liquefy.

Add the basil mixture to the bowl with the corn kernels. Add onion and tomatoes and toss well to combine. Taste and season with salt and pepper as needed.

Wednesday, December 22, 2010

Deviled Eggs


Deviled eggs are a classic (and easy) addition to any get-together. These work especially well for Christmas and Thanksgiving because you can easily prep them the day before and just store in the fridge until everyone is ready to eat. My mom gave me this recipe because she absolutely makes the BEST deviled eggs, hands down. A lot of people just cut the hard boiled eggs in half but I think that tastes gross and it has a really dry texture. This method utilizes ingredients everyone always has on hand and it's extremely easy to make.

Deviled Eggs
Adapted from: Kelly's Kitch Original
Yields: 16 deviled eggs

8 large eggs, uncooked
mayonnaise, to taste
mustard, to taste
nutmeg, for sprinkling

To hard boil the eggs, place them in a large pot full of enough cold water so they are covered. Be sure there is a little extra water on top as well. Place pot on the stove and boil for 12 minutes and then remove pot from hot burner, place a lid on top and let sit for 8 minutes. Meanwhile, prepare a cold water bath in a large bowl (cold water and ice). Place the eggs in the cold water bowl and let cool down for approximately 5 minutes.

Once eggs are cool enough to handle, gently (VERY gently) crack the egg shell by lightly tapping it against the countertop or another flat surface. When the egg shell cracks, carefully peel away the shell and clear layer underneath to expose the hard boiled egg. Repeat with remaining eggs.

Cut eggs in half lengthwise and place all the yolks in a medium mixing bowl. Add about 4 Tbsp mayonnaise and 2 tsp mustard to start. Mix with the yolk, being sure to break the yolk up well. Taste for consistency. Add more mayonnaise or mustard as desired. Fill the egg halves with the mixture and sprinkle with paprika for effect.

Friday, December 17, 2010

Stove Top Mac N Cheese


Mac and cheese is always a welcomed guest in my home. I like to dress it up, keep it basic and even throw in some meat once in a while. That is exactly what I did with this recipe. It’s a great side dish as-is, but I wanted to just have it for dinner. Since my husband won’t eat anything without meat, I thought ham chunks would go over well; and they sure did! He didn’t complain or even suggest (as he has in the past) about this not being “a real main dish.” As a side dish, however, this would be fantastic for a weeknight dinner or even something easy for New Years.

Stove Top Mac & Cheese
Adapted from: Homemade by Holman, originally Food Network
Serves: 6-8

14 oz pasta shapes (I used rotini)
3 Tbsp butter
2 eggs
9 oz evaporated milk
½ tsp hot sauce
½ tsp mustard
½ tsp dried thyme
2 ½ cups sharp cheddar cheese, shredded
salt and pepper, to taste

Cook the noodles according to package directions. Cook to al dente and drain. Reduce heat to medium-low and return the pot to the stove. Add butter and melt with pasta. Whisk together eggs, milk, hot sauce, mustard, thyme, salt and pepper and pour mixture over top of pasta. Stir and cook about one minute. Add cheese and stir constantly to melt and incorporate well. Cook an additional 2 minutes and add more salt or pepper later if needed. Serve warm.

Wednesday, December 8, 2010

Baked Parmesan Asparagus


Asparagus is one of those vegetables that my mom tried to force on me as a child once and only once. I despised how it smelled and looked so much that I would have done (and probably did do) anything to avoid eating it. Luckily I have had some recipes recently that have called for asparagus and I can’t believe what I was missing out on! Asparagus is so healthy, delicious and extremely easy to make. If you need a side dish to your Christmas dinner, this would be a very easy and very beautiful display for the table.

Baked Parmesan Asparagus
Adapted from: All Recipes
Yields: 10 spears, about 3-4 servings

10 medium fresh asparagus spears, trimmed
4 tsp olive oil
1 Tbsp parmesan cheese, grated
1/8 tsp garlic salt

Toss the asparagus spears on a non-stick or greased cookie sheet with the oil. Bake in a preheated oven at 440˚F for 12 minutes, being sure to toss at the halfway point. Meanwhile combine parmesan cheese and garlic salt. When asparagus is done cooking in the oven and is tender, sprinkle with parmesan mixture and serve warm.

Friday, November 19, 2010

Cinnamon Sugar Biscotti


If you've ever been to a cafe or Starbucks, you have probably seen their biscotti. Do they make them fresh every day? Maybe. You probably won't get a straight answer. If you were to ask me to choose between taking the time to bake my own biscotti or buying it at a cafe, I would choose to bake it any time! After baking this biscotti, I will never ever buy them at a cafe again! The ones you buy are so rock-hard you feel kind of like you might need to get your dentist on speed dial. Yes, I'm talking chipping-teeth hard. These have the perfect amount of crispiness complemented by a wonderful chewiness, too. They go great with hot drinks (coffee, tea, hot coco) or even a big glass of milk; dessert anyone? Did I mention that this was the first thing I've ever made to be eaten so quickly?! :)

Cinnamon Sugar Biscotti
Adapted from: Annie's Eats, originally Joy the Baker
Yields: 20-24 cookies

For the dough:
2 cups all-purpose flour
1.5 tsp ground cinnamon
1 tsp baking powder
1/4 tsp salt
1 cup sugar (granulated, white)
6 Tbsp butter, at room temperature
1 large egg, plus 1 large egg yolk
1 tsp vanilla extract

For topping:
1/4 cup sugar
1 tsp ground cinnamon
1 large egg, slightly beaten

Preheat oven to 325˚ F. Line a baking sheet with a silicone baking mat (or parchment paper). In a medium bowl, combine the flour, cinnamon, baking powder, and salt. Whisk slightly and set aside. In the bowl of a stand mixer, cream the butter and sugar together (paddle attachment) on medium-high speed until light and fluffy, about 3-4 minutes. Scrape the bowl with a spatula if necessary. Blend in the egg and yolk, beating well after each. Add the vanilla until well incorporated. Moving the mixer to low speed, slowly add the dry ingredients until a dough forms.

Divide dough into two halves and shape each half into a 9-inch long log. They should be about 1.5 inches wide. Place them onto the prepared baking sheet, spacing the logs at least 3-inches apart. In a small bowl, whisk the beaten egg briefly. Mix the cinnamon and sugar together in a separate small bowl and taste for preference. Add more sugar or cinnamon as desired. Baste the beaten egg on top of the two logs and sprinkle with the cinnamon sugar mixture.

Bake for 40-45 minutes, rotating halfway through the baking. Bake until tops are golden brown and slightly firm. Remove the pan from the oven but maintain the temperature in it. Once the logs are cool enough to handle, slice diagonally along the loaves into 1.5-inch thick pieces (10 per log). Place the sliced biscotti onto the baking sheet again, cut side down. Sprinkle with a little more of the cinnamon sugar mixture and bake an additional 10-15 minutes, until golden and crispy.

Wednesday, November 17, 2010

Pumpkin Yeast Bread


With all the pumpkin recipes I tried this year (of course, trying to make up for years past with zero), I decided against my better judgement to find a pumpkin bread recipe. I thought my husband would be so happy and even make his sandwiches each day for lunch on them. Nope, didn't happen. We let this loaf sit and sit all week while I procrastinated making apple butter. Unfortunately I only had a few slices, but they were a few slices of heaven. They were good, but I wouldn't make a sandwich with them. I would probably eat them as toast for breakfast slathered with apple butter. Mmm, sounds amazing right?! Well I'll have to give the update on that when I finally do make the apple butter; I'll be sure to make another batch of this bread.

I also halved the recipe to make only one loaf of bread and it came out perfectly. I did slice them a little too thick for my taste so I would suggest slicing about as thick as normal loaves of bread you find at the grocery store. Plus, unless you have a toaster oven, these thicker pieces may not fit well in the toaster. ;) Enjoy!

Pumpkin Yeast Bread
Adapted from: Annie’s Eats, originally King Arthur Flour
Yields: 2 large loaves of bread

½ cup warm water
1½ Tbsp instant yeast
2/3 cup warm milk
2 large eggs
1½ cups pumpkin puree
2 Tbsp vegetable (or canola) oil
½ cup brown sugar
2 tsp salt
½ tsp ground cinnamon*
¼ tsp ground ginger*
¼ tsp ground nutmeg*
dash of ground cloves
6½ cups bread flour (approximately)

* Substitute all these spices if you already have Pumpkin Pie Spice in your pantry, using 1 Tbsp.

In a bowl of a stand mixer (paddle attachment), mix the water and yeast briefly. Add the milk, eggs, pumpkin, oil, brown sugar, salt and spices. Mix briefly to combine. Add 4 cups of the bread flour to the mixture and mix until dough becomes sticky. Switch to the dough hook attachment. Continue to add the remaining flour on low speed a little at a time. You should have a dough that is not sticky anymore and smooth. Transfer dough to a well-oiled mixing bowl and turn it over to coat in the oil. Cover the bowl with a damp kitchen towel and let the dough rise at room temperature until it is doubled, about 1 hour.

Place the dough onto a lightly floured work surface. Divide in half. Shape each piece into a rectangle 9-inches long and 1-inch thick. With the rectangle horizontal, roll the dough firmly into a cylinder left to right. Pinch the seams closed well. Place each dough roll into a well-oiled loaf pan (9x5-inch). Press the loaves down so that they just touch each side of the pan. Cover with a towel and let rise at room temperature until doubled, about 45 minutes.

Preheat the oven to 375° F. Bake the loaves for about 30 minutes. You can also use an instant-read thermometer (which I don’t have .. yet) until it reads 190° F. The bread should be a little darkened. Transfer to a wire rack and let cool. Slice thinly (like the thickness of a loaf of bread).

Friday, November 5, 2010

Garlic Knots


I've always been afraid to make dough, breads, etc. Recently I have discovered just how easy they all are to make. I still didn't really have a great roll recipe, but I knew I was going to really need one with the cold weather approaching. I can't describe just how amazingly delicious these little rolls are. If you don’t believe me, make them yourself (please do, they are so tasty). I’m all about easy and buying store-bought items for a big holiday or get-together, but I definitely will not skimp on the rolls ever again! I even had a roll by itself for dessert later the night I baked them. They are just that good.

Garlic Knots
Adapted from: Annie’s Eats, originally King Arthur Flour
Yields: 10 rolls (or “knots”)

For the dough:
3 cups bread flour
1 Tbsp sugar
2 tsp instant yeast
1 ¼ tsp salt
2 Tbsp olive oil
¼ cup milk
1 cup plus 2 Tbsp warm water

For the glaze:
2 garlic cloves, minced
3 Tbsp butter, melted
½ tsp Italian Seasoning

In the bowl of a stand mixer fitted with the paddle attachment, combine all the dry ingredients for the dough (flour, sugar, yeast, salt). Mix briefly to combine. Add the oil, milk and water and mix until dough forms. Switch to the dough hook attachment and knead the dough on low until dough is smooth and elastic, about 8 minutes.

Transfer the dough to an oiled mixing bowl, cover with plastic wrap and let sit in a warm area for at least 1 hour (to rise). Divide the dough into 10 equal pieces. Roll each piece into a 10-inch long rope and tie a knot in the middle. Fold the ends of the dough into the middle where the knot was just formed (top end goes underneath and bottom end comes up on top). Transfer to a stone baking sheet or cookie tray lined with a silicone mat. Allow to rise, covered lightly with a kitchen towel, for 45 minutes. Knots should be puffy.

Preheat the oven to 350 degrees. To make the glaze, mix: cloves, butter and seasoning in a small bowl. Brush mixture onto the knots on the cooking sheet. Bake in the oven for 16-18 minutes until they are lightly browned on the tops. Allow knots to sit on the baking sheet for 3 minutes to cool and transfer to wire cooling rack or serve immediately.

Friday, October 29, 2010

Whipped Pumpkin Dip


I never thought I'd like pumpkin so much. Pumpkin bars, cookies, pies, and more have usually a mediocre taste for me, especially since I'm picky and don't like pumpkin that much yet. This has changed my entire way of cooking and thinking for the fall season. I think I tried so many pumpkin recipes because I wanted to find that one recipe that just knocked my socks off and was to-die-for good. Well, my friends, that search has ended .. with this dip recipe!

I like normal fruit dip but it’s got no flavor and is usually 90% sugar. Although this recipe still isn’t the healthiest, it’s ten times better for you than the store-bought dip. As an added bonus, you will O.M.G. at the taste of it, I promise. I can’t believe I have been refusing to try pumpkin all these years. Thank you to Mrs. Holman for drumming up this recipe and making my fall/pumpkin/dip dreams come true (even if I didn't know I had them)! ;)

Whipped Pumpkin Dip
Adapted from: Homemade by Holman
Yields: about 5-6 cups

8 oz cream cheese, at room temperature
¾ cup brown sugar, packed
1 cup pumpkin puree
1 tsp pumpkin pie spice
1 tsp ground cinnamon
1 cup heavy whipping cream*
3 Tbsp powdered sugar*
Apple slices, grapes and Nilla Wafers, for dipping

Place the bowl of a stand mixer in the freezer, briefly for about 5-10 minutes. In the cold bowl, beat the whipping cream on high speed with the whisk attachment until stiff peaks form, about 5 minutes. Slowly add the powdered sugar 1 tablespoon at a time until mixed well.

* If you don’t have a stand mixer at home, omit these two ingredients (and steps) and just buy whipped cream in the container at the store instead.

Meanwhile, in a separate large mixing bowl, beat the cream cheese and brown sugar until fluffy and smooth. Add in the puree and spices and blend well. The mixture will be pretty thin at this point. Fold the whipped cream from the stand mixer (or store purchased container) into the bowl with the pumpkin mixture. Mix well to make even throughout. Serve immediately or keep in airtight containers in the fridge for up to 4-5 days.

This mixture goes well with apples, grapes and Nilla Wafers.

Wednesday, October 13, 2010

Homemade Applesauce


I scoured the internet and some of my favorite blogs for an applesauce recipe that I could do in the crock pot, but there were none that I could find. Luckily I felt confident enough to make my own recipe based off of the recipes I did find. All the recipes used cinnamon and I knew I wanted that in it. A lot of them also used extra water to allow for a certain consistency. Some of the recipes called for cloves but I omitted just to keep this recipe simple and easy.

The hardest part of this recipe (and most time-consuming) is peeling, coring and chopping up the apples. I actually used a Pampered Chef Apple Peeler/Corer/Slicer so that made the process a hundred times easier. I'm not trying to sell the product but I almost chopped the apples by hand because so many people had negative reviews on the product. I have heard that it doesn't work well unless the apples are rock hard, or that it doesn't work well if the apples aren't perfectly round. Despite all the negativity surrounding the product, I still hadn't used it before so I didn't want to misjudge it. Trust me when I say that the size, shape or consistency of the apple DO NOT MATTER! I absolutely loved the product and although at times it can be a little monotonous, it really helped with this recipe (and I will now use it for when I make my Apple Pie).

Homemade Applesauce
Kelly's Kitch Original
Yields: 4 cups

6 large Braeburn (or sweet) apples, peeled, cored and diced
1/2 cup sugar
1/3 cup water
3/4 tsp cinnamon

Mix all ingredients in a crock pot on low for at least 5 hours. Place contents in a blender or food processor and mix, pulsing until desired consistency. I chose to pulse mine briefly so it's a little smooth and a little chunky, too. Serve warm or cold as a snack or dessert.

Friday, September 17, 2010

Grilled Beans


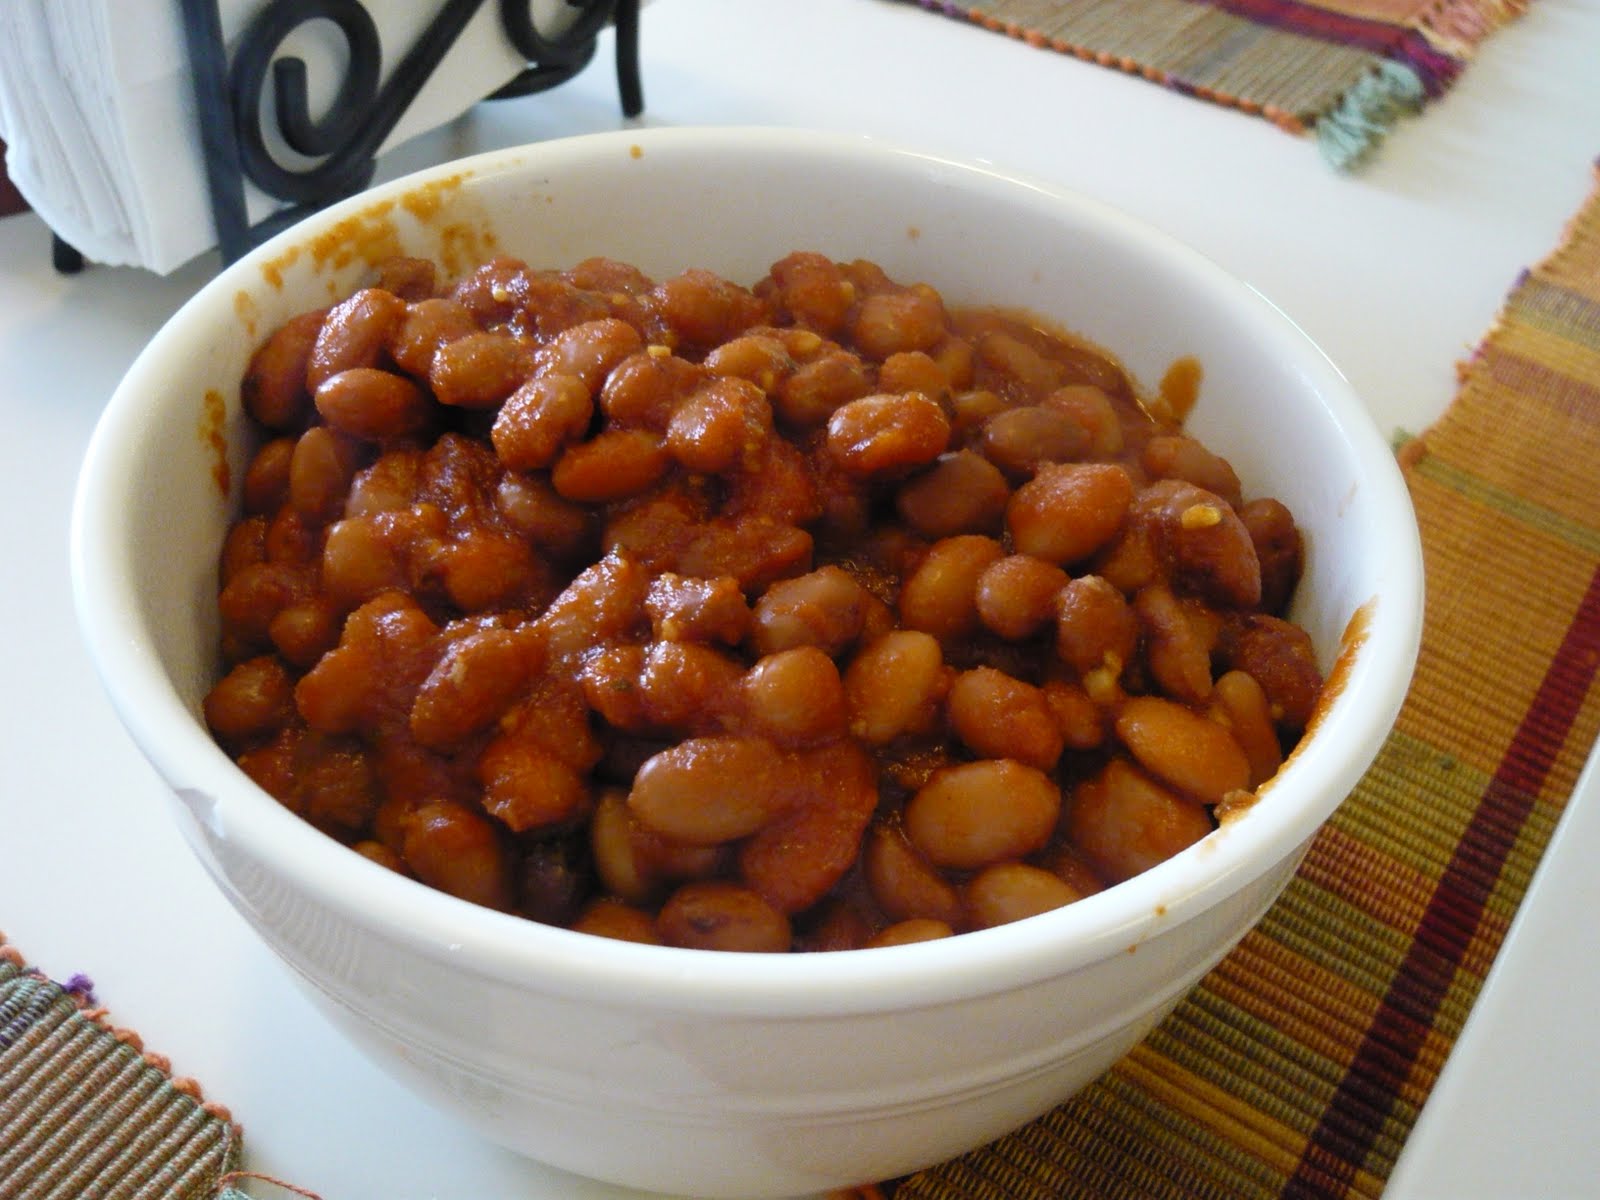
For not really ever liking baked beans growing up, I sure do have a lot of recipes on here for beans. Although my traditional baked beans are still my favorite, this goes perfectly with grilled chicken since the sauce is the same and it's oh-so-delicious. I would say these remind me more of fall and the other ones really are a spring/summer dish. These baked beans are so easy to make and really do make a perfect side dish to any BBQ you are planning!

Grilled Beans

1.5 cups tomato sauce (marinara sauce)
1.5 Tbsp finely packed brown sugar
1 Tbsp ginger, grated
1/2 Tbsp red wine vinegar
1 garlic clove, minced
2 cans pinto beans (15-oz each), rinsed and drained

In a small bowl, combine tomato sauce, brown sugar, ginger, vinegar, and garlic. Place mixture into a medium to large saucepan and add the beans. Bring to a slight boil and reduce heat to simmer for 15 minutes, until beans are slightly coated and sauce is thickened.

Pour beans into a disposable foil pan and cover with foil. While grilling chicken or cooking your main meal on the grill, place the beans on the side of the grill for 10 minutes to reheat. Serve warm with grilled chicken!

*Note: If you are making the grilled chicken recipe, the sauce measurements for that are enough for both the chicken AND the beans. I halved this recipe in case you are only making these beans by themselves.

Sunday, September 5, 2010

Old-Fashioned Coleslaw


Travel Note: My husband and I will be on a cruise this week celebrating our one year anniversary. Today we will be enjoying Half Moon Cay, Bahamas.

It's almost that time of year again .. Fall. I have yet to meet someone who doesn't like fall. My husband only likes it because of the food and the weather; otherwise he hates that the next season is his least favorite: winter. Let's not rush that one, though. Fall reminds me of gourds, pumpkins and more fun flavors. One that I have yet to try (and that I have protested all my life) is coleslaw. I never eat it when it comes on the side at a restaurant. I never have made it before. Although this recipe needed some tweaking (I used a LOT less mustard), it was a pretty good start to a classic dish. I am trying to eat healthier now and vegetables are one category that I like to not veer from my "norms". This was one recipe I'm sure glad I didn't pass up.

Old-Fashioned Coleslaw

3/4 cup plain nonfat yogurt
2 Tbsp reduced-fat mayonnaise
2 Tbsp cider vinegar
1/2 Tbsp dijon mustard
1/2 tsp salt
1/4 tsp freshly ground black pepper
1 head cabbage, shredded
2-3 carrots, shredded

In a large bowl combine all ingredients except cabbage and carrots. Mix well. Add cabbage and carrots and toss to combine evenly. Cover and refrigerate before serving. Best if eaten same day for crisp cabbage.

Saturday, August 28, 2010

Spicy Citrus Black Beans


Black beans really used to make me wanna gag. Now, I am pretty open to them since beans come on every item at Qdoba, one of my favorite "American Mexican" places to eat. I definitely prefer black over pinto beans for sure! I have never made them at home because I was just too lazy but this is quick, easy and makes for a wonderful side dish to any summer meal!

Spicy Citrus Black Beans
Adapted from: Annie's Eats, originally Simply Recipes

1 large can black beans (28 oz)
2 Tbsp olive oil
1 yellow onion, chopped
1 green pepper, chopped or minced (you can also substitute for another bell or jalapeno)
1/2 - 1 cup chicken or vegetable broth
1.5 tsp oregano
2 bay leaves
1/2 tsp salt
3 cloves garlic, minced
1 tsp chipotles in adobo, pureed
1.5 tsp ground cumin
1/4 cup orange juice
Juice of 2 limes (added lime zest, optional)
1 Tbsp white wine vinegar
Chopped fresh cilantro, to taste, plus more for garnish (optional)

Rinse the beans well in a colander over the sink. Heat olive oil in a medium saucepan on medium-high heat. Begin to sauté onion and pepper until tender, about 5-6 minutes. Add the garlic and sauté until fragrant, 30 seconds. Stir in the rinsed beans and mix in broth (use however much you would like to have more or less liquid). Bring to a simmer and add oregano, bay leaves, salt, chipotle puree, cumin, orange juice, lime juice and vinegar. Once simmering, reduce heat to medium-low and cover for 20-25 minutes. Stir occasionally. Once done, remove from heat and stir in cilantro (if using) and serve warm.

Thursday, May 13, 2010

Nachos


We've all eaten breakfast for dinner or had something completely out of the ordinary just because we have the sweet freedom to do so as an adult. Well, one of my biggest guilty pleasures is nachos. I can eat them anywhere (Sam I am?). I absolutely love all kinds of nachos but have never made any at home. Maybe because I am lazy or because I just prefer normal meals at home and guilty pleasures at restaurants. Who knows. At any rate I finally got to this dog-eared recipe and decided it was our dinner. My husband didn't complain .. it has meat in it, right!? I really think it was a wonderful change to our normal dinners that I am running out of ideas for. So go ahead and indulge once in a while.

Nachos

5 cups bite-sized tortilla chips (6 oz)
1 lb ground beef
1 can black or pinto beans (15oz), rinsed and drained
1 cup salsa
1.5 cups shredded cheese, mexican blend (6 oz)
Optional toppings: lettuce, green onions, cilantro, etc

Spread half of the tortilla chips in an 11x8 casserole dish and set aside. In a large skillet, cook the beef over medium heat until brown. Drain off fat and add beans and salsa. Spoon half the mixture on top of the tortilla chips. Sprinkle with half the cheese. Repeat layer with chips, beef mixture and cheese.

Bake at 350 degrees for 10 minutes. Remove from oven and serve on individual plates, topping with additional optional topings if desired.

Saturday, April 3, 2010

Old Fashioned Baked Beans


Beans, beans, the magical fruit .. just kidding! Every time I make baked beans (almost never) I have to sing that song at least once. It just makes me giggle inside. Yeah, sometimes cooking reverts me back to my 9-year-old immature days. We all know we were once immature. Getting back to the recipe .. my husband had a friend over to go fishing this past weekend and I couldn't pass up this opportunity to try out my moms baked beans recipe. Of course she loves her onion so if this were her actual recipe it wouldn't look like beans in the picture, it would look like onions with a few beans spread throughout (you know I love ya, mom). Well I used just a pinch of onion because my husband doesn't too much care for it and a few other common household ingredients and voila! The perfect side dish for your BBQ or party this summer. I am not sure why I skipped over doing Easter recipes but I really, really, really am enjoying all this unseasonably warm weather we have been having!

Old Fashioned Baked Beans
Adapted from: Kelly's Kitch original (mamma's recipe)

1 can baked beans of preference (1lb) - I chose country style
1/3 cup chopped onion
1/3 cup brown sugar
1/3 cup ketchup
2 tbsp dijon mustard (or you can use regular mustard too)

Mix all ingredients in a 9x9 greased baking dish on 375 degrees for 45-50 minutes uncovered. Remove from oven and allow to sit for 5 minutes because beans will be HOT. Serve immediately.

Thursday, April 1, 2010

Macaroni Salad


With all this unseasonably warm weather we have been having in Central Indiana, my husband and I have been befriending our grill yet again for a long season of cooking! Brachts, hamburgers, hot dogs . . my oh my how they do make me smile just thinking of them all! I am usually a healthy eater and watch my portions well, but when it comes to "baseball food" as I like to call it, it becomes a real challenge to control myself. One thing that helps to fill me up is macaroni salad. I have had several versions and this, by far, is one of the best recipes I have come across. Not only does it not have peas in it (yeah, it's by choice) but it is very easy to make with all things I usually tend to have around the kitchen anyways. This time I had some leftover rotini noodles so why not use what I have, right. Not only does this dish make for a fantastic side to any outdoor grill or BBQ, but it also keeps well at room temperature for camping! I am about to go in a few weeks and cannot wait to blog what we cook there out in nature where there are no computers, blogs or recipes. =)

Macaroni (Rotini?) Salad
Adapted from: Sing for your Supper

1/2-3/4 lb pasta shapes (I chose Rotini), cooked and drained
3 small carrots, diced
1 celery stalk, diced
1/2 cup frozen corn, thawed
1 cup cubed sharp cheddar cheese
salt and pepper, to taste
1/2 cup mayonnaise
1/2 cup italian salad dressing
1 tsp dijon mustard

Combine all ingredients in large bowl, cover and refrigerate for at least 1 hour before serving.

Friday, March 19, 2010

Chicken, Pepper, and Green Bean Salad


I made this quite some time ago but have not been feeling well enough to roll myself out of bed, much less sit at a computer for a while to blog. My apologies!! This was a salad that I made with a main course and a side dish but this was so filling I think it really stands well on it's own. I have never been fond of oil or vinegar based dressings but this was just out of this world amazing! I love the combination of all the different flavors of peppers, lettuce, chicken, celery, onion, etc. The dressing really pulls everything together. The only modification that really sticks in my mind is that the directions originally called for setting the beans in cold water and adding them cold like that (I think to keep them nice and crisp), but they just didn't go well with the rest of the warmed salad. I have accounted for that change below but feel free to try the cold beans for yourself.

Chicken, Pepper and Green Bean Salad

2 large red bell peppers
1 tsp olive oil
salt and pepper, to taste
1/2 lb green beans, trimmed
1/4 cup extra-virgin olive oil
3 tbsp red wine vinegar w/a dash of sugar (or you can sub sherry vinegar)
1 tbsp chopped thyme
1/2 tsp minced garlic
1 tsp olive oil
3/4 lb skinless, boneless chicken breasts, cut lengthwise into strips
1 small red onion, sliced thin
2 celery stalks, sliced thin
10 oz mixed baby salad greens (or your choice)

Preheat oven to 400 degrees and cut bell peppers lengthwise into strips. Remove seeds and ribs. Arrange peppers on a cookie sheet lined with foil and drizzle with olive oil, salt and pepper. Roast turning once, until the edges are blistered (about 40 minutes). Removed from oven and allow to cool then peel away loosened skins and set aside. This is pretty messy so you can buy raosted red pepper in the store .. but this was really worth the effort as it tasted fantastic!

Bring a sauce pan 3/4 full of water to a boil and add the green beans. Boil 5-7 minutes (timing depends on size) and drain. Set aside and keep warm. Meanwhile, in a small bowl whisk together the olive oil, vinegar, thyme, garlic, 1/2 tsp salt and a grind of pepper for the dressing.

Brush a large, non-stick frying pan with olive oil and place over medium heat. Add the chicken a few pieces at a time, turning to cook until no longer opaque and cooked thoroughly. Add 2 tbsp of dressing mixture into skillet, mix well and continue to cook another 2 minutes. Let chicken stand in pan.

In a large bowl combine salad greens, 1 tbsp vinaigrette and toss to coat well. Add chicken, red peppers, pan juices and greens. Toss to coat well. For a nicer presentation you can place the greens on a large serving platter first, then toss the latter ingredients in the bowl with juices. Then, top the greens with that mixture.

Thursday, March 11, 2010

French-Style Potato Salad


When I think of traditional potato salad I have to admit that I begin to salivate a little and think of my mom's wonderful version with russet potatoes, mayonnaise, mustard, etc. It makes me think of summer and I really yearn for that sunny warmth right now. We are just itching for a reason to grill outside right now! Well if you are like me and winter weather has got you down, here is something to cheer you up!

This is a very light, cholesterol-free, high-fiber version of potato salad. Now per the usual I always try to make new things I haven't tried before to see what my husband will and will not eat. I made these as a side dish and found out that my husband usually doesn't like red potatoes. OKAY .. hold the phones .. who doesn't like red potatoes!?!? I couldn't believe my ears! Well he loved these so thank goodness for this recipe. I loved that these weren't so heavy with all the mayo and mustard either. My cholesterol doesn't need any help going in the wrong direction.

French-Style Russet Potato Salad

2lb small, round red-skinned potatoes
3 tbsp extra-virgin olive oil
2 tbsp red wine vinegar
1 tbsp dijon mustard
kosher salt and ground black pepper, to taste
1/2 cup celery, thinly sliced
1/4 cup cervil leaves, chopped (I substituted Parsley)

Place the potatoes in large saucepan with water to cover. Bring to a boil over high heat. Reduce heat to medium-low, cover and simmer until the potatoes are tender when pierced with a knife (about 15-20 minutes). Meanwhile, in a large bowl, whisk together olive oil, vinegar, mustard, 1/2 tsp salt and pepper to taste until blended well.

When potatoes are ready, drain them and allow to cool. Once cooled enough to handle, quarter them and add them to the dressing. Add celery and chervil (or parsley) tossing gently to combine. Serve salad warm or at room temperature.