Showing posts with label quick n easy. Show all posts

Thursday, February 13, 2014

Waffles


This is one of the easiest waffle recipes I've ever found. Most recipes call for an overnight refrigeration, but really who has time for that? I don't think about breakfast until I wake up and certainly have little to no self-control if I were to make batter the night before. ;) This recipe is quick, easy, and uses ingredients everyone should have in their kitchen, if say, one would be stuck inside under emergency precautions due to a blizzard. It's definitely sure to warm up your bellies on a cold, wintry morning.


Waffles
Adapted from: Joy of Baking
Yields: 6-7 waffles

1 cup all-purpose flour
1 1/2 tsp baking powder
1/4 tsp salt
1 1/2 Tbsp granulated white sugar
1 large egg
1 cup milk
1 tsp vanilla extract
2 Tbsp unsalted butter, melted

Preheat waffle maker. In a large bowl, whisk together flour, baking powder, salt, and sugar. In a separate bowl mix the egg, milk, vanilla, and butter. Add egg mixture to dry mixture and mix just until uniform throughout.

Spray waffle iron with cooking spray if needed. Pour enough batter into iron to cover 1-2 mm above iron and level out with fork. Close the lid and cook according to waffle iron specifications. I cooked until the light on my machine indicated they were done cooking, about 3-4 minutes.

Wednesday, December 18, 2013

M&M Cookies


The usual M&M cookie recipes I've made in the past produce thin, greasy cookies. I was looking for a thicker and softer recipe to make for Santa's cookies this year. I was pleasantly surprised when I found this recipe (random Google search, FTW) and the cookies didn't look thin. Or greasy. They turned out great and even kept well over night. Okay, over several nights. :) We will definitely be baking these Monday for Santa since I am working Tuesday. This will be an exciting year since our son is really starting to understand a little more about Christmas.

M&M Cookies
Adapted from: All Recipes
Yields: 2 dozen cookies

1/2 cup packed brown sugar
1/4 cup white sugar
1/2 cup shortening
1 egg
3/4 tsp vanilla extract
1 1/4 cups all-purpose flour
1/2 tsp baking soda
1/2 tsp salt
3/4 cup M&M's, plus more for topping

Preheat oven to 350 degrees F. 

In the bowl of a stand mixer fitted with the paddle attachment, mix the sugars, shortening, egg, and vanilla until smooth. In a medium mixing bowl, mix flour, baking soda, and salt. Move mixer to slowest speed and add flour mixture in small increments. Blend well. Add M&M's to mixing bowl and mix on low speed.

Roll dough and place on cookie sheet lined with silicone baking mat. Slightly flatten with hand and press a few M&M's to the tops of cookies. Bake in preheated oven for 9-11 minutes. Allow cookies to cool on cookie sheet for 3-5 minutes and transfer to cookie rack.

Wednesday, October 9, 2013

Oven-Baked French Toast


My family was tired of the traditional pancakes (from scratch, I might add) that I usually make for weekend breakfast. We just needed something different, so over to Pinterest I went. I found this amazing recipe for baked french toast that is quick, easy, and uses regular bread. 

Yes, regular bread.

French toast usually requires Italian bread or some other kind you usually don't have lying around. This recipe is great because it uses your every day sliced sandwich bread you already have! I was skeptical as to how these would turn out but they were amazing and my 2-year-old loved them! They were soft yet firm enough to be considered "finger food" which, let's face it, is a toddler's favorite kind of food. Best part is they take about 6 minutes to cook (and probably only 5-10 minutes to prep). 

Easy peasy jungle breezy! (Wow. Too much Mickey Mouse Clubhouse.)


Oven-Baked French Toast
Yields: 20 small slices; serves 4
Adapted from: A Beautiful Mess

Ingredients

4-5 slices of bread
3-4 eggs
2 Tablespoons cream (or half & half, or milk)
1/2 teaspoon vanilla extract
Cinnamon
Cinnamon & sugar mix (your preference)

Directions

Preheat broiler on low setting and place top rack about 3-4 inches from top of oven.

Mix the egg, cream, vanilla, and a generous sprinkle of cinnamon to a shallow baking dish. Mix well. Slice bread into 4 equal slices, lengthwise and quickly coat on both sides with the egg mixture. Allow excess to drip (being careful to not allow the bread to tear) and place on a prepared baking sheet. I use a Silpat mat but you can grease your baking sheet if you don't have one. NOTE: DO NOT USE PARCHMENT PAPER.

When all slices are lined on the baking sheet, sprinkle some cinnamon sugar mixture on top. Place under the broiler (low setting) for 2-3 minutes or until the egg is cooked and sugar is starting to caramelize. 

Remove pan from oven and flip sticks onto other side and sprinkle with more cinnamon sugar topping. They will stick well to the Silpat mat so be careful when flipping. Broil an additional 2-3 minutes and serve warm.

Thursday, May 17, 2012

Grilled Corn on the Cob


Welcome back to my food blog! I apologize for being MIA the past few months, but there was just so much going on in my life that this was put on the back burner temporarily. Thanks for sticking with me!  In other news, I got a Nikon D3100 dSlr camera soon after my son was born last summer. I still didn't really know how to use it, other than Auto, so I have been attending workshops to learn my camera. Recently, I got a new lens for my first Mother's Day! I absolutely LOVE it; it's way better than the standard one my camera came with. Anyways, I hope you enjoy the improvement with the picture quality as much as I do.

Back to the food...

Corn on the cob is something I typically make at least 2-3 times per week in the summer time. I even freeze it on the cob for those middle-of-the-winter cravings. Everyone has their own way of grilling corn on the cob and I wanted to share my very easy and quick version. I've pre-boiled them, soaked them and this is by far the easiest and yields the best results.

Grilled Corn on the Cob
Adapted from: Kelly's Kitch original
Serves: 2-4

2-4 corn cobs, shucked
foil

Wrap the shucked corn, individually, in a piece of foil wrapping it like a burrito and sealing well. Simply grill on the top shelf (if you have one) or on medium heat for 8-10 minutes, flipping halfway. The corn will stay very hot if you keep it wrapped in the foil, so be sure to open it up about 5 minutes before you'd like to enjoy.

Also, we love buttered corn and growing up my mom would slather a ton of butter on a slice of bread and we could roll the corn cob on that to melt the butter. I highly suggest this!

Tuesday, February 14, 2012

Happy Valentine's Day - Easy Chocolate-Covered Strawberries


I hope everyone has a wonderful Valentine's Day today! Here is a quick and easy treat to make for that special someone if you don't have a lot of time or money. I found strawberries on sale at my grocery store and dipped them in some chocolate. Once they dried (about 15 minutes in the fridge), I put some melted white chocolate into a ziploc bag and snipped the corner off. Instant piping bag!

To melt the chocolate without taking a lot of time or using a lot of dishes, simply place the chocolate chips into a microwave-safe bowl and melt on the defrost setting in 30-second increments, stirring in between. Once it is melted, dip the fruit! Keep the fruit on a cookie sheet lined with wax paper in the fridge until they harden and enjoy!

Sorry for the gratuitous instagram photo, but I'm too sleep-deprived and exhausted from my son's teething shenanigans (yes, I said shenanigans) to break out the actual camera, get the lighting just right, etc. Thanks for understanding! :)

Friday, January 6, 2012

Biscuits & Gravy


Growing up I was told my mother made the best biscuits and gravy, but I wouldn't know because I was too afraid to try them. Gravy for breakfast always made me cringe and I wasn't a huge fan of sausage either so it made sense that I never tried it. I'm saddened now about all the great food I've missed out on, including this!

I got this recipe from my husband's best friend's mother (still following? me either). She apparently makes biscuits and gravy so good there's never any leftovers. I got some tips from her about what ingredients to use and not use and this amazing breakfast is what I came up with. I would suggest making Bisquick Biscuits, unless you have a great, fluffy breakfast biscuit recipe. The ones I made from here (without the chives) were flat and not very tasty, although they were very flaky so it made for some good biscuits for these, in my opinion.


Biscuits & Gravy
Adapted from: Kelly's Kitch original
Yields: 4 servings

1 pkg buttermilk biscuits (Bisquick)
1 lb pork sausage
1/2 cup 2% or whole milk
1-2 cups all-purpose flour
salt and pepper, to taste
 
Bake the biscuits according to package directions. Meanwhile, brown the sausage in a large skillet over medium heat. Once cooked through, add the 1/2 cup of milk to the pan and mix briefly. Add the flour in 1/4-cup increments, mixing constantly, until the gravy is your preferred consistency. We used about 1 1/2 cups. Add salt and pepper as desired and serve immediately with biscuits.

Thursday, December 29, 2011

Chocolate Covered Bananas


Pinterest is my new obsession! I got an idea to make something similar to these from one of the pins on there. I totally ignored the recipe when I made these because it was really a spur-of-the-moment kind of thing. I was making buckeyes and had a ton of leftover chocolate so I was searching for things to dip in it. Think chocolate fountain! I didn't want to use my apples since I was saving them for another recipe. I had some banana's so I dipped them into the chocoalte and froze them. I tasted them 1 hour after freezing (they weren't too frozen) and after overnight (they were rock solid). I definitely prefer and would suggest the 1-hour freezing because you still could taste the banana really well. This is a very easy dessert and a great way to use up all that extra chocolate!!

Chocolate Covered Bananas
Adapted from: Kelly's Kitch original

1/2 bag chocolate chips (6 oz)
1/4 bar paraffin wax
4-5 large bananas, cut into 1-inch segments
toothpicks
Parchment paper

Melt the chocolate and paraffin in a double boiler on the stove. While that is melting, prepare 1-2 baking sheets lined with parchment paper. Continue to mix the chocolate until all the wax is melted and there are no more chunks in the mixture. Dip the bananas with the toothpick into the chocolate, completely submerging it. Place onto the prepared baking sheet(s) and allow to freeze for at least 1 hour before serving.

If you plan to freeze overnight, I'd suggest letting them sit out for 20-30 minutes before serving.

Monday, December 26, 2011

Ants on a Log


Yes, I'm trying to make up for lost time. I know I'm not exactly posting the most amazing holiday food you've ever seen, but let's be real. We aren't going to eat ham, sugar cookies, and peppermint bark 7 days a week. I hope, anyways. Well this is a great little snack for your child or even the fun-seeking adult. I know there are the traditional ants on a log, but I had a lot of other leftover ingredients and I absolutely loved the result so I had to share!

Ants on a Log
Adapted from: Kelly's Kitch original
Yields: about 9 "logs", or 3-4 servings

4 long celery stalks
Creamy honey peanut butter (splurge, it's so good)
1/4 cup craisins

Start by chopping the celery into 3-inch long segments and filling them with the creamy peanut butter (this usually works best if you have an outside stalk so there is room to fill). Place the craisins on the peanut butter and press into it to make it stick. Voila! Easy as .. pie?

Thursday, September 22, 2011

Ham & Cheese Sliders, revisited


I have made these sliders before, usually during baseball season, but these little sandwiches are so easy to put together we make them a lot now. With football season well under way (and since I'm participating in fantasy football this year), neither one of us ever want to cook on Sundays. This is our perfect go-to meal nowadays since they involve no cutting boards and knives, pots or pans, etc. Put the few ingredients together and you've got dinner or snacks for a lot of hungry friends!! When I first made these I mentioned in my original post that I wasn't a huge fan, but I did eat them. Now I'm 100% on board and love these little sandwiches. I will probably try some kind of turkey combination soon, too!

Ham and Cheese Sliders
Adapted from: Annie's Eats, originally The Girl Who Ate Everything
Yields: 12 mini-sandwiches

For the sandwiches
12 slider rolls (I bought Hawaiian rolls and sliced them down the middle)
12 slices honey ham
12 slices Swiss cheese
mayonnaise

For the topping
3/4 Tbsp yellow mustard
4 Tbsp butter, melted
1/2 Tbsp finely minced onion
1/2 tsp Worcestershire sauce
poppy seeds, for topping

Preheat oven to 350°F. Start by placing the slider rolls on a baking sheet and slicing them, if needed. Slather on some mayonnaise on the top bun, as much as desired. Place a few small slices of ham and cheese on top of the bottom bun and place tops on sandwiches. Mix the sauce ingredients, except poppy seeds, and baste on the tops of the sandwiches. Sprinkle poppy seeds on top immediately. Cover baking sheet with foil and bake 10 minutes, until cheese has melted. Uncover and bake an additional 2 minutes. Serve warm.

Friday, September 16, 2011

Mexican Beef Melts


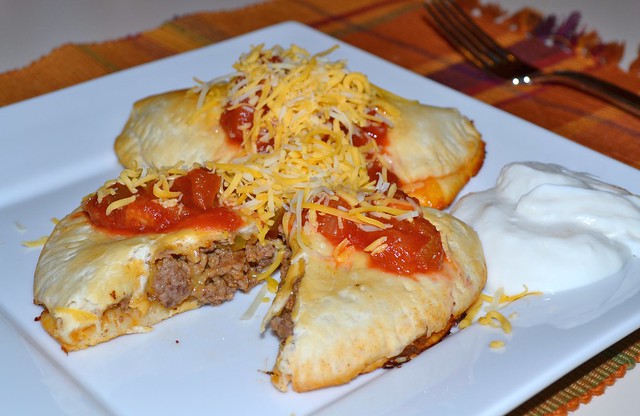
I don't know why I really have never thought to make a mexican type of calzone. I guess I'm not much of a risk taker in the kitchen when it comes to making up new dishes. I did, however, stumble upon this recipe in a booklet that was 6 years old and thought it would be a great week night dinner. With just a few ingredients and easy directions, I was determined to make this (even if I do have an 11-week-old). They turned out great even though I was somewhat skeptical of the lack of ingredients inside of the melts; or calzones. I think I might add some peppers to the meat mixture to give it a little more kick. They are still fabulous as-is and make for a quick dinner!

Mexican Beef Melts
Adapted from: Pillsbury
Yields: 4 servings

1 lb ground beef
1 package (or 3-4 Tbsp) taco seasoning mix
1/3 cup water
1 1/2 cups chunky salsa
1 can homestyle biscuits (16.3 oz)
1 cup shredded monterey jack cheese
1 cup sour cream, optional

Heat oven to 375°F and lightly spray a cookie sheet with cooking spray (or use silicone mat). In a large skillet, brown the meat. Drain and return meat to warm skillet on medium-low heat. Add water, salsa and seasoning. Mix well to combine and continue to cook until thickened, about 4-5 minutes.

Separate dough into 8 biscuits and roll out to a 6-inch diameter circle. Spoon about 1/4 cup beef mixture into biscuit rounds on cookie sheet. Top with a tablespoon of cheese and close by folding over. Press the edges with a fork to ensure a good seal. Bake 10-14 minutes, or until golden brown. Allow to cool slightly and serve by topping with salsa and cheese. Serve with sour cream if desired.

Sunday, May 15, 2011

Traditional Sugar Cookies


This is my quick go-to recipe for my sweets cravings. It's a very simple recipe that involves using ingredients you probably already have on hand. I absolutely love making (and eating) cookies any day, any time. These cookies are fantastic as-is plain, but could definitely be made even more custom by adding some icing. I might try them one day when I have more time with a softer buttercream type of icing. Even royal icing would be a delicious addition to these soft and amazing cookies.

Traditional Sugar Cookies
Adapted from: Annie's Eats, originally The Pastry Queen
Yeilds: 20 cookies

2 cups all-purpose flour
1/2 tsp baking soda
1/4 tsp salt
8 Tbsp butter, at room temperature
1/2 cup vegetable oil
1/2 cup granulated sugar, plus extra for sprinkling
1/2 cup powdered sugar
1 large egg
2 tsp vanilla extract
1/4 tsp lemon juice

In a small mixing bowl combine the flour, baking soda and salt. Set aside. In the bowl of a stand mixer fitted with the paddle attachment, mix the softened butter on medium speed until smooth. Add the vegetable oil on medium-high speed until mixed well, about 1 minute. Add in the granulated and powdered sugar until well incorporated, about 1 minute for each. Beat in the egg until well incorporated. Finally, add the vanilla and lemon juice.

Reduce mixer speed to low and add the dry mixture a little at a time. Freeze dough for 15 minutes (or at least 1 hour in the fridge). Drop dough balls onto cookie sheets lined with silicone mat or parchment paper. Flatten gently with hand and sprinkle extra sugar on top. Bake in a preheated oven at 350 degrees for about 12-15 minutes, or until bottoms are golden-brown. Let sit on cookie sheets for 10 minutes and then transfer to a wire cooling rack. Once cooled, store in airtight container.

Monday, May 9, 2011

Green Monster Smoothie


Green food, okay. Green drinks, not okay? I have heard about and seen this Green Monster Smoothie just about everywhere in the past year or two. I've been afraid to try it for one reason: it's green. And guess what gives it that bright green color? Spinach leaves! Of all things that shouldn't be in drinks!! Or should it?

I wanted to try this drink because it had so many good ingredients that I love (minus the spinach of course). I made a slight adjustment and omitted the honey, but it was perfectly sweet with all the fruit in it. It turned out absolutely amazing! I guess I just want more go-to drink recipes because it seems like I have so few. Try this recipe and adjust it however you like, adding or omitting any ingredients you think it needs. Next time I might do half pineapple and half mango. That sounds delicious! And if you were wondering, you absolutely cannot taste the spinach!!

Green Monster Smoothie
Adapted from: Annie's Eats, originally une-deux senses
Serves: 3-4

1 banana, cut into 1-inch chunks
1 cup frozen, chopped pineapple
1 pear, peeled and coarsely chopped
1 1/2 cups orange juice
2 1/2 cups baby spinach leaves, rinsed and dried

Combine all ingredients into a blender and puree until completely smooth. Enjoy immediately or store in fridge for up to 3 days. Mixture will need a good shaking/stirring when not enjoyed immediately.

Monday, February 14, 2011

Lobster Tails


Happy Valentine's Day! I don't celebrate this holiday, but I do recognize that a lot of other people do. Here is a wonderfully easy and yet fancy dinner for that special someone tonight! Seafood is one thing that I've always struggled to be able to eat. Crustacean (lobster, crab legs, etc) was always my one exception. I'm not a big fish eater but crab legs and lobster tail .. sign me up! I have never ever braved making lobster tail mostly because I was very intimidated. Ironically this was one of the easiest dishes I've ever made! It only takes about 8 minutes to cook and 5 to prepare. I had to start my side dishes long before I even got the meat prepared.

* Any crustacean goes well with clarified butter. First, melt salted butter stovetop and spoon off the top layer of fat. So easy and very much worth it! Because this was so much fun to make (and interesting), I decided to take step-by-step photos:

First, place the lobster onto a cookie sheet lined with foil. Preheat the broiler on high.


Next, cut a slit along the length of the top of the shell with a pair of kitchen scissors.


Then, gently pull the meat away from the sides and bottom of the inside of the shell. Once completed, you can pull out most of the meat and place on top of the shell. Spread a little melted butter on the meat.


Broil for 6-9 minutes (depending on size) on the second highest oven shelf position until lobster is opaque throughout.


Lobster Tails
Adapted from: Annie's Eats

lobster tails (we chose 5 ounce)
butter

First, place the lobster onto a cookie sheet lined with foil. Preheat the broiler on high. Next, cut a slit along the length of the top of the shell with a pair of kitchen scissors. Then, gently pull the meat away from the sides and bottom of the inside of the shell. Once completed, you can pull out most of the meat and place on top of the shell. Spread a little melted butter on the meat. Broil for 6-9 minutes (depending on size) on the second highest oven shelf position until lobster is opaque throughout. *Serve with clarified butter (see above).

Monday, February 7, 2011

Sloppy Joes


Sloppy Joe dinners are usually my I don’t feel like cooking and nothing sounds good dinners. Lucky for us, we both love sloppy joes anyways. I have never even attempted to make it homemade because the can is so good and so inexpensive that it would be much more cost effective (even with health reasons) to just use the can. When I saw this recipe in my google reader, however, I had to try it at least once. It came out tasting good, it was just less salty. I liked that part of it even though it took longer because with a can you just plop it in there and heat. Don’t worry though, it didn’t take that much longer. I also think the cost effectiveness outweighs the taste benefits. Don’t misunderstand me: it’s good, but just not quite the same taste as the can. It’s definitely worth trying though!

Sloppy Joes
Adapted from: The Cooks Next Door
Yields: 6-8 servings

1 lb ground beef
½ cup onion, diced
½ cup green pepper, diced
1 can petite diced tomatoes (15 oz)
1 can tomato sauce (8 oz)
3 Tbsp quick-cooking oats
1 Tbsp Worcestershire sauce
2 tsp chili powder
1 tsp garlic powder
1 tsp brown sugar
½ tsp seasoned salt
Dash cayenne pepper

Brown ground beef until halfway cooked throughout. Add onion and green pepper and cook until meat is no longer pink. Add all other ingredients and simmer for 20-30 minutes. Serve on hamburger buns immediately.

Wednesday, December 22, 2010

Deviled Eggs


Deviled eggs are a classic (and easy) addition to any get-together. These work especially well for Christmas and Thanksgiving because you can easily prep them the day before and just store in the fridge until everyone is ready to eat. My mom gave me this recipe because she absolutely makes the BEST deviled eggs, hands down. A lot of people just cut the hard boiled eggs in half but I think that tastes gross and it has a really dry texture. This method utilizes ingredients everyone always has on hand and it's extremely easy to make.

Deviled Eggs
Adapted from: Kelly's Kitch Original
Yields: 16 deviled eggs

8 large eggs, uncooked
mayonnaise, to taste
mustard, to taste
nutmeg, for sprinkling

To hard boil the eggs, place them in a large pot full of enough cold water so they are covered. Be sure there is a little extra water on top as well. Place pot on the stove and boil for 12 minutes and then remove pot from hot burner, place a lid on top and let sit for 8 minutes. Meanwhile, prepare a cold water bath in a large bowl (cold water and ice). Place the eggs in the cold water bowl and let cool down for approximately 5 minutes.

Once eggs are cool enough to handle, gently (VERY gently) crack the egg shell by lightly tapping it against the countertop or another flat surface. When the egg shell cracks, carefully peel away the shell and clear layer underneath to expose the hard boiled egg. Repeat with remaining eggs.

Cut eggs in half lengthwise and place all the yolks in a medium mixing bowl. Add about 4 Tbsp mayonnaise and 2 tsp mustard to start. Mix with the yolk, being sure to break the yolk up well. Taste for consistency. Add more mayonnaise or mustard as desired. Fill the egg halves with the mixture and sprinkle with paprika for effect.

Wednesday, December 8, 2010

Baked Parmesan Asparagus


Asparagus is one of those vegetables that my mom tried to force on me as a child once and only once. I despised how it smelled and looked so much that I would have done (and probably did do) anything to avoid eating it. Luckily I have had some recipes recently that have called for asparagus and I can’t believe what I was missing out on! Asparagus is so healthy, delicious and extremely easy to make. If you need a side dish to your Christmas dinner, this would be a very easy and very beautiful display for the table.

Baked Parmesan Asparagus
Adapted from: All Recipes
Yields: 10 spears, about 3-4 servings

10 medium fresh asparagus spears, trimmed
4 tsp olive oil
1 Tbsp parmesan cheese, grated
1/8 tsp garlic salt

Toss the asparagus spears on a non-stick or greased cookie sheet with the oil. Bake in a preheated oven at 440˚F for 12 minutes, being sure to toss at the halfway point. Meanwhile combine parmesan cheese and garlic salt. When asparagus is done cooking in the oven and is tender, sprinkle with parmesan mixture and serve warm.

Monday, November 8, 2010

Meatloaf


Meatloaf. Every child's nightmare. As it is with most children, it was with me. I hated my mom's meatloaf and wouldn't even try it. Once I did, I was hooked. She lured me into it by tricking me and making me think that the process to make it is fun. She was right, it actually is pretty fun. Mixing everything in a bowl and being able to smash and squeeze the life out of it is really fun and a good stress reliever for a long, hard day (not that I know about those anymore being unemployed). This meatloaf is a basic, delicious and easy recipe for any family. My husband tends to devour it leaving no slice behind. It goes really well with a teeny tiny bit of ketchup, too. For my husband's benefit, I also only put a ton of onion on one side so he doesn't have to eat them as he doesn't like them.

Meatloaf
Kelly's Kitch original
Serves: 3-4

1lb ground beef
½ cup onion (more or less for preference)
1/3 cup ketchup
2 pieces of bread, torn into 1-inch pieces
1 egg
2 pieces of bread, for baking

Preheat oven to 350 degrees. Mix all ingredients in a medium mixing bowl by hand, except the two bread pieces for baking. Grease a glass baking dish and place the two bread pieces on the bottom of the pan. Place the meatloaf mixture on top in the shape of a loaf of bread and bake, uncovered. Make sure the meatloaf is not touching the sides of the glass baking dish. Bake for 45-50 minutes, until the center is no longer pink.

Wednesday, November 3, 2010

Sugar Grapes


Thumbing through my great-grandmother's recipe book, I came across this recipe. Sugar, egg whites and grapes. Simply from intrigue I pulled out the ingredients from my fridge and starting making these little guys. I only did a few, just in case they didn't taste all that good. Well, the result was interesting. The sugar did harden on the skins of the grapes although some had too much sugar (never thought I'd say that). My advice to anyone that wants to make these is to not put too much sugar on the grapes. The sweetness of the sugar and juiciness of the grapes are a perfect combination. I might even suggest mixing the grapes in the egg whites and then tossing with a small amount of sugar in a small bowl. Although they are a little sweet, they make for great finger food or a sweet side dish to your holiday meal. Another idea is just for a centerpiece or visual effect, these are adorable!

Sugar Grapes
Kelly's Kitch Original

20-30 grapes
1 egg, yolk removed
Sugar to coat

Dip the grapes in the egg white and then into a small bowl containing the sugar. Place the grapes on a cookie sheet to dry. If you want to speed the process a little, dip the grapes into the egg white and place in a small bowl. Then, add a little sugar at a time and coat the grapes, until desired coverage. Allow the sugar to harden on the skin of the grapes for at least 1 hour.

Friday, October 8, 2010

Black Beans, Chicken and Rice


It's finally October and fall. One of my favorite times of the year to cook. It's like a fresh start and I don't have to worry about yard work anymore. Not that I don't like it, it's just very time consuming so cooking sort of gets put on the backburner. Well now it's time to focus on the cooking and food! This recipe is from another magazine that got lost over the years (circa 2007!) but I have dog-eared lots of pages in it. Finally I got to one recipe and it was this one! It's so delicious and the flavors aren't too overpowering. Also, my husband made the comment that with the black beans and peppers it looked like Halloween in a bowl. This would be perfect for a Halloween dinner. It's quick, easy and delicious!

Black Beans, Chicken and Rice
Adapted from: Pillsbury
Serves: 4

2 tsp canola oil
1 cup uncooked long-grain white rice
1 1/2 tsp ground cumin
1 tsp chili powder
2 cups cubed cooked chicken
2 cups frozen bell pepper and onion, chopped
1 can black beans, drained and rinsed (15 oz)
1 can chicken broth (14 oz)
2 Tbsp water
1/2 cup shredded cheddar cheese

In a 12-inch skillet, heat oil over medium-high heat. Cook and stir in rice, cumin and chili powder for 1-2 minutes. Stir in all remaining ingredients except cheese. Heat to boiling, cover, reduce heat and simmer for  15 minutes. Make sure liquid is absorbed and rice is tender, stirring occasionally.

Remove skillet from heat and uncover. Fluff quickly with a fork. Sprinkle cheese on top and cover. Let stand for 1-2 minutes while the cheese melts. Serve warm.

Wednesday, September 29, 2010

Santa Fe Chicken Salad Wraps


One last delicious summer-style meal that you can make all winter long (pending being able to find good tomatoes). I love the summer but I am more of a fall girl. To tell you the truth, I really could live without air conditioning. Not many people can say that. Well, even though summer is coming to a close I have great plans in store for fall and winter! As my last summer meal, I have made a delicious chicken wrap that I found in a really old magazine (circa 2008) that I've not opened once. I actually made this entire recipe indoors so it could be a fall/winter meal, especially when you get the winter blues and miss summer. That happens to me around early Feburary.

Santa Fe Chicken Salad Wraps
Adapted from: Kraft Food & Family, Summer 2008
Serves: 4-6 people; 8 wraps

2 cooked boneless chicken breasts, cubed
4 cups torn romaine lettuce
1 large tomato, chopped
1 can whole kernel corn, drained (11 oz)
1/2 cup mexican-style shredded cheese
1/4 cup Ranch dressing
1/4 cup salsa
8 flour tortillas, large

To cook the chicken, I baked them in a glass dish, covered in foil (with my preferred seasonings) for around 20-25 minutes at 375 degrees. Make sure the chicken is cooked all the way through and then allow it to cool a bit and cube it. Set aside.

Toss romaine lettuce, chicken, tomatoes, and corn in a large mixing bowl. Sprinkle with cheese. Combine dressing and salsa in separate bowl and pour over romaine mixture. Toss to coat evenly.

Meanwhile, place all of the tortillas on a plate, stacked, and microwave for 25 seconds to heat them. Then, place the romaine mixture on top of each one, dividing equally. Roll up and if needed, keep together with a toothpick. Serve immediately.