
Showing posts with label appetizer. Show all posts

Thursday, September 22, 2011

Ham & Cheese Sliders, revisited


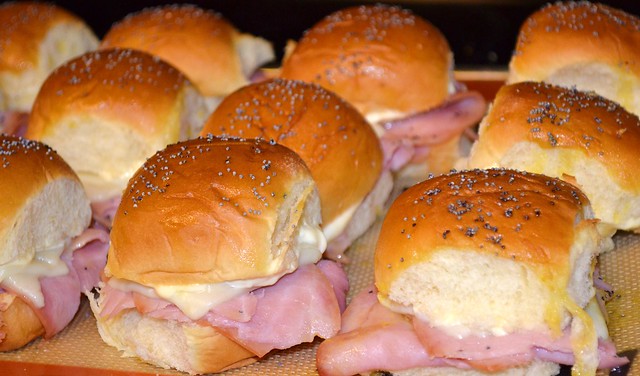
I have made these sliders before, usually during baseball season, but these little sandwiches are so easy to put together we make them a lot now. With football season well under way (and since I'm participating in fantasy football this year), neither one of us ever want to cook on Sundays. This is our perfect go-to meal nowadays since they involve no cutting boards and knives, pots or pans, etc. Put the few ingredients together and you've got dinner or snacks for a lot of hungry friends!! When I first made these I mentioned in my original post that I wasn't a huge fan, but I did eat them. Now I'm 100% on board and love these little sandwiches. I will probably try some kind of turkey combination soon, too!

Ham and Cheese Sliders
Adapted from: Annie's Eats, originally The Girl Who Ate Everything
Yields: 12 mini-sandwiches

For the sandwiches
12 slider rolls (I bought Hawaiian rolls and sliced them down the middle)
12 slices honey ham
12 slices Swiss cheese
mayonnaise

For the topping
3/4 Tbsp yellow mustard
4 Tbsp butter, melted
1/2 Tbsp finely minced onion
1/2 tsp Worcestershire sauce
poppy seeds, for topping

Preheat oven to 350°F. Start by placing the slider rolls on a baking sheet and slicing them, if needed. Slather on some mayonnaise on the top bun, as much as desired. Place a few small slices of ham and cheese on top of the bottom bun and place tops on sandwiches. Mix the sauce ingredients, except poppy seeds, and baste on the tops of the sandwiches. Sprinkle poppy seeds on top immediately. Cover baking sheet with foil and bake 10 minutes, until cheese has melted. Uncover and bake an additional 2 minutes. Serve warm.

Friday, December 24, 2010

Classic Cheese Ball


MERRY CHRISTMAS EVE!!

If you have ever been to a dinner party without a cheese ball, I apologize. Cheese balls are the quintessential appetizer and have been for decades. I love most cheese balls, but there have been a few I didn't quite like. I wanted to be sure to make one that was amazing and beautiful, too, for our family Christmas dinner. I found a recipe that looked like a winner online and amazingly enough it turned out great. I will adapt it next time with different cheeses and maybe even use grated instead of shredded cheese, too. Adapt it how you want, but try the original first because it's surely a winner!

Classic Cheese Ball
Adapted from: About.com
Yields: 1 large cheese ball

18 ounces cream cheese, room temperature
8 ounces shredded or grated cheddar cheese
2 tsp grated onion
2 tsp worcestershire sauce
2 tsp minced garlic
finely chopped pecans

In a large mixing bowl, combine all of the ingredients except pecans. Mix well with a hand blender to make sure everything is uniform throughout. Roll into a ball using plastic wrap and store in the fridge for 1 hour. Remove ball from plastic wrap and roll in chopped pecans to cover the surface. Rewrap cheese ball in clean plastic wrap and store in the fridge until the day you are serving it. Set cheese ball out 2 hours before guests arrive. Serve alongside a variety of crackers.

Wednesday, December 22, 2010

Deviled Eggs


Deviled eggs are a classic (and easy) addition to any get-together. These work especially well for Christmas and Thanksgiving because you can easily prep them the day before and just store in the fridge until everyone is ready to eat. My mom gave me this recipe because she absolutely makes the BEST deviled eggs, hands down. A lot of people just cut the hard boiled eggs in half but I think that tastes gross and it has a really dry texture. This method utilizes ingredients everyone always has on hand and it's extremely easy to make.

Deviled Eggs
Adapted from: Kelly's Kitch Original
Yields: 16 deviled eggs

8 large eggs, uncooked
mayonnaise, to taste
mustard, to taste
nutmeg, for sprinkling

To hard boil the eggs, place them in a large pot full of enough cold water so they are covered. Be sure there is a little extra water on top as well. Place pot on the stove and boil for 12 minutes and then remove pot from hot burner, place a lid on top and let sit for 8 minutes. Meanwhile, prepare a cold water bath in a large bowl (cold water and ice). Place the eggs in the cold water bowl and let cool down for approximately 5 minutes.

Once eggs are cool enough to handle, gently (VERY gently) crack the egg shell by lightly tapping it against the countertop or another flat surface. When the egg shell cracks, carefully peel away the shell and clear layer underneath to expose the hard boiled egg. Repeat with remaining eggs.

Cut eggs in half lengthwise and place all the yolks in a medium mixing bowl. Add about 4 Tbsp mayonnaise and 2 tsp mustard to start. Mix with the yolk, being sure to break the yolk up well. Taste for consistency. Add more mayonnaise or mustard as desired. Fill the egg halves with the mixture and sprinkle with paprika for effect.

Monday, December 6, 2010

Grilled Chicken Quesadillas


One menu item I have never tried to make at home would be a quesadilla. For one, they look very hard. Also, I never really liked them enough to try it. I have been running out of dinner ideas lately (hint: in need of cook books), so I decided to give it a try. I’m glad I did because these quesadillas were absolutely amazing fresh and tasted even better reheated! I love foods that I can heat up for leftovers. Some foods stay well and some don’t. These do and they are a great weeknight meal, even if you do end up with a lot of leftovers.
Grilled Chicken Quesadillas
Adapted from: Annie’s Eats, originally Confections of a Foodie Bride
Serves: 4

1 Tbsp chili powder
2 Tbsp fresh cilantro, minced (optional)
1 Tbsp olive oil
juice of 1 lime
dash salt
1 tsp cumin
½ tsp red pepper flakes
2 boneless, skinless chicken breasts, halved lengthwise
½ yellow onion, chopped
2 tomatoes, seeded and diced
corn tortillas (6-7 inch)
cooking spray
shredded cheese

Heat a grill pan or skillet over medium-high heat. In a pie plate, combine the chili powder, cilantro, olive oil, lime juice, salt, cumin and red pepper flakes. Whisk to combine and coat the chicken halves in the mixture. Cook chicken until browned on both sides and is no longer pink inside. Remove from heat and shred the chicken once cooled. Add the onion to the pan and cook until tender, about 5 minutes.

In a medium mixing bowl, combine the chicken, onion, and diced tomatoes. Toss well. Lightly brush or spray one side of a tortilla with vegetable oil. Flip over on a clean work surface so that the oiled side is down. Place a quarter cup of chicken mixture onto tortilla and spread evenly. Sprinkle shredded cheese on top. Fold tortilla over to sandwich the filling like a taco.

Cook the assembled quesadilla over medium-high heat in a lightly oiled grill pan or skillet until browned on the outside and cheese is melted on the inside. Slice into wedges and repeat with remaining tortillas and chicken mixture. Serve warm with sour cream and salsa.

Monday, November 29, 2010

Caesar Salad Pizza


Caesar salad is my number one favorite kind of salad. It's usually pretty consistent on the toppings and the wonderful flavor of the dressing is amazing, too. I have made other pizza crusts before but this one is very doughy and tastes just like bread you would serve with a normal side caesar salad. It's not like my deep dish pizza crust or anything close to it. I did roll these crusts out thinner because they looked too thick compared to the picture on the website. They did, however rise a little more than I would have hoped so I will probably make them even thinner next time. Don't be afraid to roll the dough thinner than you normally like it; it will turn out perfect! Also, feel free to add or omit toppings you like on your salads. I added chicken to make this a more wholesome dinner.

Caesar Salad Pizza
Adapted from: Annie's Eats, originally The Pastry Queen
Serves:6-8

For the crust:
1 ½ cups warm water
5 tsp instant yeast
2 Tbsp olive oil, plus more for brushing
2 tsp honey
4-5 cups all-purpose flour
1 tsp salt
½ tsp red pepper flakes
¾ cup coarse cornmeal
freshly shredded parmesan cheese

For assembly:
Caesar dressing
1 large head Romaine lettuce, washed and chopped
1 pint cherry tomatoes, halved
garlic croutons
Parmesan shavings

To make the crust, combine the water, yeast, oil, honey and 3 cups flour in the bowl of a stand mixer fitted with the dough hook attachment. Add the salt and red pepper flakes. Mix on low speed until combined. Add 1 more cup of the flour and mix until soft. Mix on low speed for 5 minutes to knead. Add the rest of the flour 1-2 Tablespoons at a time (as needed) until the dough is smooth and tacky but not sticky.

Coat 2 baking sheets with olive oil (or preheat a pizza stone, unoiled). Preheat oven to 450 degrees F. Sprinkle baking sheet(s) with cornmeal. Divide the dough into 4 equal pieces (use only those needed, freeze the rest in plastic wrap and a ziploc bag). Cover the dough with a damp towel and let sit for 10 minutes, until the oven heats up.
With a rolling pin, flatten dough ball into 10-inch circle on well-floured surface. Brush each dough with olive oil and sprinkle with parmesan cheese. Transfer to prepared baking sheet or stone and bake until lightly golden and crisp, about 10-15 minutes.

To assemble the salad, combine lettuce, tomatoes and dressing (as desired) in large mixing bowl. Toss to coat evenly and place a generous amount on cooked, warm pizza crust. Top with parmesan cheese and croutons as desired.

Friday, November 12, 2010

Spinach Artichoke Dip


If my husband and I are eating out at a restaurant, we typically splurge a little bit. Spinach and artichoke dip is one thing we never disagree on when it comes to ordering an appetizer. I never really thought I could replicate any dip recipe, but this is a healthier and just as tasty spinach and artichoke dip. I actually baked these in smaller ramekin's so that we could bring them in our lunches. My husband absolutely loved them! According to the website these little guys are about 100-110 calories per 1/4 cup (about the size of my rammekins). I added a tiny bit more cheese so it's a little over 100 calories.

Spinach Artichoke Dip
Adapted from: Food Network
Serves: 4-6

Pinch salt
10 oz baby spinach leaves
fresh basil (1 cup); or 4 Tbsp dry basil
¾ cup canned cannellini beans, drained and rinsed
6 oz Neufchatel cream cheese
1 garlic clove, minced
½ cup chicken broth
14 oz can artichoke hearts, drained, squeezed dry, and finely chopped
½ cup grated parmesan cheese
1 cup shredded mozzarella cheese
pinch cayenne pepper, to taste
2-3 dashes Worcestershire sauce
pinch ground pepper, to taste
chips, for dipping

Preheat the oven to 450-degrees. Boil water and salt stovetop. Prepare an ice water bowl while water is heating up by placing very cold water and lots of ice cubes into a large mixing bowl. Stir the spinach leaves into the boiling water and keep immersed for 30 seconds, until the leaves turn bright green. Remove spinach from boiling water and place into ice water bath. Drain and squeeze dry, then roughly chop.

Puree the beans, cream cheese, garlic and broth in a food processor until smooth. Transfer to medium mixing bowl and fold in the chopped spinach, artichokes, parmesan and ¾ cup of the mozzarella cheese. Add cayenne pepper, Worcestershire sauce, salt, and black pepper. Toss to combine.

Place mixture into oven-proof, greased individual ramekins or large serving bowl, about 1-quart. Top with remaining mozzarella cheese. Bake until bubbly, about 20-25 minutes at 450 degrees.

Monday, November 1, 2010

Chicken Empanadas, revisited


I first made these quite some time back but the picture was dull, lifeless and let's be honest: unappetizing. I absolutely turn to these empanadas whenever I have the craving for Mexican but don’t have a lot of time (or energy) for a complete meal. These would be perfect for an appetizer as well since they qualify as “finger food” and are small. Whatever the occasion, these little bites are sure to please anyone!
Chicken Empanadas
Adapted from: Paula Deen
Serves: 4-6

2 boneless chicken breasts, cooked and cubed small
8 oz Monterey Jack Cheese blend
4-6 ounces softened cream cheese
1/2 cup chopped red bell pepper
1 jalapeno, seeded and chopped
1 tbsp ground cumin
salt and pepper, to taste
3 pie crusts, unbaked
water

I cooked the chicken ahead of time by boiling 2 parts water, 1 part chicken broth. Bring to a boil, then reduce the heat and simmer for 20 minutes or until chicken is cooked. Remove the chicken from the pot and set aside on a plate to cool.

Preheat oven to 400 degrees. Lightly grease two baking sheets. In a large bowl, combine all ingredients except water and pie crust. Mix well. Unroll one pie crust onto lightly floured surface and roll into a 15-inch circle (a bit thinner than what the package comes in). Cut rounds using a large cookie cutter (or I used the rim of a can from a 28-ounce jar of diced tomatoes). I am all about reycling! ;) As the rounds are cut, place a generous 1 tbsp of the mixture in the middle. With a clean fingertip, lightly brush the edges of the crust with the water. Fold dough over and seal gently with a fork.

Repeat and re-roll all dough until all empanadas are made and placed on baking sheets. Bake for 15-17 minutes and allow to cool for 1-2 minutes before serving. They will be hot!

Friday, October 29, 2010

Whipped Pumpkin Dip


I never thought I'd like pumpkin so much. Pumpkin bars, cookies, pies, and more have usually a mediocre taste for me, especially since I'm picky and don't like pumpkin that much yet. This has changed my entire way of cooking and thinking for the fall season. I think I tried so many pumpkin recipes because I wanted to find that one recipe that just knocked my socks off and was to-die-for good. Well, my friends, that search has ended .. with this dip recipe!

I like normal fruit dip but it’s got no flavor and is usually 90% sugar. Although this recipe still isn’t the healthiest, it’s ten times better for you than the store-bought dip. As an added bonus, you will O.M.G. at the taste of it, I promise. I can’t believe I have been refusing to try pumpkin all these years. Thank you to Mrs. Holman for drumming up this recipe and making my fall/pumpkin/dip dreams come true (even if I didn't know I had them)! ;)

Whipped Pumpkin Dip
Adapted from: Homemade by Holman
Yields: about 5-6 cups

8 oz cream cheese, at room temperature
¾ cup brown sugar, packed
1 cup pumpkin puree
1 tsp pumpkin pie spice
1 tsp ground cinnamon
1 cup heavy whipping cream*
3 Tbsp powdered sugar*
Apple slices, grapes and Nilla Wafers, for dipping

Place the bowl of a stand mixer in the freezer, briefly for about 5-10 minutes. In the cold bowl, beat the whipping cream on high speed with the whisk attachment until stiff peaks form, about 5 minutes. Slowly add the powdered sugar 1 tablespoon at a time until mixed well.

* If you don’t have a stand mixer at home, omit these two ingredients (and steps) and just buy whipped cream in the container at the store instead.

Meanwhile, in a separate large mixing bowl, beat the cream cheese and brown sugar until fluffy and smooth. Add in the puree and spices and blend well. The mixture will be pretty thin at this point. Fold the whipped cream from the stand mixer (or store purchased container) into the bowl with the pumpkin mixture. Mix well to make even throughout. Serve immediately or keep in airtight containers in the fridge for up to 4-5 days.

This mixture goes well with apples, grapes and Nilla Wafers.

Thursday, August 19, 2010

Strawberry Soup


There isn't much to say about this soup that isn't obvious from it's ingredients (or that delicious photo): strawberries, yogurt, yum! Anything with strawberries in it, I will try. I don't like chocolate, but I thoroughly make up for it with my love of strawberry. Unfortunately that doesn't help me to try new flavors at ice cream outings because if strawberry is an option, I will choose it every single time. Shakes? Strawberry, thank you. I guess you could say I do have a slight obsession with them, which makes it very surprising that I haven't posted more recipes. Usually I like to just eat them by the pound (oops) and so this was a change for me. As soon as I had that first bite of this soup, I knew it wouldn't last more than a day or two. My blender also made it to the sink pretty clean. ;)

Strawberry Soup
Adapted from: The Cooks Next Door, originally Food Network

1 lb strawberries, cleaned and hulled
3/4 cup whipping cream (or half & half)
3/4 cup plain yogurt (or sour cream)
1/4 cup sugar
4 tsp lemon juice

Puree strawberries in blender and pour into a medium-sized tupperware bowl. Add remaining ingredients one at a time to incorporate. Mix well. Chill before serving and garnish with strawberry or mint.

Sunday, July 25, 2010

Ham and Cheese Sliders


I saw these on a blogger's website and thought to myself that I would probably never make these because of my everlasting hatred for ham. I have despised the fatty taste of ham ever since I can remember and will ONLY eat it from HoneyBaked Ham now. Since I have decided to change my mind for what is probably the most fattening yet delicious ham ever I decided to give this a try, too. Although it's nothing I would brag about, my husband and his teammates thoroughly enjoyed these! I even ate two myself!! I wanted to wait until football season was in full swing to make these, but I just couldn't wait since the perfect opportunity presented itself. My husband plays in an Adult League Baseball team here and they had a double header the other night: 6pm and 9pm. I knew he wouldn't eat anything unless I brought it to him well before the game so I quickly threw these together and they inhaled them! Not that those guys are picky, but I would definitely call this a success!

Ham and Cheese Sliders
Adapted from: Annie's Eats, originally The Girl Who Ate Everything

For the sandwiches
12 slider rolls (I bought Hawaiin rolls and sliced them down the middle)
12 slices honey ham
12 slices swiss cheese
mayonnaise

For the topping
3/4 tbsp yellow mustard
4 tbsp butter, melted
1/2 tbsp finely minced onion
1/2 tsp Worcestershire sauce
poppy seeds, for topping

Preheat oven to 350 degrees. Start by placing the slider rolls on a baking sheet and slicing them, if needed. Slather on some mayonnaise on the top bun, as much as desired. Place a few small slices of ham and cheese on top of the bottom bun and place tops on sandwiches. Mix the sauce ingredients, except poppy seeds, and baste on the tops of the sandwiches. Sprinkle poppy seeds on top immediately. Cover baking sheet with foil and bake 10 minutes, until cheese has melted. Uncover and bake an additional 2 minutes. Serve warm.

Thursday, May 13, 2010

Nachos


We've all eaten breakfast for dinner or had something completely out of the ordinary just because we have the sweet freedom to do so as an adult. Well, one of my biggest guilty pleasures is nachos. I can eat them anywhere (Sam I am?). I absolutely love all kinds of nachos but have never made any at home. Maybe because I am lazy or because I just prefer normal meals at home and guilty pleasures at restaurants. Who knows. At any rate I finally got to this dog-eared recipe and decided it was our dinner. My husband didn't complain .. it has meat in it, right!? I really think it was a wonderful change to our normal dinners that I am running out of ideas for. So go ahead and indulge once in a while.

Nachos

5 cups bite-sized tortilla chips (6 oz)
1 lb ground beef
1 can black or pinto beans (15oz), rinsed and drained
1 cup salsa
1.5 cups shredded cheese, mexican blend (6 oz)
Optional toppings: lettuce, green onions, cilantro, etc

Spread half of the tortilla chips in an 11x8 casserole dish and set aside. In a large skillet, cook the beef over medium heat until brown. Drain off fat and add beans and salsa. Spoon half the mixture on top of the tortilla chips. Sprinkle with half the cheese. Repeat layer with chips, beef mixture and cheese.

Bake at 350 degrees for 10 minutes. Remove from oven and serve on individual plates, topping with additional optional topings if desired.

Thursday, April 1, 2010

Macaroni Salad


With all this unseasonably warm weather we have been having in Central Indiana, my husband and I have been befriending our grill yet again for a long season of cooking! Brachts, hamburgers, hot dogs . . my oh my how they do make me smile just thinking of them all! I am usually a healthy eater and watch my portions well, but when it comes to "baseball food" as I like to call it, it becomes a real challenge to control myself. One thing that helps to fill me up is macaroni salad. I have had several versions and this, by far, is one of the best recipes I have come across. Not only does it not have peas in it (yeah, it's by choice) but it is very easy to make with all things I usually tend to have around the kitchen anyways. This time I had some leftover rotini noodles so why not use what I have, right. Not only does this dish make for a fantastic side to any outdoor grill or BBQ, but it also keeps well at room temperature for camping! I am about to go in a few weeks and cannot wait to blog what we cook there out in nature where there are no computers, blogs or recipes. =)

Macaroni (Rotini?) Salad
Adapted from: Sing for your Supper

1/2-3/4 lb pasta shapes (I chose Rotini), cooked and drained
3 small carrots, diced
1 celery stalk, diced
1/2 cup frozen corn, thawed
1 cup cubed sharp cheddar cheese
salt and pepper, to taste
1/2 cup mayonnaise
1/2 cup italian salad dressing
1 tsp dijon mustard

Combine all ingredients in large bowl, cover and refrigerate for at least 1 hour before serving.

Sunday, March 28, 2010

Chicken Empanadas


I had no idea what an empanada was until I found this recipe. It looked good and the ingredients were all things I enjoy so why not give it a try!? Well, I am so glad I did. This is really something different that I have never eaten before but the taste combination was so flavorful! I actually made some salsa for dipping but we didn't even use it because these were so tasty and filling. I could only really eat three and my husband stopped at five. We absolutely loved them and they will go on our must-make-again list. These would be perfect for a game night or small get-together with friends or family, too.

Chicken Empanadas
Adapted from: Sing for your Supper, originally Paula Deen

2-3 boneless chicken breasts, cooked and cubed small
8 oz Monterey Jack Cheese blend
4-6 ounces softened cream cheese
1/2 cup chopped red bell pepper
1 jalapeno, seeded and chopped
1 tbsp ground cumin
salt and pepper, to taste
1 package refrigerated pie crusts (2 crusts, 15 oz)
water

I cooked the chicken ahead of time by boiling 2 parts water, 1 part beef broth (because I forgot the chicken broth). Normally I would use chicken broth. Bring to a boil, then reduce the heat and simmer for 20 minutes or until chicken is cooked. Remove the chicken from the pot and set aside on a plate to cool.

Preheat oven to 400 degrees. Lightly grease two baking sheets. In a large bowl, combine all ingredients except water and pie crust. Mix well. Unroll one pie crust onto lightly floured surface and roll into a 15-inch circle (a bit thinner than what the package comes in). Cut rounds using a large cookie cutter (or I used the rim of a can from a 28-ounce jar of diced tomatoes). I am all about reycling! ;) As the rounds are cut, place a generous 1 tbsp of the mixture in the middle. With a clean fingertip, lightly brush the edges of the crust with the water. Fold dough over and seal gently with a fork.

Repeat and re-roll all dough until all empanadas are made and placed on baking sheets. Bake for 13-15 minutes and allow to cool for 1-2 minutes before serving. They will be hot!

Friday, March 26, 2010

Homemade Salsa


If you are a fan of Annie's Eats (and I highly suggest that you become one if you already are not), then you will know this salsa as My Favorite Salsa. I always love going out to Mexican restaurants because of the chips and salsa. Now there is no need because this is so comparable to restaurant quality, but without all of the preservatives and salt. If you haven't guessed already, I don't really like much salt in anything. Well, anyways I went to the grocery store hoping to find big, beautiful jalapeno's like I normally do but this time they were all wrinkly and soft so I opted for getting a pepper that was a bit hotter and using one less. It's okay, I figured, since Brad loves spicy foods. This was great and I will most likely keep some on hand for guests and/or ourselves for snacking from now on! No more store-bought salsa!! If I can just find the perfect queso dip, we probably will never leave home again.

Homemade Salsa
Adapted from: Annie's Eats

1 jalapeno, seeded and coarsely chopped
1 marzano pepper, seeded and coarsely chopped
4 cloves garlic, minced
2 large vine-ripe tomatoes, cubed (large)
1 can diced tomatoes (28 oz), drained for chunky salsa
2 tbsp red wine vinegar
1 tbsp cumin
1/2 red onion, chopped
dash salt
1/2 tsp ground cayenne pepper
1/4 cup fresh cilantro
juice of one lime

In a large food processor, combine the peppers and garlic. Process until finely chopped. You might have to scrape the sides of the bowl to get the excess. Add remaining ingredients and pulse on low speed until salsa is at desired consistency. Transfer to airtight container and refrigerate 2 hours before serving to allow flavors to blend.

Note: I have a very small food processor and combined the first half of the ingredients in the first batch and then pulsed the canned tomatoes and sesasonings in the second batch. Then I mixed everything in a large bowl together.

Friday, March 19, 2010

Chicken, Pepper, and Green Bean Salad


I made this quite some time ago but have not been feeling well enough to roll myself out of bed, much less sit at a computer for a while to blog. My apologies!! This was a salad that I made with a main course and a side dish but this was so filling I think it really stands well on it's own. I have never been fond of oil or vinegar based dressings but this was just out of this world amazing! I love the combination of all the different flavors of peppers, lettuce, chicken, celery, onion, etc. The dressing really pulls everything together. The only modification that really sticks in my mind is that the directions originally called for setting the beans in cold water and adding them cold like that (I think to keep them nice and crisp), but they just didn't go well with the rest of the warmed salad. I have accounted for that change below but feel free to try the cold beans for yourself.

Chicken, Pepper and Green Bean Salad

2 large red bell peppers
1 tsp olive oil
salt and pepper, to taste
1/2 lb green beans, trimmed
1/4 cup extra-virgin olive oil
3 tbsp red wine vinegar w/a dash of sugar (or you can sub sherry vinegar)
1 tbsp chopped thyme
1/2 tsp minced garlic
1 tsp olive oil
3/4 lb skinless, boneless chicken breasts, cut lengthwise into strips
1 small red onion, sliced thin
2 celery stalks, sliced thin
10 oz mixed baby salad greens (or your choice)

Preheat oven to 400 degrees and cut bell peppers lengthwise into strips. Remove seeds and ribs. Arrange peppers on a cookie sheet lined with foil and drizzle with olive oil, salt and pepper. Roast turning once, until the edges are blistered (about 40 minutes). Removed from oven and allow to cool then peel away loosened skins and set aside. This is pretty messy so you can buy raosted red pepper in the store .. but this was really worth the effort as it tasted fantastic!

Bring a sauce pan 3/4 full of water to a boil and add the green beans. Boil 5-7 minutes (timing depends on size) and drain. Set aside and keep warm. Meanwhile, in a small bowl whisk together the olive oil, vinegar, thyme, garlic, 1/2 tsp salt and a grind of pepper for the dressing.

Brush a large, non-stick frying pan with olive oil and place over medium heat. Add the chicken a few pieces at a time, turning to cook until no longer opaque and cooked thoroughly. Add 2 tbsp of dressing mixture into skillet, mix well and continue to cook another 2 minutes. Let chicken stand in pan.

In a large bowl combine salad greens, 1 tbsp vinaigrette and toss to coat well. Add chicken, red peppers, pan juices and greens. Toss to coat well. For a nicer presentation you can place the greens on a large serving platter first, then toss the latter ingredients in the bowl with juices. Then, top the greens with that mixture.

Sunday, February 28, 2010

Tomato and Cucumber Salad


Well, it's Girl Scout Cookie season and guess what that means. I need some lighter, healthier recipes to make up for it. Here is a fantastic recipe that is low in calroies and high in fiber! I found this recipe in my Williams-Sonoma cookbook that has been collecting dust over the years. I rarely cook from it because I am very intimidated by it and also because a lot of the recipes are more summer/fall related. It is the winter right now: time for soups and stews. Well, I don't care! I needed something for lunch today and this absolutely satisfied. There are usually little tid-bits of information about the recipe's so I will include that here and keep in mind they are not my words. I also will include the original recipe that I loosely adapted my recipe from (i.e. I don't like olives so I discluded those and added a few more cucumbers and tomatoes as well as using dry basil instead of basil leaves). Keep in mind I made it in a smaller quantity than the orignial recipe too.

"This salad is reminiscent of the deli-style Greek versions made with iceberg lettuce, but instead of lettuce, it uses lots of juicy ripe tomatoes and crunchy cucumbers. A medium tomato only has 35 calories but is high in vitamins C and A, lycopene, and flavonoids that fight cancer and some types of heart disease. Very red tomatoes are richest in lycopene." - Williams-Sonoma, Essentials of Healthful Cooking

Tomato and Cucumber Salad

1.5 lb ripe tomatoes, chopped
1/2 cup torn fresh basil leaves (I used dry basil)
2 tbsp olive oil or peanut oil
1/2 tsp minced garlic
kosher salt
6 inch piece English cucumber (I used about 3/4 of a regular cucumber from my local supermarket)
1/2 sweet onion
1/2 cup crumbled ricotta cheese
2 tbsp sliced, pitted Kalamata olives (I ommited this)
1 tsp red wine vinegar
freshly ground pepper

Combine tomatoes, basil, oil, garlic, pinch salt and toss gently to combine. Let stand 5 minutes. Then cut the cucumber in half discarding the seeds and cut into 1/2-inch cubes. Next, dice the onion. Add the cucumber, onion, cheese, and olives to the mixture, then sprinkle with the vinegar and toss to mix. Season with pepper and stir. Serve at room temperature.

Sunday, November 15, 2009

Pigs In A Blanket


Who doesn't like finger food!? Surely not anyone in this house. One night I decided to make a childhood favorite and I found an easy recipe on Home Is Where the Holman's Are blog . They looked wonderful and who can really resist a lil smokey wrapped in delicious carbohydrates.

Of course even with the simplest of recipes I have to complicate things. The recipe calls for a puff pastry and with my very little knowledge of cooking and even food itself, I didn't know what that was. Well, I was told it was in the freezer section so when I got there and couldn't find anything I just bought a package of Crescent rolls. Yup. Just plain ol' dinner rolls. They worked great and tasted fantastic. I was looking around that section asking myself what I thought would go well with a lil smokey and cheese. I bought two but only needed one so now we get dinner rolls with dinner tomorrow night. What a luxury.

Another thing that I changed in my recipe is to NOT use parchment paper because they stuck to it and it was almost impossible to get them off without a lovely paper attachment. Next time I will just spray the pan.

Pigs In A Blanket 

1 pkg Crescent Rolls
1 pkg Lil' Smokeys
1 block sharp cheddar cheese
1 egg
1 tbsp water
1/2 tsp garlic powder
flour

Preheat oven to 350 degrees. Cut cheese into small, thin slices. Cut a small slit in the smokeys and insert the cheese. Roll out the crescent rolls onto well-floured surface and cut into small triangles. Roll each smokey inside each crescent roll and place onto greased cookie sheet.

Beat egg and mix in garlic powder and water in small bowl. Brush on the top of each pig-in-a-blanket. Bake for 15 minutes or until golden brown.