Showing posts with label cookies. Show all posts

Saturday, December 9, 2017

Gingersnap Cookies


I have never had a gingersnap cookie that I can recall and I was looking for a new cookie recipe to try. I am never disappointed with Annie’s recipes so I tried these and they were so good! They have the perfect amount of crunch while also being soft. They are not too strong either so I was able to eat two .. or maybe three. (I might have lost count.) Haha.

Gingersnap Cookies
Source: Everyday Annie
Yields: 2.5 dozen cookies

  • 2½ cups all-purpose flour
  • 1 tsp. baking soda
  • 1½ tsp. ground ginger
  • ½ tsp. ground cinnamon
  • ¼ tsp. ground cloves
  • ¼ tsp. salt
  • 2/3 cup canola oil
  • 1 cup packed brown sugar
  • 1/3 cup molasses
  • 1 large egg, plus 1 large egg white
  • 1 cup coarse/sparkling sugar

Preheat oven to 325 degrees F. In a medium mixing bowl, combine the flour, baking soda, ginger, cinnamon, cloves, and salt. Blend with a whisk or fork. In the bowl of a stand mixer, combine the canola oil, brown sugar, molasses, and 1 large egg. Mix with beater attachment. Slowly add the dry mixture into the wet mixture until well combined. 

Roll the dough into 1-inch balls. Place the egg white into a small bowl and the sugar into a separate small bowl. Dip the dough balls into the egg white allowing it to drip for a second and then into the sugar. Place onto a cookie sheet lined with a silicone baking mat and slightly flatten with your hand. 

Bake in the preheated oven for 15-17 minutes until the center is cooked and edges begin to crack. Enjoy!

Wednesday, December 18, 2013

M&M Cookies


The usual M&M cookie recipes I've made in the past produce thin, greasy cookies. I was looking for a thicker and softer recipe to make for Santa's cookies this year. I was pleasantly surprised when I found this recipe (random Google search, FTW) and the cookies didn't look thin. Or greasy. They turned out great and even kept well over night. Okay, over several nights. :) We will definitely be baking these Monday for Santa since I am working Tuesday. This will be an exciting year since our son is really starting to understand a little more about Christmas.

M&M Cookies
Adapted from: All Recipes
Yields: 2 dozen cookies

1/2 cup packed brown sugar
1/4 cup white sugar
1/2 cup shortening
1 egg
3/4 tsp vanilla extract
1 1/4 cups all-purpose flour
1/2 tsp baking soda
1/2 tsp salt
3/4 cup M&M's, plus more for topping

Preheat oven to 350 degrees F. 

In the bowl of a stand mixer fitted with the paddle attachment, mix the sugars, shortening, egg, and vanilla until smooth. In a medium mixing bowl, mix flour, baking soda, and salt. Move mixer to slowest speed and add flour mixture in small increments. Blend well. Add M&M's to mixing bowl and mix on low speed.

Roll dough and place on cookie sheet lined with silicone baking mat. Slightly flatten with hand and press a few M&M's to the tops of cookies. Bake in preheated oven for 9-11 minutes. Allow cookies to cool on cookie sheet for 3-5 minutes and transfer to cookie rack.

Friday, October 28, 2011

Halloween Royal Icing Sugar Cookies


I've made so many batches of these royal icing sugar cookies that I can now almost do it without a recipe. Well, at least the icing I can. For these scary Halloween cookies, I simply made a small batch of white royal icing and piped the ghosts, then dyed the excess orange with two drops yellow food coloring and one drop of red food coloring. It makes the perfect color orange! Once those dried, then I filled them in with a larger batch of icing, again starting with the white.

On a side note, a good friend of mine told me to just put some powdered sugar and a small teaspoon (or less) of meringue powder in a bowl. Then, slowly add a small amount of water at a time. If it gets too watery, add more powdered sugar. This will be your basic white color. I know most people use Wilton's coloring, but I have used it before and personally I think it tastes horrifyingly awful (words cannot describe how much I dislike them). Using basic food coloring actually doesn't change the consistency of the icing. If you feel like it is too watery from that, then just add a little more powdered sugar; no harm done!

Before the icing was dried I sprinkled the orange and black sugar sprinkles on the pumpkins and put red hots on the ghosts for eyes. Use what you have in your pantry! I had these sprinkles and red hots from previous recipes so I thought I'd use them up before they went bad. Be creative and have fun this Halloween!


Thursday, September 29, 2011

Peanut Butter Cookies


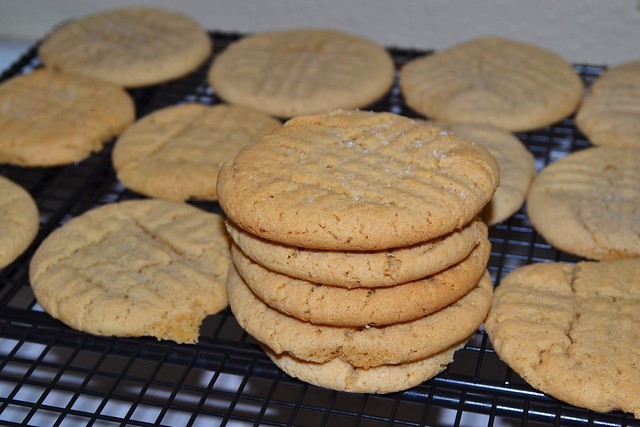
In one word: YUM! Peanut butter is one of my all-time favorite foods (okay, is it really a "food"). I have always had a love for peanut butter; we go way back. I have actually already made these cookies but in the previous attempt, I forgot some key ingredients. Those cookies were a little fluffy for my taste though. These cookies spread evenly and even kept the fork pattern I pressed into them, which takes me back to my younger days. I remember baking these peanut butter cookies often. They were so much fun to make. My mom would make the batter and put them on cookie sheets so I could press the fork into them. Loved it! These cookies haven't changed since then (albeit with a different recipe) and I am always getting compliments from friends and family about how great they taste!

As a side note, because I use light corn syrup for my sweetener, I use a honey-flavored peanut butter. This is not necessary, but really made these cookies stand out from other batches.

Peanut Butter Cookies
Adapted from: Annie's Eats, originally Taste of Home
Yields: 2-3 dozen cookies, depending on size

3 cups all-purpose flour
1 cup sugar
1.5 tsp baking soda
1 tsp baking powder
pinch salt
1/4 cup vegetable shortening
4 tbsp butter, room temperature
1 cup creamy peanut butter
1 cup light corn syrup (or honey)
2 large eggs
sugar, for sprinkling

In medium mixing bowl, combine flour, sugar, baking soda, baking powder and salt. Whisk together and set aside. Cream together shortening, butter, peanut butter and syrup (or honey). Mix in eggs one at a time being sure to incorporate well before adding the second. With mixer on lowest speed, slowly add in dry mixture little by little until blended well.

Preheat oven to 350°F. Roll dough into 1-1.5 inch balls and place onto greased cookie sheets and slightly flatten with fork to make a cross-section design (see original recipe link for picture). Sprinkle with a little bit of sugar on the flattened cookies. Bake for 12-15 minutes until they are golden. Since they are peanut butter cookies they don't change color too much so don't over-cook them. Allow cookies to cool for about 5 minutes on the cookie sheet before transferring to wire racks to finish cooling completely. Serve with cold milk for best results! Store in airtight container.

Sunday, May 15, 2011

Traditional Sugar Cookies


This is my quick go-to recipe for my sweets cravings. It's a very simple recipe that involves using ingredients you probably already have on hand. I absolutely love making (and eating) cookies any day, any time. These cookies are fantastic as-is plain, but could definitely be made even more custom by adding some icing. I might try them one day when I have more time with a softer buttercream type of icing. Even royal icing would be a delicious addition to these soft and amazing cookies.

Traditional Sugar Cookies
Adapted from: Annie's Eats, originally The Pastry Queen
Yeilds: 20 cookies

2 cups all-purpose flour
1/2 tsp baking soda
1/4 tsp salt
8 Tbsp butter, at room temperature
1/2 cup vegetable oil
1/2 cup granulated sugar, plus extra for sprinkling
1/2 cup powdered sugar
1 large egg
2 tsp vanilla extract
1/4 tsp lemon juice

In a small mixing bowl combine the flour, baking soda and salt. Set aside. In the bowl of a stand mixer fitted with the paddle attachment, mix the softened butter on medium speed until smooth. Add the vegetable oil on medium-high speed until mixed well, about 1 minute. Add in the granulated and powdered sugar until well incorporated, about 1 minute for each. Beat in the egg until well incorporated. Finally, add the vanilla and lemon juice.

Reduce mixer speed to low and add the dry mixture a little at a time. Freeze dough for 15 minutes (or at least 1 hour in the fridge). Drop dough balls onto cookie sheets lined with silicone mat or parchment paper. Flatten gently with hand and sprinkle extra sugar on top. Bake in a preheated oven at 350 degrees for about 12-15 minutes, or until bottoms are golden-brown. Let sit on cookie sheets for 10 minutes and then transfer to a wire cooling rack. Once cooled, store in airtight container.

Monday, December 20, 2010

Chocolate Chip Cookies


Chocolate chip cookies are such a classic cookie to make. There are always several variations and I can never quite get them the way I like (soft, chewy and the chocolate melty). That is, until now! I simply used a recipe my friend gave me for peanut butter chocolate chip cookies and simply just used chocolate chips instead. It turned out great and unfortunately nobody got to taste them but my husband over the course of that week. ;) I guess it's a good thing he has a gym membership or we'd really be in trouble.

Chocolate Chip CookiesAdapted from: a friend
Yields: 2 dozen cookies

2 sticks butter, softened
3/4 cup granulated sugar
3/4 cup brown sugar
1 tsp vanilla
2 eggs
2 3/4 cup flour
1 tsp baking powder
1 pkg chocolate chips (about 12 oz)

Blend butter, sugars, eggs, vanilla and baking powder in large bowl. Mix in flour and gently add the chips. Refrigerate for a few hours (optional, but helps to roll dough later).

Roll dough into balls and place on greased cookie sheet. With palm of hand or a flat spatula, flatten dough balls down. Bake at 350 degrees F for 15 minutes or until edges are a light golden brown. Remove from baking sheet to cool.

Wednesday, December 15, 2010

Soft Spritz Cookies


I’ve never made spritz cookies before, but I sure have eaten them. They are always very delicious and soft and just a little flaky. I wanted to make a perfect recipe but I knew that I would have to start small and tweak it as I went. This is a fantastic recipe to start with and I might add a little more almond extract or more vanilla extract next time. Other than that, these cookies were easy to work with and baked perfectly (even without my trusty Silpat). One change I did make in the directions below was to dye the cookie dough before adding the dry ingredients. That way, it has more of a chance to incorporate and you don’t get chunks of dye like I did the first time.

Soft Spritz Cookies
Adapted from: All Recipes
Yields: 4 dozen cookies

1 cup butter, softened
1 ¼ cup powdered sugar
1 egg
1 tsp vanilla extract
½ tsp almond extract (more if desired)
2 ½ cups all-purpose flour
½ tsp salt
food coloring (optional)

In a mixing bowl of a stand mixer, cream together butter and sugar until smooth on medium speed using the paddle attachment. Beat in the egg and extracts. Add food coloring if desired (mixture will be darker than cookies will come out). In a separate bowl, combine flour and salt. Gradually add to the creamed mixture on low speed. Switch to the dough hook about halfway through the flour mixture.

Using a cookie press fitted with the disc of your choice, press as much dough as will fit into the tube. Follow manufacturer’s instructions on how to press and bake 2-inches apart on an ungreased cookie sheet. Bake in a preheated oven at 375˚F for 6-8 minutes until set (do not brown). Allow cookies to cool for 3-5 minutes on cookie sheet and transfer to wire rack to cool completely.

Friday, November 19, 2010

Cinnamon Sugar Biscotti


If you've ever been to a cafe or Starbucks, you have probably seen their biscotti. Do they make them fresh every day? Maybe. You probably won't get a straight answer. If you were to ask me to choose between taking the time to bake my own biscotti or buying it at a cafe, I would choose to bake it any time! After baking this biscotti, I will never ever buy them at a cafe again! The ones you buy are so rock-hard you feel kind of like you might need to get your dentist on speed dial. Yes, I'm talking chipping-teeth hard. These have the perfect amount of crispiness complemented by a wonderful chewiness, too. They go great with hot drinks (coffee, tea, hot coco) or even a big glass of milk; dessert anyone? Did I mention that this was the first thing I've ever made to be eaten so quickly?! :)

Cinnamon Sugar Biscotti
Adapted from: Annie's Eats, originally Joy the Baker
Yields: 20-24 cookies

For the dough:
2 cups all-purpose flour
1.5 tsp ground cinnamon
1 tsp baking powder
1/4 tsp salt
1 cup sugar (granulated, white)
6 Tbsp butter, at room temperature
1 large egg, plus 1 large egg yolk
1 tsp vanilla extract

For topping:
1/4 cup sugar
1 tsp ground cinnamon
1 large egg, slightly beaten

Preheat oven to 325˚ F. Line a baking sheet with a silicone baking mat (or parchment paper). In a medium bowl, combine the flour, cinnamon, baking powder, and salt. Whisk slightly and set aside. In the bowl of a stand mixer, cream the butter and sugar together (paddle attachment) on medium-high speed until light and fluffy, about 3-4 minutes. Scrape the bowl with a spatula if necessary. Blend in the egg and yolk, beating well after each. Add the vanilla until well incorporated. Moving the mixer to low speed, slowly add the dry ingredients until a dough forms.

Divide dough into two halves and shape each half into a 9-inch long log. They should be about 1.5 inches wide. Place them onto the prepared baking sheet, spacing the logs at least 3-inches apart. In a small bowl, whisk the beaten egg briefly. Mix the cinnamon and sugar together in a separate small bowl and taste for preference. Add more sugar or cinnamon as desired. Baste the beaten egg on top of the two logs and sprinkle with the cinnamon sugar mixture.

Bake for 40-45 minutes, rotating halfway through the baking. Bake until tops are golden brown and slightly firm. Remove the pan from the oven but maintain the temperature in it. Once the logs are cool enough to handle, slice diagonally along the loaves into 1.5-inch thick pieces (10 per log). Place the sliced biscotti onto the baking sheet again, cut side down. Sprinkle with a little more of the cinnamon sugar mixture and bake an additional 10-15 minutes, until golden and crispy.

Wednesday, November 10, 2010

Pumpkin Butterscotch Cookies


I was a little hesitant to originally make these cookies because of the sunken-in appearance of the butterscotch chips. Not that the cookies have to be pretty, but it just made them look kind of hard to make. I was completely shocked by how many cookies this recipe yielded and how fluffy they were. Because of that, you really want to make sure to have plenty of milk for dipping these little lovelies into. This would make a great treat to bring to the family for the holidays and they will be astonished to see that you have found canned pumpkin puree. Too bad they don’t know that you actually made the puree yourself at home. I know that really helped me to try all of my pumpkin recipes this year. Plus if you find pie pumpkins pretty cheap, then that is all it will cost you, besides time.

Pumpkin Butterscotch Cookies
Adapted from: Annie's Eats, originally Joy the Baker
Yields: 25 cookies

2 cups plus 3 Tbsp all-purpose flour
1 ½ tsp baking powder
1 tsp baking soda
½ tsp salt
1 tsp cinnamon
2 large eggs
1 cup sugar
½ cup canola oil (or vegetable)
1 cup pumpkin puree
1 tsp vanilla extract
1 cup butterscotch chips

Preheat oven to 325 degrees. In a small bowl, combine the flour, baking powder, baking soda, salt and cinnamon. Set aside. In the bowl of a stand mixer, combine the eggs and sugar. Beat on medium-high until smooth, about 1 minute. Blend in the oil, puree and vanilla. Mix well.

On low speed, add dry mixture into the stand mixer a little at a time. Mix until well incorporated and then fold in the butterscotch chips. Drop the dough balls with a small ice cream scooper onto a silicone-lined baking sheet and bake for 14-16 minutes. Make sure to rotate halfway through the cooking time. When they are done, a toothpick should come out clean from the middle of the cookies. Allow to cool 5 minutes on the baking sheet and then transfer to a wire cooling rack.

The pumpkin taste really didn’t set in until the second day so store these in an airtight container for up to 5 days and enjoy them from the fridge or heated for a brief 10 seconds in the microwave. Don’t forget the milk!

Thursday, September 23, 2010

White Chocolate Macadamia Oatmeal Cookies


If the name of these cookies isn't a mouthful, I'm not sure I know what is. I absolutely LOVE white chocolate and macadamia nuts. If I ever get a choice I will always choose that kind of cookie over any other kind. Locally we have a place called Paradise Bakery and they are known for having amazing cookies. No offense, but these white chocolate/macadamia nut cookies are better than theirs!! I really couldn't taste the oats in them and they cooked and blended well with the other ingredients. Absolutely heaven. I really love that they were a little healthier (hey, you still have to use sugar and chocolate in them) than the normal cookies.

White Chocolate Macadamia Oatmeal Cookies
Adapted from: allrecipes
Yields: 28 cookies

1/2 cup butter, softened
1/2 cup white sugar
1/2 cup brown sugar, packed
1 egg
1 Tbsp vanilla extract
1.5 cups all-purpose flour
1 tsp baking powder
1 tsp baking soda
1.5 cups traditional oats
1 cup white chocolate chips
1 cup macadamia nuts, chopped

Preheat oven to 350 degrees. In the bowl of a stand mixer fitted with the paddle attachment, combine the butter, white and brown sugars until smooth. Add in the egg and vanilla and mix on medium-low until fully incorporated.

In a separate bowl, combine the dry ingredients: flour, baking powder, baking soda. Pour this dry mixture into the stand mixer bowl and mix until well blended. Slowly add in the oats, chocolate chips and nuts. Make sure the mixer is on the lowest setting for this as the batter will thicken some.

Roll batter into small 1-inch balls and place on greased baking sheet (although I highly recommend Silpat mats as I use them for all my baking now). Bake in preheated oven for 12-14 minutes or until edges are golden brown. Keep cookies on baking sheet for a few more minutes to ensure softness and then place on a cooling rack. Store in an airtight container.

Tuesday, August 3, 2010

Sugar Cookies, revisited


I made sugar cookies with royal icing quite some time ago (around Christmas) and the icing just didn't set hard enough and the cookies all stuck to each other. This time I was determined to make perfect royal icing cookies .. and it was a complete success!! I updated the link to the recipe and the recipe for the icing. These really turned out fantastic!

Everyone raved about them and thought they were really cute. I made them for my mom's boyfriend, Phil obviously, who was turning 60 years old. I made cookies that said "That's what she said", "60 = sexy", "Phil", and "Got beer?" He really loves to golf so I made them green and white (also to match the golf-themed cake that we got from Heavenly Sweets). If you ever want a birthday cake or even a wedding cake, I highly recommend them if you can get to the Noblesville, Indiana area!! Some cakes aren't always the best looking cakes, but what is most important, to me, is the taste. NOBODY beats their buttercream icing .. nobody.

Thursday, June 17, 2010

Oreo Cream Cheese Swirl Brownies


Got Brownies?

I have always held a special place in my heart for hating brownies. Considering I have only had the kind that comes from a box, this is now no surprise to me. I don't even like chocolate that much. Well my nephew is staying with us this week and although I would like to see him shed a few pounds (the poor kids at school make fun of his weight), I just had to try these out! I think I had more fun making the cream cheese part than I did the brownies. The brownies came out so soft and not crunchy on the edges like my usual brownies (remember .. from the box). I think I crushed the Oreo cookies a little too much so next time I will break them gently. Also, next time I might bake it a little longer and use a bigger pan for thinner brownies.

The cream cheese didn't exactly harden like I had hoped. Don't worry though, it's still amazingly delicious! I even let my nephew swirl the cream cheese in with a fork. As you can see, he really enjoyed that part. I might even use the base of the brownie mixture for home made brownies since that part was just gooey goodness! And that coming from someone who doesn't like chocolate that much is really saying something!

Oreo Cream Cheese Swirl Brownies
Adapted from: Annie's Eats, originally Sugar Plum

8 tbsp unsalted butter
¾ cup sugar
1 cup all-purpose flour
½ cup unsweetened cocoa powder
½ tsp salt
2 large eggs
¼ cup milk
1½ cups chopped Oreo cookies
6 oz cream cheese, at room temperature
½ cup powdered sugar
1½ tsp vanilla extract
 
Preheat oven to 350 degrees. Line a 9x9 (or bigger, for thinner brownies) pan with aluminum foil and lightly spray with canola oil. In a small saucepan on medium heat, melt butter and sugar together until well blended. Once melted, turn up the heat to boil for 1 minute and set aside to cool.
 
In a medium mixing bowl combine flour, cocoa powder and salt until well blended. Mix in 2 eggs well and then whisk in milk. Finally, add the chopped Oreo's and fold into batter. Pour batter into pan lined with foil.
 
For the cream cheese topping, mix cream cheese, powdered sugar and vanilla extract on medium speed in an electric mixer until well blended. Drop the cream cheese mixture onto the brownie mix in the pan in dollops/chunks. Take a fork or knife and swirl until level and mixed (almost like marble).
 
Bake at 350 degrees for 22-25 minutes until a toothpick comes out clean. Allow to cool for 10-15 minutes. Tip: If you place the pan in the refrigerator for 1 hour after cooling the pan, it makes it very easy to slice.

Saturday, February 20, 2010

Cookie Dough Truffles


Stop what you are doing and make these right now! Eat a few, then give the rest away. People will love you .. if they are human and love chocolate. K? Mkay. So now that you are back and have many more friends than you thought you did, let me tell you my little story with these .. and melting chocolate. And if you can't tell from my picture I made one batch slightly pink with two drops of red food coloring because a friend just found out she is having a baby girl!!! I couldn't find white mini chips so the regular chocolate had to do. No complaints so far.

I love to bake for the holidays. I have never had much success as I do not own a double boiler. People have said, "oh just use a bowl and place it on top of a boiling pot of water" but that makes me so nervous about cracking the bowl. You see, a long time ago while dating my husband I thought I would make him fondue cheese in the ceramic pot. It cracked on us in the middle of dinner and scared me so I totally freak out any time I melt chocolate or anything similar.

This past holiday season I found a new trick! I figured out I could put chocolate in a heat proof bowl on the defrost setting and that would melt it perfectly! Worked like a charm! The only problem!? I still buy the chocolate chips and not the regular chocolate that melts thin and is better for things like this. See, I like a thin layer of chocolate rather than a thicker coating. Usually it goes on so thick I need like 3 packages of chips for two dozen buckeyes or in this case cookie dough balls. So if you learned a lesson from all this: BUY REAL CHOCOLATE for dipping!

Also as another tip: Do NOT use wax paper. It will stick to your truffles, buckeyes, etc. If you just put them onto a cookie sheet they pop off just fine once refridgerated.

Cookie Dough Truffles
Adapted from: Annie's Eats, originally Taste of Home

8 tbsp butter, room temperature
3/4 cup brown sugar
2 1/4 cup all-purpose flour
1 can sweetened condensed milk (14 oz)
1 tsp vanilla extract
1/2 cup mini semi-sweet chocolate chips

1.5 cups semi-sweet or bittersweet chocolate, for dipping (chopped)
mini chocolate chips, for garnishing

Combine butter and brown sugar in mixing bowl with hand mixer until light and fluffy. Beat in half the flour, then condensed milk and vanilla and mix well. Then add the other half of the flour. Mixture will thicken. When combined well, gently beat in the 1/2 cup of the mini chocolate chips. Refridgerate dough for 10-15 minutes so it can harden.

Once hardened, roll into desired sized balls placing on a cookie sheet and placing in the freezer to harden for at least 1 hour. After hardened, begin to melt chocolate in double boiler or stove top in heat proof bowl atop pot with boiling water. Once melted, begin to dip choclate balls with a toothpick into the chocolate compeltely covering them. Allow to drip excess chocolate for a few seconds and return to cookie sheet and immediately garnish with mini chocolate chips as desired. Return to fridge to cool and set.

Tuesday, February 16, 2010

Chewy Peanut Butter Cookies


I am always looking for the perfect cookie. I don't like them crunchy or doughy in the middle. Whether it's snickerdoodles or peanut butter .. I like them to stay soft out of the oven. I never had much success before I started this blog but I have begun to develop some skills thankfully. These cookies are a MUST-MAKE for any occasion. They are very simple and easy to make, especially if you have a stand mixer. This was the very first recipe I used my Kitchen Aid mixer for!!


Such a beautiful sight huh!? Please excuse the background where my outlet cover is missing. I was in the midst of painting my kitchen. Can we say embarassing! You can view how that went here on my other blog.

Anyways, the cookies turned out fantastic despite dinner that was a failure (no need to blog that). I actually forgot the shortening even though I had it set out .. and Annie explicitly mentions it in her blog post (link below). I should really think about re-naming this blog to something like "Kelly forgets another ingredient." That just doesn't have a nice ring to it though. I will for sure make another batch soon with the shortening to see if I can taste the difference. We will call these my "experimental" peanut butter cookies. Oh and I also replaced honey with karo light syrup because that is what I had on hand (and Google said I could substitute it).

Chewy Peanut Butter Cookies
Adapted from: Annie's Eats, originally Taste of Home

3 cups all-purpose flour
1 cup sugar
1.5 tsp baking soda
1 tsp baking powder
pinch salt
1/4 cup vegetable shortening (I accidentally omitted this)
4 tbsp butter, room temperature
1 cup creamy peanut butter
1 cup light corn syrup (or honey)
2 large eggs
sugar, for rolling dough

In medium mixing bowl, combine flour, sugar, baking soda, baking powder and salt. Whisk together and set aside. Cream together shortening, butter, peanut butter and syrup (or honey). Mix in eggs one at a time being sure to incorporate well before adding the second. With mixer on lowest speed, slowly add in dry mixture little by little until blended well.

Preheat oven to 350 degrees. Roll dough into 1-1.5 inch balls and roll in sugar. Place onto greased cookie sheets and slightly flatten with fork to make a cross-section design (see original recipe link for picture). The dough rises a bit and the cookies stay very thick so the design won't stay but it's to help them shape a little. Bake for 10-12 minutes until they are golden. Since they are peanut butter cookies they don't change color too much so don't over-cook them. Allow them to cook for about 5 minutes on the cookie sheet before transferring to wire racks to finish cooling completely. Serve with cold milk for best results! Store in airtight container.

Tuesday, December 15, 2009

Royal Icing & Sugar Cookies

Waking up Christmas morning to open presents, eat cookies and play with your siblings. That is what these cookies remind me of. They are a classic and are the perfect (and I mean PERFECT) recipe. Annie's Eats is where I found the recipe for both the cookies and the icing. One batch and I was done. These made about 28 cookies and I used every last piece of dough. I made extra, don't worry.

The icing on the other hand I will modify for next trial. I have heard horror stories about how hard royal icing is to master but this was the easiest especially with her how-to instructions on her blog. I can't believe I actually made them and succeeded! I dyed the red batch of icing with the suggested Wilton's dye and I couldn't find it in green so I had to use my food coloring I had at home. I actually liked the taste much better of the food coloring batch than the Wilton's. That stuff just left a gross after-taste in my mouth and the icing never really set right underneath the top. Not sure why. Use food coloring and if the mix gets too watery, add a little more powdered sugar.

Another tip would be to do the icing of the cookies on a cookie tray. Don't worry about them sliding around, they won't. I put them on a dish towel and needless to say, that dish towel is in need of a washer! The cookies were superb and had a perfect hint of almond extract. The icing was great and I heard no complaints from anyone.

Sugar Cookies (about 28 cookies)

1 cup butter
1 cup powdered sugar
1 egg, beaten
1.5 tsp almond extract (I used imitation and it tasted fine)
1 tsp vanilla
2.5 cup flour

Cream butter and add in powdered sugar. Blend in egg, almond extract, vanilla and flour. Chill dough until firm. Roll into 1/4" thickness (or as desired) on well-floured surface and cut with cookie cutters. Re-roll dough and repeat. Bake cookies at 375 for 8-10 minutes. The cookies should not brown and they will not rise. Allow to cool before decorating.


When using royal icing, you have to have a lot of will power. No, not the Nascar racecar driver. Don't eat it as difficult as that is. :) When you make the batches of icing, divvy them up into sealable containers. The number of containers = number of colors you need. I used two different colors for one batch of 28 cookies and I had TONS of icing leftover so you could probably get away with 4 colors of icing with two batches of cookies easy.

Make the icing, put in piping bags with the couplers and tips and pipe the cookies (as shown above). I suggest Tip 3 as I had the best luck with this one (not popping the bag off the coupler). Allow those to cool (an hour or so) while the leftover icing is sealed in containers. You can leave the piping in the bags when not in use in a tall glass with a small amount of water in the bottom. Then add water to the sealable containers with the icing 1 tsp at a time so that the icing is more of a liquid consistency and drips off of a mixing spoon smoothly.

Then, spoon the icing inside the piped cookies. Using a bottle with nozzle works the best and is less messy. Help the icing reach the edges of the cookie with a toothpick until they look like the cookies below! As you can see I experimented with a few to see what I could get away with. Allow these to cool overnight and enjoy!


Royal Icing

4 cups powdered sugar
2 tbsp meringue powder (you can sub 2-3 egg whites for this)
5 tbsp water
toothpicks - for icing

Combine all ingredients with a mixer. Paddle attachment on a stand mixer is best. This will be the consistency of the icing that is piped for edging so if need be, you may add a small amount of water if it doesn't initially pipe through the #2 tip. After edging all the cookies, add about 1-3 more tbsp of water to the remaining icing in a tupperware container until it is smooth and drips off the back of a clean spoon. It should reabsorb into the tupperware container in about 10-12 seconds. It doesn't take much more water to get the consistency needed.

Note: I used to add enough water to make it the consistency on Annie's website but that was too much water and the icing never set. Use just a little less than is recommended on that website.

Thursday, December 3, 2009

White Chocolate Chip Macadamia Nut Cookies


All-American classic cookies. Nothing compares to the beautiful taste of white chocolate chips and macadamia nuts together in the same cookie. The only reason this is my favorite cookie of all time is because it has no chocolate. At all. My husband tells me I am not a real woman because I hate chocolate. It's sad, but very true.

Even though not true "chocolate" it's still the most wonderful sweet treat ever. When Hershey's came out with the Cookies N Cream bars .. it was heaven at the check out line! Not so much for my thighs. Well Snickerdoodles are never the easiest to master and I still have yet to do so. Here is the recipe so far. Trial number one was delicious but not quite perfection and that is what my kitchen strives for.

I think one reason this recipe failed was because I was over-zealous with the white-chocolate chips. I just love them SO much I felt I had to double the recipe. Learn from my mistake .. that is a big no-no. You have got to have some cookie with your white chocolate chips.

White Chocolate Chip Macadamia Nut Cookies

1/2 cup butter
3/4 cup sugar
1 egg
1 tsp vanilla extract
1 1/4 cups flour
1/2 tsp baking soda
8 ounces white chocolate
6 ounces macadamia nuts, chopped

In a medium bowl, cream together the butter and sugar. Stir in the egg and vanilla. Combine the flour and baking soda in separate bowl then stir into mixture. Then, stir in the white chocolate chips and nuts. The mixture was very liquidy and the cookies spread out quite a bit so drop cookies in small nickel sized drops on greased cookie sheet. Make sure they are pretty far apart too (approximately 2 inches is best). Bake in preheated oven at 375 degrees for about 7-8 minutes or until cookies are golden brown on the bottom.

Wednesday, October 21, 2009

Snickerdoodles


I saw the most delicious looking picture on the Apple-A-Day blog for some snickerdoodles. These cookies are my favorite from when I was a kid and growing up. I think the cinnamon flavor is so might lighter to enjoy than chocolate chips. But then again, I am not your normal chocolate lover. Cinnamon is another story, however. My apple pie .. YUM! Well, that is for another blog .. another day.

At any rate, I made these exactly as specified to the recipe, but unfortunately everybody's oven is different and cookie trays are different. Well, my cookies came out really soft to begin with (so soft I thought they weren't completely cooked although they were). After cooling on the cooling racks they were very hard. I don't like hard snickerdoodles so I will definitely try try again! After keeping in the fridge, however they were quite soft. Also, this is the first time I have used the cooling racks. I see them everywhere so I wanted to get some to use. Not a huge fan so far. They aren't anything to brag about.

Tip: eat the cookies after heating in microwave for about 10 seconds with a small glass of milk!! OMGYUM!! For the rest of them, keep them refridgerated and they will stay nice and perfectly soft!!

Snickerdoodles

2 3/4 cup flour
2 tsp baking powder
1 cup butter, softened
1 3/4 cup sugar
2 large eggs
4-5 tsp ground cinnamon

Sift together flour and powder in a small bowl. Set aside. Put butter and 1 1/2 cup sugar in large bowl and mix on medium speed until pale and fluffy. Mix in eggs. Gradually stir in flour mixture on low speed.

In a separate small bowl, mix together remaining 1/4 cup sugar and desired amount of cinnamon to preferred ratio. I typically always have a nice mixture on hand for cinnamon sugar toast, which will do just fine!

Shape dough into 1 3/4 inch balls and roll into cinnamon sugar mix. Note: the mixture was pretty sticky so have all of your pans laid out and ready to go before making these! Place on baking sheets and bake at 350 degrees for 12-15 minutes or until edges are very slightly golden brown. Halfway through baking, rotate cookie sheets. Cool on wire rack if desired.

Wednesday, October 14, 2009

Peanut Butter Chocolate Chip Cookies


So a friend of mine at work brought in these amazing melt-in-your-mouth cookies one day. Well, of course I had to try to remake them myself. When I remade them they weren't quite the same taste, but both were equally fantastic! I am not really a big chocolate lover, but these have a hint of peanut butter so the chocolate is not overwhelming. These cookies are also the only cookies I have ever made that didn't turn into rocks 2 hours after baking them. I am so proud!! They are the PERFECT soft batch cookies.

Peanut Butter Chocolate Chip Cookies

2 sticks butter, softened
3/4 cup granulated sugar
3/4 cup brown sugar
1 tsp vanilla
2 eggs
2 3/4 cup flour
1 tsp baking powder
1 pkg peanut butter chocolate chips

Blend butter, sugars, eggs, vanilla and baking powder in large bowl. Mix in chips and then flour. Refrigerate for a few hours (optional, but helps to roll dough later).

Roll dough into balls and place on greased cookie sheet. With palm of hand or a flat spatula, flatten dough balls down. Bake at 350 degrees (conventional) for 15 minutes or until edges are a light golden brown. Remove from baking sheet to cool.