Showing posts with label dinner. Show all posts

Saturday, May 19, 2012

Pork Baby Back Ribs


Ribs are something I really didn't enjoy growing up. (I know; you're sensing a theme here, huh.) I've always been a picky eater and when it came to ribs I only ate my step-dad's ribs. He would slow-boil them all afternoon with some special juices and they would almost fall off the bone. They were perfect! I have tried for a while now to improve my ribs, but not have to stay in the kitchen all afternoon while they cook. I have to say that this recipe is one of the best. I've tested crock-pot recipes and stove-top and this is what I've found to make the perfect baby back ribs!

Pork Baby Back Ribs
Adapted from: Kelly's Kitch original
Yields: 1 rack; 3-4 servings

1 rack baby back ribs
juice of one lime
juice of one lemon
Sweet Baby Ray's BBQ Sauce

Cut the ribs every two bones to separate them. Place into a large pot or dutch oven and fill with enough water to cover, plus a little extra. Stir in the juices, lemon and lime halves, and bring water to a boil stove top. Once water is slowly boiling, turn the temperature down to medium-low and allow to simmer for 1-2 hours (or however long you can allow). 

Once the ribs are cooked, remove them from the water and slather with BBQ sauce. NOTE: If you make these a day ahead of time, you can store the cooked BBQ ribs in an airtight container overnight and cook the next evening. This gives the ribs a chance to soak in some of the sauce. 

Place ribs on a grilling tray lined with foil and cook on the grill on medium heat for about 10-15 minutes, flipping halfway. Since you've already cooked the ribs stove top, all you're doing on the grill is giving them a bit more flavor and reheating them. 

They will be tender, but not completely fall apart. Add more BBQ sauce as desired and enjoy!

Friday, December 23, 2011

Pasta alla Vodka


Are you needing an easy week night dinner that tastes like you've been slaving for hours? Look no further! This amazing dish has by far the absolute best sauce I've ever made! I made it twice, but it was still too involved and, per my husband, required too many dirty dishes for clean-up. The second try I think was the better of the two recipes! This is so creamy and delicious that I am thinking it might be on our weekly menu. I'm sure the liquor store will think we have really taken a liking Vodka when we keep coming back for it.

Pasta alla Vodka
Adapted from: Annie's Eats, originally Cooks Illustrated
Yields: 5 servings

16 oz dried pasta shapes
2 Tbsp olive oil
1/4 cup minced onion
1 Tbsp tomato paste
2 garlic cloves, minced
1 tsp red pepper flakes
1 can crushed tomatoes (15 oz)
1/4 cup water
1/2 tsp table salt
1/4 cup vodka
1/2 cup heavy whipping cream
1/4 cup reserved pasta water, if needed
2 Tbsp finely chopped fresh basil leaves
freshly grated Parmesan cheese, for topping

Cook pasta according to package directions until al dente and drain, reserving 1/4 cup pasta water. Meanwhile, heat the olive oil in a large skillet over medium-high heat until shimmering. Add onion and tomato paste and cook until onion is softened, about 3 minutes. Mix in garlic and red pepper flakes until fragrant, about 30 seconds.

Pour the crushed tomatoes into a 2-cup liquid measuring cup and add enough water to make it 2 cups (about 1/4 cup of water is necessary). Add this and the salt to the pan with the onion mixture. Remove pan from heat and add the vodka. Return pan to heat and simmer briskly on medium heat until alcohol cooks off, about 10 minutes. Reduce the heat if simmer becomes too brisk.

Stir in the cream and cook an additional 1 minute, being sure to not cook too long or else the sauce will separate. Add the pasta to the pan with the sauce and toss well. Cook on medium-low heat for about 3 minutes to allow the sauce to be absorbed by the pasta. If the pasta seems to thick, add some of the reserved pasta water. Both times I used all of the 1/4 cup and it made the dish much more creamy! Add the basil and top with Parmesan cheese when serving.

Thursday, October 20, 2011

Southwestern Stuffed Peppers, revisited


I've made these stuffed peppers in the past and this is a great dish that my husband and I always love to have for dinner. It's quick enough for a week night and easy enough to double if you're having some guests over. We love these as leftovers, too, since they keep well and reheat great. If you're in the mood for Mexican but don't want to spend an hour (or two) making a huge, fancy, complicated dish, then this is your recipe!

From this post forward, I've added a new tag on the right-hand side of the page: leftover-approved. This will be for any dinner (or meal-item) that is approved by myself and/or my husband to eat for leftovers. Some things really do not keep up well after being in the fridge and then the microwave. Hopefully this will help with week night meal selection!

Southwestern Stuffed Peppers
Adapted from: Homemade by Holman
Yields: 4 servings

1/2 lb ground beef
1 tsp ground cumin
1/2 tsp chili powder
1/4 tsp cayenne pepper
1 cup black beans, drained and rinsed
1 cup corn
1/2 cup red onion, diced
1 can diced tomatoes (option w/chiles), undrained
1/2 cup brown rice, uncooked
4 bell peppers, any color
1 cup cheddar cheese, shredded
1 lime
1/4 cup cilantro, chopped (optional)
sour cream, (optional)

Preheat oven to 350°F. Cook rice as directed and set aside. Meanwhile, brown ground beef in a large skillet on medium-high heat and crumble as it cooks. Add 1/2 tsp cumin, 1/4 tsp cayenne and 1/4 tsp chili powder. Mix well and add diced tomatoes, reducing heat to medium low. Add onions, black beans, corn and simmer until rice is cooked and softened.

Meanwhile, prepare peppers by cutting in half lengthwise (top to bottom) and removing stem, seeds, etc. Rinse and set in a large glass baking dish. Add 2 tbsp water to bottom of dish.

When rice has cooked thoroughly, add 1/2 tsp cumin and 1/4 tsp chili powder and mix well. Stir into the ground beef mixture and add half the cilantro, if using. Spoon filling into pepper halves. Squeeze lime juice on top of stuffed peppers. Cover pan with foil and bake for 20-25 minutes. Uncover (peppers should be softened) and sprinkle on cheese and continue cooking an additional 5 minutes until cheese is melted. Top with remaining cilantro and sour cream if desired.

Monday, October 10, 2011

Mediterranean Meatball Skillet


I really wasn't a huge fan of this recipe, but it had lots of zucchini in it, so I wanted to try it before winter came along and zucchini's were out of season. I was very pleasantly surprised to find that I actually love meatballs (and veggies) without tomato sauce and pasta. This was a very easy dish to make and even the leftovers were amazing! My husband still wanted to see more of a tomato sauce base, so maybe next time I'll add a can of sauce as well. Try the original and see how you like it. The feta cheese really made this dish go from good to great, so don't skimp on it. The seasonings are great, too, and this is a perfect way to use up all of that extra zucchini!! Don't forget that you can also slice or grate it and freeze, too.

Mediterranean Meatball Skillet
Adapted from: Betty Crocker
Yields: 4-6 servings

2 tsp olive oil
1 small onion, cut into wedges
3/4 cup uncooked long-grain white rice
1 green bell pepper, chopped
20 frozen, cooked meatballs (or try this recipe)
1-1.5 cups water
1 medium zucchini, halved lengthwise and sliced
1 can diced tomatoes with Italian seasoning
1/2 cup crumbled feta cheese

Heat oil in large skillet on medium-high heat. Once heated, add the onion and cook until crisp-tender, about 4-5 minutes, stirring frequently. Add rice, bell pepper, meatballs, and water. Bring to a boil. Reduce heat, cover and let simmer 20 minutes, stirring once halfway through cooking.

Stir in zucchini and tomatoes. Cover and cook an additional 8-10 minutes.or until zucchini is tender and water is absorbed (this is why I will use 1 cup next time). Top with feta cheese and remember that with feta, a little goes a long way.

Thursday, October 6, 2011

Thai Chicken, revisited


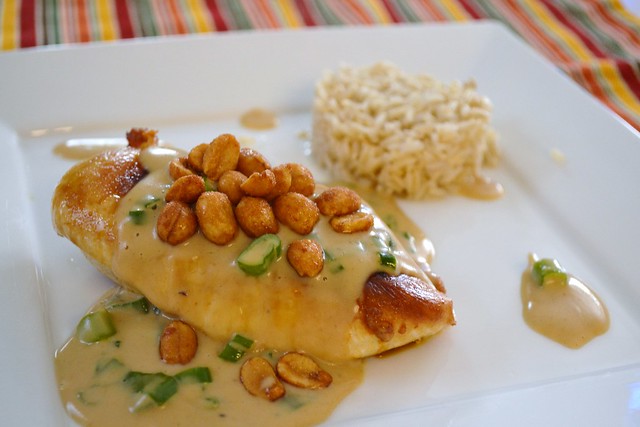
This Thai chicken is something my husband requests often. I have a really tough time saying no because it's an amazingly easy and delicious dish, and because it's my husband. The only thing I don't like about this recipe is that it has chives in it. Don't get me wrong, I love chives and without them, this dish wouldn't be nearly as tasty. On the other hand, I hate that they go bad so quickly. While at the farmers market a few weeks ago, a gentleman was selling me some chives and he said you can chop them and freeze them. WHY have I not thought of that before? There will be no more throwing bad chives out of this house again! I'm going to try some recipes with my newly frozen chives soon so I'll update how it went. So far they still look great though!

Thai Chicken
Adapted from: Biggest Book of 30-Minute Meals (Better Homes & Garden)
Yields: 4 servings

4 skinless, boneless chicken breasts (medium sized, 1-1.5 lbs)
4 green onions, cut into 1/2-inch pieces
1/4 cup creamy peanut butter
3/4 cup unsweetened coconut milk
1/4 tsp black pepper
1/4 tsp ground ginger
1 tbsp canola oil
1/4 cup honey roasted peanuts
In a small mixing bowl, combine coconut milk, peanut butter, ginger and pepper. Set aside.

In a large skillet, heat oil over medium heat and cook chicken breasts until cooked thoroughly. Remove from skillet and keep warm. Add green onions to warm skillet and cook for 1-2 minutes until tender. Stir in sauce mixture, stirring until bubbly. Remove from heat.

Place chicken on plate and spread sauce over top and sprinkle with peanuts to serve.

Monday, September 26, 2011

Chicken Stroganoff


This recipe originally called for cubed turkey, but I'm not seasoned enough yet to experiment with it; nor do I know where to find turkey like that (reasonably priced anyways). Chicken is a great substitute and tasted amazing in this easy skillet dinner. You can always cook the chicken when you have time and just store it in the fridge. That really makes this dinner take no time at all to prepare. We also always substitute frozen corn for peas with any recipe since we both dislike peas. My husband even took all of the leftovers (and yes, I mean ALL) for lunch the next few days. None of this was thrown out if that says anything about the taste. Next time I might not use as many noodles since it wasn't as creamy as I'd like. I added quite a bit more than the recipe called for. :) That's what I do, though.

Chicken Stroganoff
Adapted from: Pillsbury
Yields: 4-6 servings

1 can chicken broth (14 oz)
1 jar turkey gravy (12 oz)
2.5 cups uncooked wide egg noodles
1 cup sliced carrots
1 cup frozen corn
1/2 cup sour cream
1/8 tsp ground nutmeg
1/8 tsp pepper
2 cups cooked, cubed chicken (or turkey)

In a large skillet, heat broth and gravy until boiling. Stir in noodles, carrots, peas, sour cream, nutmeg and pepper. Return pan to boiling. Reduce heat, cover and simmer on medium-low for 10 minutes. Stir in the chicken (or turkey) until noodles and vegetables are tender and warm.

Thursday, September 22, 2011

Ham & Cheese Sliders, revisited


I have made these sliders before, usually during baseball season, but these little sandwiches are so easy to put together we make them a lot now. With football season well under way (and since I'm participating in fantasy football this year), neither one of us ever want to cook on Sundays. This is our perfect go-to meal nowadays since they involve no cutting boards and knives, pots or pans, etc. Put the few ingredients together and you've got dinner or snacks for a lot of hungry friends!! When I first made these I mentioned in my original post that I wasn't a huge fan, but I did eat them. Now I'm 100% on board and love these little sandwiches. I will probably try some kind of turkey combination soon, too!

Ham and Cheese Sliders
Adapted from: Annie's Eats, originally The Girl Who Ate Everything
Yields: 12 mini-sandwiches

For the sandwiches
12 slider rolls (I bought Hawaiian rolls and sliced them down the middle)
12 slices honey ham
12 slices Swiss cheese
mayonnaise

For the topping
3/4 Tbsp yellow mustard
4 Tbsp butter, melted
1/2 Tbsp finely minced onion
1/2 tsp Worcestershire sauce
poppy seeds, for topping

Preheat oven to 350°F. Start by placing the slider rolls on a baking sheet and slicing them, if needed. Slather on some mayonnaise on the top bun, as much as desired. Place a few small slices of ham and cheese on top of the bottom bun and place tops on sandwiches. Mix the sauce ingredients, except poppy seeds, and baste on the tops of the sandwiches. Sprinkle poppy seeds on top immediately. Cover baking sheet with foil and bake 10 minutes, until cheese has melted. Uncover and bake an additional 2 minutes. Serve warm.

Friday, September 16, 2011

Mexican Beef Melts


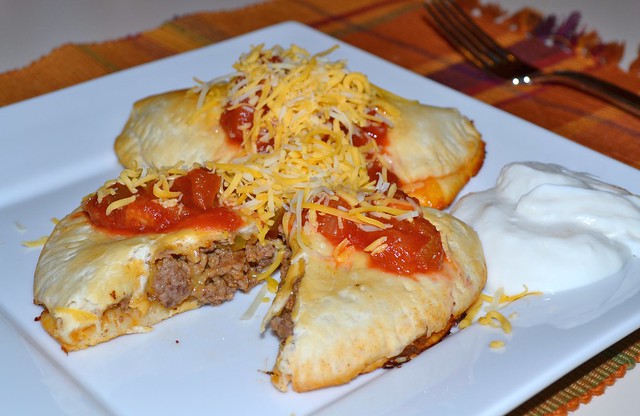
I don't know why I really have never thought to make a mexican type of calzone. I guess I'm not much of a risk taker in the kitchen when it comes to making up new dishes. I did, however, stumble upon this recipe in a booklet that was 6 years old and thought it would be a great week night dinner. With just a few ingredients and easy directions, I was determined to make this (even if I do have an 11-week-old). They turned out great even though I was somewhat skeptical of the lack of ingredients inside of the melts; or calzones. I think I might add some peppers to the meat mixture to give it a little more kick. They are still fabulous as-is and make for a quick dinner!

Mexican Beef Melts
Adapted from: Pillsbury
Yields: 4 servings

1 lb ground beef
1 package (or 3-4 Tbsp) taco seasoning mix
1/3 cup water
1 1/2 cups chunky salsa
1 can homestyle biscuits (16.3 oz)
1 cup shredded monterey jack cheese
1 cup sour cream, optional

Heat oven to 375°F and lightly spray a cookie sheet with cooking spray (or use silicone mat). In a large skillet, brown the meat. Drain and return meat to warm skillet on medium-low heat. Add water, salsa and seasoning. Mix well to combine and continue to cook until thickened, about 4-5 minutes.

Separate dough into 8 biscuits and roll out to a 6-inch diameter circle. Spoon about 1/4 cup beef mixture into biscuit rounds on cookie sheet. Top with a tablespoon of cheese and close by folding over. Press the edges with a fork to ensure a good seal. Bake 10-14 minutes, or until golden brown. Allow to cool slightly and serve by topping with salsa and cheese. Serve with sour cream if desired.

Friday, September 2, 2011

Sausage Jumbalaya, revisited


Finally I'm starting to get back into a routine with the little one! Even though I still love to cook (bake, mostly) I seem to find little time for myself. Easy, week night dinners are high on my priority list. That and low-ingredient meals since going to the grocery is now a race to see whether I can make it home before bubba wakes up. ;) This meal has both few ingredients, is inexpensive, and utilizes the crock pot. It really couldn't get any easier unless you had a live-in cook! I have made (and posted) this recipe in the past, but now that I have a dslr camera, I'm motivated to repost old recipes that are hidden in the archives and give new life the previously dull pictures. Enjoy!

Sausage Jumbalaya
Adapted from: Easy Slowcooker Cookbook
Yields: 6 servings

Ingredients

1 lb cooked, smoked sausage links, chopped
1 red onion, chopped
1 green bell pepper, chopped
2 tsp minced garlic
1 lg can diced tomatoes (28 oz), undrained
1 Tbsp parsley flakes
1/2 tsp ground thyme
1 tsp cajun seasoning
1/4 tsp cayenne pepper
3/4 cup uncooked long-grain white rice

Directions

Spray slow cooker (or use liner) and combine all ingredients except rice. Cover and cook on low for 5-6 hours. Add the rice, mix well, and cook an additional 1 hour on low. Serve warm.

Sunday, August 28, 2011

Penne and Smoked Sausage


Ever get into a slump when it comes to weeknight meals? I know I usually do. When it comes to smoked sausage I have two recipes. Two. How sad is that?! I can make hundreds of things with ground beef, chicken, etc. Why should smoked sausage get ignored? Not anymore! I was inspired by some recent commercials of a woman making a pasta dish with her smoked sausage. Seemed like a great idea. This pasta turned out better than I'd expected, but my husband wasn't totally impressed. It was good enough for dinner, but not for leftovers. You can decide for yourself, but I think it was rather tasty. It has very few ingredients and is a quick weeknight dinner for those with a family!

Penne and Smoked Sausage
Adapted from: Taste of Home
Yields: 6-8 servings

Ingredients

2 cups uncooked penne pasta
1 lb cooked smoked sausage, halved and diced
1 1/2 cups milk
1 can cream of celery soup (10.75 oz)
1 1/2 cups french fried onions, divided
1 cup shredded mozzarella cheese, divided
1 cup frozen corn

Directions

Cook pasta according to package directions. Meanwhile, preheat oven to 375°F. Grease a 13x9 casserole dish and set aside. In a large bowl, combine milk and soup. Mix well and add 1/2 cup french fried onions, 1/2 cup shredded cheese, corn and sausage. Mix until well incorporated.

Transfer contents of bowl to the greased baking pan. Flatten slightly with a spoon. Cover with foil and bake for 25-30 minutes, or until bubbly. Remove foil and top with remaining 1 cup of french fried onions and 1/2 cup cheese. Bake, uncovered, for an additional 3-5 minutes, or until cheese has melted. Enjoy!

Wednesday, June 29, 2011

Meatball Subs


Summer reminds me of cookouts, baseball and amazing food (can we say, Apple Pie)! This isn't typically something I would make, or eat, but my husband is a HUGE meatball lover. He saw this recipe in the cookbook I received a while back from a giveaway and requested this be one of the first to make from it. Boy was I glad he wanted this! It was so incredibly delicious; much better than I was anticipating. Given the choice, I'd never choose a meatball sub .. over anything really. This however was different. It had substance. It didn't need a bunch of toppings to mask the taste. These would be great for a summer gathering or even a cookout at your house, just cut the buns in half and voila!

Meatball Subs
Adapted from: Simply Suppers
Yields: 4 subs

For meatballs:
1/4 cup panko bread crumbs
1/4 cup milk
3/4 lb ground beef
1/4 lb Italian sausage
2 Tbsp finely diced shallots (or onion)
5 garlic cloves, minced
1/4 cup ricotta cheese
1 cup finely grated Parmesan cheese
1 large egg, lightly beaten
2 Tbsp parsley, chopped
1/4 tsp freshly ground nutmeg
1 tsp dried thyme
1/2 tsp dried oregano
kosher salt
finely ground black pepper

For sandwiches:
2 cups tomato sauce
4 crusty sandwich rolls/buns
2 cups shredded mozzarella cheese

To prepare the meatballs, preheat oven to 395 degrees. In a large mixing bowl, combine bread crumbs and milk until mixed well. Add the remaining ingredients for the meatballs and mix well with hands. Season with salt and pepper as desired. When well combined, shape into 16-20 meatballs.

In a large skillet over medium-high heat, warm the oil until a few droplets of water sizzle when sprinkled onto the skillet. Working in batches, cook the meatballs until well-browned on each side, about 4-5 minutes total time. Transfer the browned meatballs to a rimmed baking sheet and continue this process until all meatballs are browned.

Cook meatballs in preheated oven for about 8-10 minutes, until the center is no longer pink. DO NOT turn the oven off.

To assemble a sandwich, heat a medium saucepan over medium heat and add the tomato sauce. Add the meatballs and toss until well coated and warmed. Place meatballs on sandwich buns and place on a clean baking sheet. Sprinkle mozzarella cheese evenly amongst the four sandwiches and bake in oven until the cheese has melted, about 3-5 minutes. Serve immediately.

Wednesday, June 22, 2011

Corn Chowder


Usually chowder is a fall or winter recipe. Also, I'm not a big fan of soup. The recipe and picture just looked amazing from reading my new cook book and so I dog-eared it. It took a week of coercing myself to get the energy to make this, but in the end it really didn't take that long at all! If you're not really a soup fan like myself, then just give this a try; you won't regret it. If you love potatoes and corn, then you will absolutely love this recipe. The one complaint I think I had was that if you eat the soup by itself, it's sort of bland-tasting so I HIGHLY recommend adding cheese and even bacon pieces. I think next time I'll add a little more salt and pepper as well as melt in a little cheese. The recipe below is the original.

On a side note, I am about two weeks away from my due date. That is why the posts have been MIA lately and probably will continue to be. I have pictures, new recipes, and more, but what little energy I have is reserved for naps, cleaning and daily contractions. I apologize, but please do enjoy the rest of my blog posts in recent months for all of your recipe needs. I'll be posting my favorite summer recipes in the coming weeks to give you all a taste of what my summer will (hopefully) be like this year!

Corn Chowder
Adapted from: Simply Suppers
Serves: 8-10 *

2 Tbsp unsalted butter
1 Tbsp olive oil
1 cup yellow onion, finely diced
2 garlic cloves, minced
1/2 tsp dried thyme
1/4 cup all-purpose flour
6 cups chicken stock
4 large russet potatoes, peeled and diced
2 cups half-and-half
4 cups corn kernels, thawed if using frozen
kosher salt
finely ground black pepper
1/2 cup shredded cheddar cheese, for topping
1/4 cup cooked bacon, crumbled, for topping

In a large stockpot over medium-high heat, warm the butter and oil until a few droplets of water sizzle when sprinkled into the pot. Add onions, garlic and thyme. Cook, stirring occasionally until soft, about 4 minutes. Dust the onion mixture with flour and stir to coat. Cook for 1 minute and whisk in the chicken stock. Increase heat to high and bring the mixture to a boil.

Add potatoes and bring mixture back to a boil. Stir in half-and-half. Reduce heat to medium and simmer uncovered for 15 minutes, or until potatoes are tender.

Add the corn and simmer until the corn is softened, about 15 minutes. Season with salt and pepper to taste. Serve hot and garnish with cheese and bacon as desired.

* NOTE: This recipe makes a lot of soup. If you are a smaller family and don't want too many leftovers, then halve the recipe.

Friday, May 6, 2011

Chicken, Poblano and Corn Quesadillas


From past experience, I've learned that quesadillas are a tricky yet easy dinner (or appetizer) to make. It takes some finesse I think, but they are always worth the effort in the end. My first attempt I was over-zealous and wanted to make an entire quesadilla (unfolded, two tortillas in the skillet). That was the worst idea! They fell apart and didn't crisp all that well. So learn from my mistake; when the directions for a quesadilla say to fold it over in half, do it. I also made some minor changes to this recipe because I like flavorful quesadillas with lots of different ingredients. I added tomatoes and I think a side of sour cream or salsa would have been even better!

Chicken, Poblano, and Corn Quesadillas
Adapted from: Simply Suppers
Yields: 6-8 quesadillas

1 large poblano pepper, halved
olive oil
1 cup shredded, cooked chicken
1 cup corn kernels
1 cup Monterrey Jack cheese, shredded
1 tomato, chopped
6-8 8-inch flour tortillas
sour cream (optional)
salsa (optional)

Start by roasting the poblano pepper. Preheat the broiler on high and move the oven rack to the highest position. Remove all seeds and stems from the pepper and place on oiled cookie sheet. Place in the oven and broil for about 8 minutes on each side, enough to get them charred on the edges. Set aside to cool.

Preheat a skillet on the stove to medium heat. Meanwhile, fill tortillas with ingredients: shredded chicken, cheese, corn and tomatoes. You can add the salsa and sour cream beforehand or use as a dipping sauce. Be sure to only fill half the tortilla. Fold in half and spray the top of the tortilla with olive oil cooking spray. Place folded tortilla into preheated skillet with the oiled side down. Lightly spray the other side of the tortilla while cooking.

Leave tortilla on skillet until crunchy and darkened, about 3-4 minutes. Flip over to cook the other side gently with a spatula. Leave on skillet until crunchy and darkened, about 3-4 minutes. Serve immediately.

Monday, April 4, 2011

Chicken Salad


Simple and easy is what I'm currently looking for in recipes lately. Starting my third trimester soon and slowly losing patience with cooking (among other things) has just drained me; physically and mentally. This was easy to make and actually made lots of leftovers which were amazing the next few days! This is something I could see my husband making when the baby comes because it's so easy and not very time-consuming. Next time I might try it with some leftover chicken breast, shredded, to see if I can taste the difference.

We also just got back from our "babymoon" in Washington DC so I might post about the places we ate there soon as well. I made a list of the good places and the bad places to avoid. It's about even on both sides.


Chicken Salad
Adapted from: Allrecipes
Serves: 4-6

2 10-ounce-cans chicken chunks, drained & rinsed
1 cup seedless green grapes, halved
1/2 cup sliced almonds
1/3 cup pecans, chopped
1/2 cup chopped celery
1 8-oz can mandarin oranges, drained
1/2 cup cucumber ranch salad dressing
1/4 cup mayonnaise

Mix all ingredients in a medium mixing bowl. Cover and allow to chill for at least 1 hour in the fridge. Serve on warm buns or large croissant rolls.

Monday, March 21, 2011

Hearty Beef Ragu


When I look at this picture, it reminds me of Chef Boyardee’s Beefaroni. Trust me, it tastes nothing like that! Wait, is that a good thing? ;) This beef ragu was really delicious. I don’t think I cooked the veggies enough because they were still crunchy so I would suggest cooking them a bit longer. Other than that, my husband approved. He likes meat, meat and more meat. This was perfect for him to come home to one day after work. I also think this would go really well with some homemade garlic bread. Although it does take a little bit of time to simmer, I know that it is worth it.

Hearty Beef Ragu
Adapted from: Confections of a Foodie Bride, originally Williams-Sonoma
Serves: 6-8

2 Tbsp olive oil
1 small yellow onion, finely chopped
3 garlic cloves, minced
1 carrot, finely chopped
1 tsp rosemary
1 lb ground beef
2/3 cup cranberry juice (or red wine)
3 Tbsp tomato paste
2 ½ cups canned crushed tomatoes
1 tsp salt
½ tsp freshly ground pepper
1/3 cup parmesan cheese, grated
1 lb pasta shapes (penne, rotini, etc)
1/2 tsp freshly ground pepper
Heat olive oil in large stock pot over medium-low heat. Add onion, garlic, carrot, celery and rosemary. Cook until veggies are softened, about 10-12 minutes. Add 1-2 Tbsp water, if needed, to keep the pan from drying out and vegetables from browning. Add the ground beef, breaking up with a wooden spatula, and cook until browned, about 10 minutes. Add cranberry juice (or wine) and tomato paste. Cook, stirring occasionally, until most of the liquid has evaporated, about 5 minutes.

Reduce heat to low and add tomatoes, salt and pepper. Cover partially and cook, stirring occasionally, until the sauce is thick, about 30-40 minutes. Add the parmesan cheese for the last 5-10 minutes of cooking.

Before the sauce is finished, cook the pasta according to the package instructions. Drain the pasta and add to the stock pot with the sauce. Mix well to combine and season with salt and pepper as desired. Serve warm.

Wednesday, March 9, 2011

White Cheddar Chicken Pasta


My husband has been the most supportive person in the entire world during the first half of my pregnancy. He has put up with mood swings, the occasional stomach ache, and my constantly-changing body (and not in the ‘honey I’m getting a six pack’ kind of way). I absolutely love him for that and for always paying attention. His memory is ten times what mine is. When I sent him to the grocery store to get some white cheddar cheese, all of it was unpasteurized except one. He remembered that our OB’s office told me to never eat unpasteurized cheese (I miss real queso). What an amazing husband I have!

I needed white cheddar cheese, shredded, for this recipe and it only comes in blocks. I guess almost all grocery stores keep them near the deli counter instead of where the general shredded cheese is. This kind of cheese and the way it melts is really the only kind of cheese I would recommend for this dish. It really gave a great taste to the chicken and pasta. The spices really kicked it up a notch, especially for my husband who loves spicy foods. This is a perfect weeknight meal to take for lunches in the days after cooking it. It keeps well and still tastes great!

White Cheddar Chicken Pasta
Adapted from: Homemade by Holman
Serves: 4-6
For the chicken
1 lb boneless, skinless chicken breasts, cut into 1-inch pieces
¼ tsp mustard
1 Tbsp thyme
½ tsp salt
½ tsp freshly ground pepper
1 Tbsp olive oil

For the Pasta:
1 lb short-cut pasta (bowtie or rotini)
2 Tbsp butter
2 Tbsp all-purpose flour
2 cloves garlic, minced
1 small onion, finely diced
1 Tbsp Dijon mustard
8 oz sharp white cheddar cheese, grated
2 cups milk
1 Tbsp thyme
1 Tbsp oregano
Crushed red pepper flakes, to taste
Grated parmesan cheese, to taste

Heat olive oil in large skillet over medium heat. Mix together mustard, thyme, salt and pepper. Sprinkle spices onto both sides of raw chicken pieces. When the pan is hot, add the chicken and brown about 3-5 minutes per side until cooked all the way through. Set aside on a plate and cover to keep warm.

Melt butter in large skillet over medium heat and add flour. Whisk to combine. Add wine, garlic, onions, and mustard and cook about 5 minutes, until onions are translucent. Reduce heat to low and slowly add milk, stirring to combine. Cook about 5-7 minutes more until mixture begins to thicken. Add cheese and stir well to melt.

Meanwhile, cook pasta according to package directions. Once everything is warmed and cooked through, add together in the large skillet with the cheese mixture. Add thyme and oregano and toss well to incorporate. Serve warm and top with parmesan cheese and red pepper flakes as desired.

Wednesday, February 16, 2011

Chicken Pot Pie, revisited

I've made this pot pie before. It is one of our favorite dinners of all time! I just wanted to share it again just so that it doesn't get lost in the archives. We really do have to restrain ourselves from eating it more than once a month. Yup, it's that good! One thing both my husband and I will not eat (ever) is peas. Normal chicken pot pie contains peas, but I substituted the corn and it has been a fantastic replacement. If I were to reccomend any weeknight dinner, this would be at the top of my list. One thing I might experiment with in the near future is purchasing some large rammekins and making individual pot pies.

Chicken Pot Pie
Adapted from: All-Recipes
Yields: One 9-inch pie

1 lb boneless, skiness chicken breasts (cubed)
1 cup sliced carrots
1 cup frozen whole kernel corn
1/2 cup celery, chopped
2 tbsp butter
1/3 cup chopped onion, minced
1/3 cup all-purpose flour
salt and pepper, to taste
1/4 tsp celery seed
1 3/4 cup chicken broth
2/3 cup milk
2 unbaked pie crusts

Preheat oven to 425 degrees. In a stock pot, combine chicken, carrots, corn, celery and add water to cover and boil for 15 minutes. Remove from heat and set aside. About halfway through, heat a medium sauce pan over medium heat cooking the butter and onions until soft, about 5-7 minutes. Stir in flour, salt, pepper, and celery seed. Then, slowly stir in chicken broth and milk. Simmer over medium-low heat until thickened, about 8 minutes.

Unfold one pie crust into greased pie pan and place chicken mixture in. Then, pour liquid mixture on top making sure nothing overflows. Place second crust flat on top and cut off excess dough from edge of pan. Then, fold top and bottom crusts together and into a zig-zag (fluted) pattern. Cut slits on top crust for ventilation and bake for 25-30 minutes, until crust is golden brown.

Monday, February 14, 2011

Lobster Tails


Happy Valentine's Day! I don't celebrate this holiday, but I do recognize that a lot of other people do. Here is a wonderfully easy and yet fancy dinner for that special someone tonight! Seafood is one thing that I've always struggled to be able to eat. Crustacean (lobster, crab legs, etc) was always my one exception. I'm not a big fish eater but crab legs and lobster tail .. sign me up! I have never ever braved making lobster tail mostly because I was very intimidated. Ironically this was one of the easiest dishes I've ever made! It only takes about 8 minutes to cook and 5 to prepare. I had to start my side dishes long before I even got the meat prepared.

* Any crustacean goes well with clarified butter. First, melt salted butter stovetop and spoon off the top layer of fat. So easy and very much worth it! Because this was so much fun to make (and interesting), I decided to take step-by-step photos:

First, place the lobster onto a cookie sheet lined with foil. Preheat the broiler on high.


Next, cut a slit along the length of the top of the shell with a pair of kitchen scissors.


Then, gently pull the meat away from the sides and bottom of the inside of the shell. Once completed, you can pull out most of the meat and place on top of the shell. Spread a little melted butter on the meat.


Broil for 6-9 minutes (depending on size) on the second highest oven shelf position until lobster is opaque throughout.


Lobster Tails
Adapted from: Annie's Eats

lobster tails (we chose 5 ounce)
butter

First, place the lobster onto a cookie sheet lined with foil. Preheat the broiler on high. Next, cut a slit along the length of the top of the shell with a pair of kitchen scissors. Then, gently pull the meat away from the sides and bottom of the inside of the shell. Once completed, you can pull out most of the meat and place on top of the shell. Spread a little melted butter on the meat. Broil for 6-9 minutes (depending on size) on the second highest oven shelf position until lobster is opaque throughout. *Serve with clarified butter (see above).

Monday, February 7, 2011

Sloppy Joes


Sloppy Joe dinners are usually my I don’t feel like cooking and nothing sounds good dinners. Lucky for us, we both love sloppy joes anyways. I have never even attempted to make it homemade because the can is so good and so inexpensive that it would be much more cost effective (even with health reasons) to just use the can. When I saw this recipe in my google reader, however, I had to try it at least once. It came out tasting good, it was just less salty. I liked that part of it even though it took longer because with a can you just plop it in there and heat. Don’t worry though, it didn’t take that much longer. I also think the cost effectiveness outweighs the taste benefits. Don’t misunderstand me: it’s good, but just not quite the same taste as the can. It’s definitely worth trying though!

Sloppy Joes
Adapted from: The Cooks Next Door
Yields: 6-8 servings

1 lb ground beef
½ cup onion, diced
½ cup green pepper, diced
1 can petite diced tomatoes (15 oz)
1 can tomato sauce (8 oz)
3 Tbsp quick-cooking oats
1 Tbsp Worcestershire sauce
2 tsp chili powder
1 tsp garlic powder
1 tsp brown sugar
½ tsp seasoned salt
Dash cayenne pepper

Brown ground beef until halfway cooked throughout. Add onion and green pepper and cook until meat is no longer pink. Add all other ingredients and simmer for 20-30 minutes. Serve on hamburger buns immediately.

Wednesday, February 2, 2011

Traditional Crust Pizza


I know I haven't been the most consistent blogger lately and I sincerely apologize! I have lots of great recipes in the near future coming though. We have already tried a bunch and they are delicious! Pizza, however, is always a favorite in this household. I love that you can put anything on top and make it specific to your taste. My husband prefers simply meat and extra cheese. I prefer veggies of all sorts and a little meat here and there. One topping I've come to love is mild pork sausage. It gives the pizza some extra kick and tastes much better than traditional, tasteless sausage (make note, Hungry Howies). This recipe is very simple and the hardest part is waiting for the dough to rise.

Traditional Crust Pizza
Adapted from: Annie's Eats (crust)
Yields: 1 large, 8-slice pizza

1/4-1/3 cup tomato sauce
1 tsp sugar
4-5 cups mozzarella cheese
toppings of your choice (sausage, peppers, etc)

Preheat the oven with a baking stone in it to 350 degrees. While the oven is heating up, roll the pizza crust out onto a well-floured surface into a circle so it's about 1/2-inch thick. Place the crust on top of the heated pizza stone. Pour the tomato sauce on top of the crust and spread evenly leaving around a 3/4-inch diameter around the edges for the crust to rise. Sprinkle the sugar on top of the sauce. Sprinkle the cheese on top of the tomato sauce being sure to cover evenly and completely. Add toppings of your choice and bake for 15-18 minutes for a soft, but firm crust. Allow pizza to cool slightly. Cut and enjoy!