Showing posts with label favorites. Show all posts

Monday, January 6, 2014

Bacon, Egg, and Toast Cups, revisited


This is a recipe I've made and posted in the past, but I wanted to revisit it. It deserves a much needed revamped picture and is so delicious and easy that it needs to be known. I love these little cups because they have all of your breakfast necessities in one: dairy, protein, and bacon. (All of the important food groups.) Haha. But seriously, they are so delicious you will want to make more than 6 if you plan on sharing. They tend to go fast and are very addicting!

Bacon, Egg and Toast Cups
Adapted from: Annie's Eats, originally The Noshery

6 pieces of bread
6 bacon slices
4-5 eggs (beaten if you like scrambled eggs)
shredded cheese
salt and pepper

Preheat the oven to 400 degrees F. Meanwhile, cook bacon on medium-high heat for about 6-8 minutes on each side to slightly cook (you still want them to be flexible). Place bacon on plate with paper towels to cool. While the bacon is cooling, cut out a 3-inch round out of the bread slices.

Take the bacon pieces and wrap them around the edges of the bread. Then, place the round bread pieces in each of 6 greased muffin cups so that it forms a little bowl. Note: The bread WILL stay in the muffin cups since it's not toasted yet. I was somewhat skeptical of that. Next, pour the egg into it until it almost fills up and sprinkle with cheese on top. Bake for 10-15 minutes, or until the egg is done (will not be liquid anymore).

Sprinkle with salt and pepper, to taste, and serve immediately!

Wednesday, October 9, 2013

Oven-Baked French Toast


My family was tired of the traditional pancakes (from scratch, I might add) that I usually make for weekend breakfast. We just needed something different, so over to Pinterest I went. I found this amazing recipe for baked french toast that is quick, easy, and uses regular bread. 

Yes, regular bread.

French toast usually requires Italian bread or some other kind you usually don't have lying around. This recipe is great because it uses your every day sliced sandwich bread you already have! I was skeptical as to how these would turn out but they were amazing and my 2-year-old loved them! They were soft yet firm enough to be considered "finger food" which, let's face it, is a toddler's favorite kind of food. Best part is they take about 6 minutes to cook (and probably only 5-10 minutes to prep). 

Easy peasy jungle breezy! (Wow. Too much Mickey Mouse Clubhouse.)


Oven-Baked French Toast
Yields: 20 small slices; serves 4
Adapted from: A Beautiful Mess

Ingredients

4-5 slices of bread
3-4 eggs
2 Tablespoons cream (or half & half, or milk)
1/2 teaspoon vanilla extract
Cinnamon
Cinnamon & sugar mix (your preference)

Directions

Preheat broiler on low setting and place top rack about 3-4 inches from top of oven.

Mix the egg, cream, vanilla, and a generous sprinkle of cinnamon to a shallow baking dish. Mix well. Slice bread into 4 equal slices, lengthwise and quickly coat on both sides with the egg mixture. Allow excess to drip (being careful to not allow the bread to tear) and place on a prepared baking sheet. I use a Silpat mat but you can grease your baking sheet if you don't have one. NOTE: DO NOT USE PARCHMENT PAPER.

When all slices are lined on the baking sheet, sprinkle some cinnamon sugar mixture on top. Place under the broiler (low setting) for 2-3 minutes or until the egg is cooked and sugar is starting to caramelize. 

Remove pan from oven and flip sticks onto other side and sprinkle with more cinnamon sugar topping. They will stick well to the Silpat mat so be careful when flipping. Broil an additional 2-3 minutes and serve warm.

Friday, June 1, 2012

Graham Crackers


Graham crackers never get old in my opinion. Plain, cinnamon sugar, chocolate. They're all so good! With summer here, it's s'mores season. Yup, I said it. I know we all daydream about a sunset at home with a toasty marshmallow sandwiched between a piece of chocolate and two tasty graham crackers. (crickets) Oh, that's just me? Oh, well that's my dream at least. Anyways, I found several graham cracker recipes and the one on this website looked the best, and had the best variety of common ingredients, or so I thought. 

The day I decided to make these, I couldn't find my whole wheat flour and realized last-minute that I didn't have half of the other ingredients (honey, molasses, etc) so I improvised. When I say improvise, I use that term very loosely. I Googled the crap out of "x substitute" recipes. I decided to give this recipe a try with some odd combinations of ingredients based on the original. Guess what?! They turned out JUST like the store-bought ones, only slightly a lot less stale. Delicious! My 11-month-old also loves them to gnaw on since he's teething and he loves his crackers. These would be a great toddler snack!

Graham Crackers
(Loosely) Adapted from: Confections of a Foodie Bride
Yields: 40 crackers

2 cups plus 3 Tbsp. all-purpose flour *
1/4 cup wheat bran *
1/2 tsp. salt
1/2 tsp. baking soda
4 Tbsp. butter, at room temperature
1/2 cup granulated sugar
1/4 cup plus 2 Tbsp. light corn syrup (or honey)
2 Tbsp. maple syrup
1 egg

Whisk the dry ingredients together and set aside.

In a stand mixer fitted with the paddle attachment, cream together the butter and sugar. Add the corn syrup and maple syrup just until incorporated. Add the egg and beat for another minute. 

With the mixer on low speed, add the dry ingredients in 3 equal batches, mixing well in between. Wrap the dough tightly in plastic wrap at least 4 hours, or overnight. 

When ready to bake, preheat the oven to 325ºF.

Divide the dough into two equal halves. Roll one half onto a lightly floured surface until very thin. The crackers will puff slightly in the oven and the thinner they are, the crunchier they become. (I'm talking 2-4 mm thick here, people.)

Cut the dough with a dough cutting tool or pizza cutter to desired shape and size. Prick a fork into the top, centers of them to prevent too much puffing.

Bake for 12 minutes, or until starting to brown. They will be very soft, but will harden when cooling so leave them to cool completely on the baking sheet. Store in an airtight container. 

* Instead of using all all-purpose flour, you may substitute and use 1 1/2 cup whole wheat flour + 3/4 cup plus 3 Tbsp. all-purpose flour, just omit the wheat bran. 

Tuesday, May 29, 2012

Strawberry Banana Muffins


For the past few summers (and since starting this blog), I've always wanted to go strawberry picking. This was my first summer doing so and I absolutely loved it! My 11-month-old had a blast (eating too many, probably) and we are all enjoying having all of the strawberries around! These muffins were the first recipe I tried with our strawberries from Spencer's Farm. It was an older recipe from Annie's website but nonetheless I knew it wouldn't disappoint.

Normally I have a pretty big sweet tooth so these muffins, at first bite, were a little on the dry side. I think next time I might add a tiny bit of cinnamon sugar to the top before baking. Or I'm sure more strawberries couldn't hurt. Nobody ever complained about too many strawberries. None of my friends anyways. ;) These are a great breakfast and my son really enjoyed them as well!

Strawberry Banana Muffins
Adapted from: Annie's Eats
Yields: 12-14 muffins

3/4 cup light brown sugar
2 eggs
1 tsp. vanilla extract
2 large, ripe bananas, mashed (about 1 cup)
1/2 cup (1 stick) unsalted butter, melted
2 1/4 cup all-purpose flour
1 1/2 tsp. baking powder
1/4 tsp. baking soda
1 tsp. cinnamon
1/4 tsp. salt
1 cup fresh or frozen strawberries, chopped

Preheat oven to 350ºF and grease a muffin tray. Set aside.

In a medium bowl, whisk together the brown sugar, eggs, vanilla extract and banana's. Add the melted butter and mix to combine.

In a separate large bowl, combine the flour, baking powder, baking soda, cinnamon, and salt. Fold in the strawberries and toss to coat them well. (This prevents the strawberries from sinking during the baking process.)

Add the wet ingredients to the dry ingredients, just until combined. Do not over-mix.

Fill each muffin cup about 3/4 full of batter and bake for 20-25 minutes,  until a toothpick comes out clean. Allow muffins to cool slightly and transfer to a wire rack to cool.

Saturday, May 19, 2012

Pork Baby Back Ribs


Ribs are something I really didn't enjoy growing up. (I know; you're sensing a theme here, huh.) I've always been a picky eater and when it came to ribs I only ate my step-dad's ribs. He would slow-boil them all afternoon with some special juices and they would almost fall off the bone. They were perfect! I have tried for a while now to improve my ribs, but not have to stay in the kitchen all afternoon while they cook. I have to say that this recipe is one of the best. I've tested crock-pot recipes and stove-top and this is what I've found to make the perfect baby back ribs!

Pork Baby Back Ribs
Adapted from: Kelly's Kitch original
Yields: 1 rack; 3-4 servings

1 rack baby back ribs
juice of one lime
juice of one lemon
Sweet Baby Ray's BBQ Sauce

Cut the ribs every two bones to separate them. Place into a large pot or dutch oven and fill with enough water to cover, plus a little extra. Stir in the juices, lemon and lime halves, and bring water to a boil stove top. Once water is slowly boiling, turn the temperature down to medium-low and allow to simmer for 1-2 hours (or however long you can allow). 

Once the ribs are cooked, remove them from the water and slather with BBQ sauce. NOTE: If you make these a day ahead of time, you can store the cooked BBQ ribs in an airtight container overnight and cook the next evening. This gives the ribs a chance to soak in some of the sauce. 

Place ribs on a grilling tray lined with foil and cook on the grill on medium heat for about 10-15 minutes, flipping halfway. Since you've already cooked the ribs stove top, all you're doing on the grill is giving them a bit more flavor and reheating them. 

They will be tender, but not completely fall apart. Add more BBQ sauce as desired and enjoy!

Friday, January 6, 2012

Biscuits & Gravy


Growing up I was told my mother made the best biscuits and gravy, but I wouldn't know because I was too afraid to try them. Gravy for breakfast always made me cringe and I wasn't a huge fan of sausage either so it made sense that I never tried it. I'm saddened now about all the great food I've missed out on, including this!

I got this recipe from my husband's best friend's mother (still following? me either). She apparently makes biscuits and gravy so good there's never any leftovers. I got some tips from her about what ingredients to use and not use and this amazing breakfast is what I came up with. I would suggest making Bisquick Biscuits, unless you have a great, fluffy breakfast biscuit recipe. The ones I made from here (without the chives) were flat and not very tasty, although they were very flaky so it made for some good biscuits for these, in my opinion.


Biscuits & Gravy
Adapted from: Kelly's Kitch original
Yields: 4 servings

1 pkg buttermilk biscuits (Bisquick)
1 lb pork sausage
1/2 cup 2% or whole milk
1-2 cups all-purpose flour
salt and pepper, to taste
 
Bake the biscuits according to package directions. Meanwhile, brown the sausage in a large skillet over medium heat. Once cooked through, add the 1/2 cup of milk to the pan and mix briefly. Add the flour in 1/4-cup increments, mixing constantly, until the gravy is your preferred consistency. We used about 1 1/2 cups. Add salt and pepper as desired and serve immediately with biscuits.

Friday, December 23, 2011

Pasta alla Vodka


Are you needing an easy week night dinner that tastes like you've been slaving for hours? Look no further! This amazing dish has by far the absolute best sauce I've ever made! I made it twice, but it was still too involved and, per my husband, required too many dirty dishes for clean-up. The second try I think was the better of the two recipes! This is so creamy and delicious that I am thinking it might be on our weekly menu. I'm sure the liquor store will think we have really taken a liking Vodka when we keep coming back for it.

Pasta alla Vodka
Adapted from: Annie's Eats, originally Cooks Illustrated
Yields: 5 servings

16 oz dried pasta shapes
2 Tbsp olive oil
1/4 cup minced onion
1 Tbsp tomato paste
2 garlic cloves, minced
1 tsp red pepper flakes
1 can crushed tomatoes (15 oz)
1/4 cup water
1/2 tsp table salt
1/4 cup vodka
1/2 cup heavy whipping cream
1/4 cup reserved pasta water, if needed
2 Tbsp finely chopped fresh basil leaves
freshly grated Parmesan cheese, for topping

Cook pasta according to package directions until al dente and drain, reserving 1/4 cup pasta water. Meanwhile, heat the olive oil in a large skillet over medium-high heat until shimmering. Add onion and tomato paste and cook until onion is softened, about 3 minutes. Mix in garlic and red pepper flakes until fragrant, about 30 seconds.

Pour the crushed tomatoes into a 2-cup liquid measuring cup and add enough water to make it 2 cups (about 1/4 cup of water is necessary). Add this and the salt to the pan with the onion mixture. Remove pan from heat and add the vodka. Return pan to heat and simmer briskly on medium heat until alcohol cooks off, about 10 minutes. Reduce the heat if simmer becomes too brisk.

Stir in the cream and cook an additional 1 minute, being sure to not cook too long or else the sauce will separate. Add the pasta to the pan with the sauce and toss well. Cook on medium-low heat for about 3 minutes to allow the sauce to be absorbed by the pasta. If the pasta seems to thick, add some of the reserved pasta water. Both times I used all of the 1/4 cup and it made the dish much more creamy! Add the basil and top with Parmesan cheese when serving.

Tuesday, December 20, 2011

Mashed Potatoes


I've never really had a go-to mashed potato recipe, unless you call a box a "recipe." I was so sick and tired of taking the time to make instant mashed potatoes (that by the way are disgusting anyways), when I could have made them fresh in the same amount of time. My motivation to find the perfect recipe was jump-started by my mother bringing over bags of potatoes. What else could I do but make mashed potatoes and potato salad (recipe to come soon-ish.. hey, I'm being honest). These are so quick and the only time-consuming part is chopping the potatoes, but what else are you going to do while the water starts to boil?!

Mashed Potatoes
Adapted from: Kelly's Kitch original
Yields: 4-6 servings

6-8 medium-large russet potatoes, peeled and diced
1/4 cup shredded cheese, cheddar
2 Tbsp sour cream
2 tsp garlic powder
1/4 cup milk
4-6 Tbsp butter, depending on taste, at room temperature

Bring a large pot of water (1/3 of the way full) to a boil and add potato dices. Boil on medium-high until softened and a fork can easily pierce the potato all the way through. When potatoes are done cooking, drain in a strainer and return to the pot. Add cheese, sour cream, and garlic powder. Beat with hand beaters on low speed until cheese is melted and potatoes are the right consistency.

While beating, slowly add the milk a little at a time until potatoes are at the consistency of your preference. Do NOT over-beat the potatoes to get every single chunk out because they will become too starchy. Add the butter one tablespoon at a time with the beater and taste after each addition. Add more or less depending on your taste. Serve immediately.

Sunday, December 4, 2011

Caramel Pumpkin Cheesecake


There isn't much I can say about this cheesecake that isn't already plainly obvious in the pictures. Other than my cracks, but I kinda like my cheesecake cracks. This cheesecake was so delicious and the pumpkin flavor really wasn't all that overbearing, which is fantastic since (confession time) I don't like pumpkin. I made this for Thanksgiving and I was in charge of something pumpkin for dessert. Pumpkin pie is too strong and bland for that matter so I decided to do something rich, creamy, and that would "wow" my husband's family. Wow, it did.

Next time I think I'll try it without the caramel topping (at least on top) since it stuck to everything and I think it would have been a tad bit less rich that way. I'm all for sweets, but I think Ree has a seriously unnatural sweet tooth. ;) Not that that's a bad thing...


Caramel Pumpkin Cheesecake
Adapted from: Pioneer Woman
Yields: 1 large cheesecake (12")

For Crust

12 ounces, weight store-bought gingersnaps
½ cup chopped pecans
6 Tablespoons butter, melted
2 Tablespoons brown sugar
1 dash salt

Filling

4 x 8 oz packages cream cheese
1 ½ cup sugar
1 can pumpkin puree (15oz) or 1 cup homemade
1 teaspoon ground cinnamon
1 teaspoon allspice
½ teaspoon nutmeg
4 eggs
2 Tablespoons heavy whipping cream
1 jar (about 12 oz) caramel topping, optional
Extra chopped pecans
Extra crushed gingersnaps

Crush gingersnaps in food processor or a Ziploc bag with a mallet. Add chopped pecans, melted butter, brown sugar, salt and pulse (or mix) until combined well. Mixture should stick together, but barely. Be sure it’s not too soggy. Press into bottom and sides of a greased 12-inch springform pan. Chill in fridge for 20-30 minutes.

While crust is chilling, make the filling by beating cream cheese and sugar in a bowl until light and fluffy (this is where a stand mixer is really helpful). Add pumpkin, spices, and mix again. Add the eggs one at a time, allowing each one to mix with cream cheese mixture for at least 20 seconds. Add cream and mix until just combined.

Remove crust from fridge and pour ½ jar of caramel topping on crust, if using. NOTE: Reviews on PW website indicate the caramel can harden sometimes, however I used the same brand she did and mine turned out great. Sprinkle caramel with extra chopped pecans. Gently pour the cheesecake mixture into the pan. Even out the top with a spatula.

Bake at 350°F for no less than 1 hour 15 minutes, or until no longer soupy. It should still be somewhat jiggly in the middle though. I baked mine quite a bit longer, but then again the recipe called for a 10-inch pan and mine overflowed.

Cool on the counter for 30 minutes and pour the rest of the caramel topping on top of cheesecake, if using. Smooth out with spatula and chill for at least 4 hours, or overnight. It said to cover the cheesecake, but be careful because the caramel sticks to EVERYTHING.

When ready to serve, remove the rim from the pan and slice. Sprinkle with extra crushed gingersnaps, if desired. The best way to slice a cheesecake is with a knife that has been run under hot water for a few seconds on each side. After each slice, clean the knife off with the hot water and slice again. Sounds tedious, but it makes the best (and most beautiful) slices!

Tuesday, November 8, 2011

Classic Apple Pie, revisited


Apple pie is the quintessential all-American dessert; in my eyes it is anyways. Pumpkin pie just doesn't do it for me, even after an amazing Thanksgiving dinner. This year what was I elected to bring? Pumpkin pie. *shudder*

What am I bringing in addition to (yes, I follow directions) the pumpkin pie? THIS! It's my mom's recipe handed down from generations who've made this amazing dish before. I made it last year for the Fourth of July and my husband's friends were amazed it was completely homemade. Needless to say, it was eaten quickly and next time I'll have to make three pies. If you're looking for a classic and delicious pie for Thanksgiving or any occasion (ah hem, week night cravings), this is it!!


Classic Apple Pie
Kelly's Kitch original
Yields: 8 slices; 1 9-inch pie

3/4 cup sugar
1/4 cup flour
1/2 tsp cinnamon
1/2 tsp nutmeg
7 medium to large apples, peeled and sliced (or chopped)
3 tbsp butter or margarine
3 tsp lime or lemon juice
2 nine-inch pie crusts

Grease a 9-inch pie plate and place an unbaked pie crust  into it. Stir together sugar, flour, cinnamon and nutmeg in large bowl. Mix in apples until mixture is paste-like. Place mixture into greased pie pan lined with pie crust.

Cut the butter into pea-sized portions and lay on top of the apple filling. Squeeze a little lime juice on top. Cover with the second pie crust and fold edges over and make into zig-zag (crust) pattern. Cut 6-8 slits in the top of the pie crust about an inch long. Sprinkle top crust with cinnamon.

Cover the edges of the crust with foil and bake for 30 minutes at 425°F. Remove foil and bake another 15-20 minutes, until crust is golden brown.

Friday, October 28, 2011

Halloween Royal Icing Sugar Cookies


I've made so many batches of these royal icing sugar cookies that I can now almost do it without a recipe. Well, at least the icing I can. For these scary Halloween cookies, I simply made a small batch of white royal icing and piped the ghosts, then dyed the excess orange with two drops yellow food coloring and one drop of red food coloring. It makes the perfect color orange! Once those dried, then I filled them in with a larger batch of icing, again starting with the white.

On a side note, a good friend of mine told me to just put some powdered sugar and a small teaspoon (or less) of meringue powder in a bowl. Then, slowly add a small amount of water at a time. If it gets too watery, add more powdered sugar. This will be your basic white color. I know most people use Wilton's coloring, but I have used it before and personally I think it tastes horrifyingly awful (words cannot describe how much I dislike them). Using basic food coloring actually doesn't change the consistency of the icing. If you feel like it is too watery from that, then just add a little more powdered sugar; no harm done!

Before the icing was dried I sprinkled the orange and black sugar sprinkles on the pumpkins and put red hots on the ghosts for eyes. Use what you have in your pantry! I had these sprinkles and red hots from previous recipes so I thought I'd use them up before they went bad. Be creative and have fun this Halloween!


Thursday, October 20, 2011

Southwestern Stuffed Peppers, revisited


I've made these stuffed peppers in the past and this is a great dish that my husband and I always love to have for dinner. It's quick enough for a week night and easy enough to double if you're having some guests over. We love these as leftovers, too, since they keep well and reheat great. If you're in the mood for Mexican but don't want to spend an hour (or two) making a huge, fancy, complicated dish, then this is your recipe!

From this post forward, I've added a new tag on the right-hand side of the page: leftover-approved. This will be for any dinner (or meal-item) that is approved by myself and/or my husband to eat for leftovers. Some things really do not keep up well after being in the fridge and then the microwave. Hopefully this will help with week night meal selection!

Southwestern Stuffed Peppers
Adapted from: Homemade by Holman
Yields: 4 servings

1/2 lb ground beef
1 tsp ground cumin
1/2 tsp chili powder
1/4 tsp cayenne pepper
1 cup black beans, drained and rinsed
1 cup corn
1/2 cup red onion, diced
1 can diced tomatoes (option w/chiles), undrained
1/2 cup brown rice, uncooked
4 bell peppers, any color
1 cup cheddar cheese, shredded
1 lime
1/4 cup cilantro, chopped (optional)
sour cream, (optional)

Preheat oven to 350°F. Cook rice as directed and set aside. Meanwhile, brown ground beef in a large skillet on medium-high heat and crumble as it cooks. Add 1/2 tsp cumin, 1/4 tsp cayenne and 1/4 tsp chili powder. Mix well and add diced tomatoes, reducing heat to medium low. Add onions, black beans, corn and simmer until rice is cooked and softened.

Meanwhile, prepare peppers by cutting in half lengthwise (top to bottom) and removing stem, seeds, etc. Rinse and set in a large glass baking dish. Add 2 tbsp water to bottom of dish.

When rice has cooked thoroughly, add 1/2 tsp cumin and 1/4 tsp chili powder and mix well. Stir into the ground beef mixture and add half the cilantro, if using. Spoon filling into pepper halves. Squeeze lime juice on top of stuffed peppers. Cover pan with foil and bake for 20-25 minutes. Uncover (peppers should be softened) and sprinkle on cheese and continue cooking an additional 5 minutes until cheese is melted. Top with remaining cilantro and sour cream if desired.

Thursday, October 6, 2011

Thai Chicken, revisited


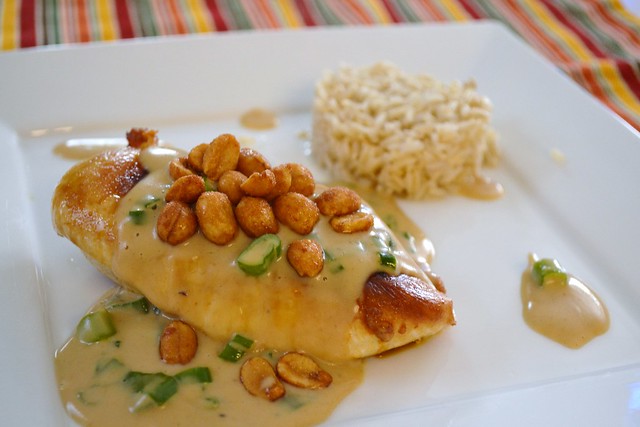
This Thai chicken is something my husband requests often. I have a really tough time saying no because it's an amazingly easy and delicious dish, and because it's my husband. The only thing I don't like about this recipe is that it has chives in it. Don't get me wrong, I love chives and without them, this dish wouldn't be nearly as tasty. On the other hand, I hate that they go bad so quickly. While at the farmers market a few weeks ago, a gentleman was selling me some chives and he said you can chop them and freeze them. WHY have I not thought of that before? There will be no more throwing bad chives out of this house again! I'm going to try some recipes with my newly frozen chives soon so I'll update how it went. So far they still look great though!

Thai Chicken
Adapted from: Biggest Book of 30-Minute Meals (Better Homes & Garden)
Yields: 4 servings

4 skinless, boneless chicken breasts (medium sized, 1-1.5 lbs)
4 green onions, cut into 1/2-inch pieces
1/4 cup creamy peanut butter
3/4 cup unsweetened coconut milk
1/4 tsp black pepper
1/4 tsp ground ginger
1 tbsp canola oil
1/4 cup honey roasted peanuts
In a small mixing bowl, combine coconut milk, peanut butter, ginger and pepper. Set aside.

In a large skillet, heat oil over medium heat and cook chicken breasts until cooked thoroughly. Remove from skillet and keep warm. Add green onions to warm skillet and cook for 1-2 minutes until tender. Stir in sauce mixture, stirring until bubbly. Remove from heat.

Place chicken on plate and spread sauce over top and sprinkle with peanuts to serve.

Thursday, September 29, 2011

Peanut Butter Cookies


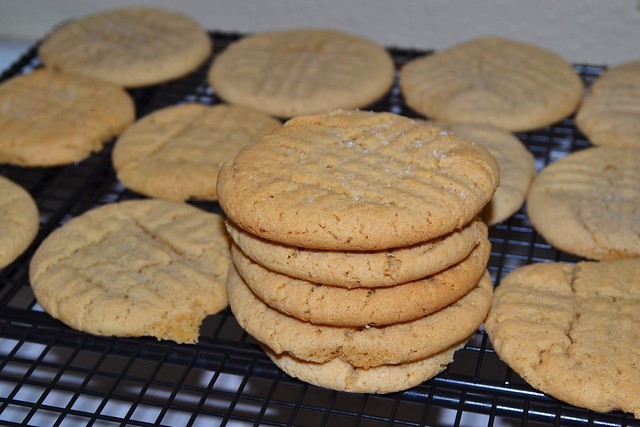
In one word: YUM! Peanut butter is one of my all-time favorite foods (okay, is it really a "food"). I have always had a love for peanut butter; we go way back. I have actually already made these cookies but in the previous attempt, I forgot some key ingredients. Those cookies were a little fluffy for my taste though. These cookies spread evenly and even kept the fork pattern I pressed into them, which takes me back to my younger days. I remember baking these peanut butter cookies often. They were so much fun to make. My mom would make the batter and put them on cookie sheets so I could press the fork into them. Loved it! These cookies haven't changed since then (albeit with a different recipe) and I am always getting compliments from friends and family about how great they taste!

As a side note, because I use light corn syrup for my sweetener, I use a honey-flavored peanut butter. This is not necessary, but really made these cookies stand out from other batches.

Peanut Butter Cookies
Adapted from: Annie's Eats, originally Taste of Home
Yields: 2-3 dozen cookies, depending on size

3 cups all-purpose flour
1 cup sugar
1.5 tsp baking soda
1 tsp baking powder
pinch salt
1/4 cup vegetable shortening
4 tbsp butter, room temperature
1 cup creamy peanut butter
1 cup light corn syrup (or honey)
2 large eggs
sugar, for sprinkling

In medium mixing bowl, combine flour, sugar, baking soda, baking powder and salt. Whisk together and set aside. Cream together shortening, butter, peanut butter and syrup (or honey). Mix in eggs one at a time being sure to incorporate well before adding the second. With mixer on lowest speed, slowly add in dry mixture little by little until blended well.

Preheat oven to 350°F. Roll dough into 1-1.5 inch balls and place onto greased cookie sheets and slightly flatten with fork to make a cross-section design (see original recipe link for picture). Sprinkle with a little bit of sugar on the flattened cookies. Bake for 12-15 minutes until they are golden. Since they are peanut butter cookies they don't change color too much so don't over-cook them. Allow cookies to cool for about 5 minutes on the cookie sheet before transferring to wire racks to finish cooling completely. Serve with cold milk for best results! Store in airtight container.

Thursday, September 22, 2011

Ham & Cheese Sliders, revisited


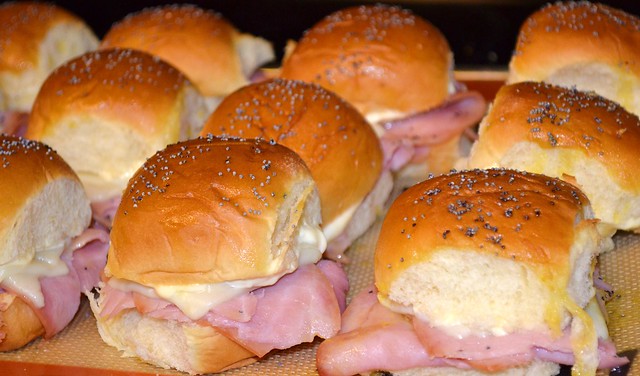
I have made these sliders before, usually during baseball season, but these little sandwiches are so easy to put together we make them a lot now. With football season well under way (and since I'm participating in fantasy football this year), neither one of us ever want to cook on Sundays. This is our perfect go-to meal nowadays since they involve no cutting boards and knives, pots or pans, etc. Put the few ingredients together and you've got dinner or snacks for a lot of hungry friends!! When I first made these I mentioned in my original post that I wasn't a huge fan, but I did eat them. Now I'm 100% on board and love these little sandwiches. I will probably try some kind of turkey combination soon, too!

Ham and Cheese Sliders
Adapted from: Annie's Eats, originally The Girl Who Ate Everything
Yields: 12 mini-sandwiches

For the sandwiches
12 slider rolls (I bought Hawaiian rolls and sliced them down the middle)
12 slices honey ham
12 slices Swiss cheese
mayonnaise

For the topping
3/4 Tbsp yellow mustard
4 Tbsp butter, melted
1/2 Tbsp finely minced onion
1/2 tsp Worcestershire sauce
poppy seeds, for topping

Preheat oven to 350°F. Start by placing the slider rolls on a baking sheet and slicing them, if needed. Slather on some mayonnaise on the top bun, as much as desired. Place a few small slices of ham and cheese on top of the bottom bun and place tops on sandwiches. Mix the sauce ingredients, except poppy seeds, and baste on the tops of the sandwiches. Sprinkle poppy seeds on top immediately. Cover baking sheet with foil and bake 10 minutes, until cheese has melted. Uncover and bake an additional 2 minutes. Serve warm.

Monday, September 19, 2011

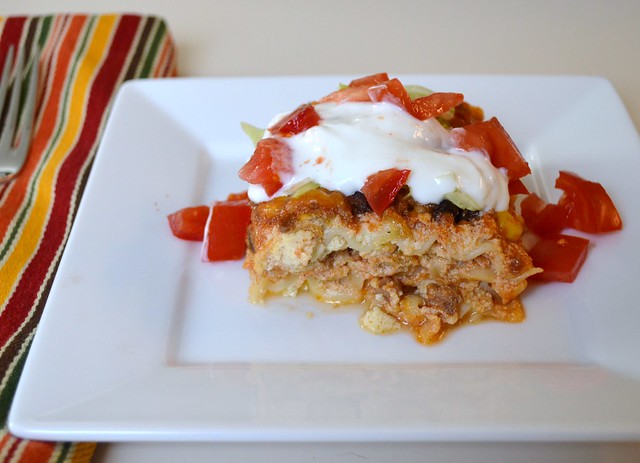
Southwest Lasagna


I've never really been one to be that adventurous when eating out at a restaurant (of any kind). I find something I like and I get it. Every time. I'm starting to try new things as my tastes "mature" so to speak. For example, I have always hated disliked meatloaf and lasagna when my mom made it for us growing up. I'm not sure why but I think it was just because they looked so gross and messy. At any rate I've grown to love them both. Partly because they are very inexpensive meals and have lots of delicious leftovers. Also, I think they are very flavorful and the type of dish you can change almost any aspect of and it would still turn out wonderfully. Hence why I chose a lasagna theme.

I saw this recipe in an old magazine (yes, I've been digging up oldies here lately). I just had to try it because it sounded amazing. A combination of two amazing things: Mexican food and lasagna!! It turned out amazing and I even took it for leftovers my first day back to work since Camden came into our lives. It was just as tasty as when I pulled it out of the oven! You can top it with chopped lettuce, tomato and sour cream but it really doesn't need them if you don't have any on hand.

Southwest Lasagna
Adapted from: Pillsbury
Yields: 8 servings

9 uncooked lasagna noodles
1lb ground beef
1 package (1.25oz) taco seasoning mix
3/4 cup water
1 jar tomato pasta sauce (28oz)
1 can black beans, drained and rinsed
9 oz frozen corn, at room temperature
2 tsp ground cumin
1 container ricotta cheese (15oz)
1 can chopped green chiles (4.5oz)
2 eggs
3 cups shredded Monterey Jack cheese

Preheat oven to 375°F and place a large, rimmed cookie sheet on the rack below middle oven rack. Spray a 13x9 casserole dish with cooking spray (use a deep dish if you have one). Cook and drain lasagna noodles per package directions. Rinse with cold water and drain well.

Meanwhile, cook ground beef in a large skillet over medium-high heat until brown. Drain and return to pan. Stir in taco seasoning mix and water. Reduce heat and simmer, stirring occasionally. Sauce should be thickened, about 5 minutes. Stir in pasta sauce, beans, corn, and cumin. Cook about 5 minutes longer, stirring occasionally, until heated throughout.

In a small bowl, combine ricotta, chiles and eggs.

To assemble lasagna, arrange 3 cooked and cooled lasagna noodles along the bottom of the greased casserole dish. Spoon and spread 1/3 of the ricotta mixture over noodles. Top with 1/3 of the meat mixture and then 1/3 cheese. Repeat layers topping with the cheese. Place dish on middle oven rack and bake, uncovered, 25-30 minutes, or until cheese is melted and bubbly. Let stand 10 minutes before serving.

Monday, September 12, 2011

Butterscotch Scones


It's starting to feel more like fall and you all know what that brings; cooler weather and pumpkin, well, everything! I am so excited this year to be spending Camden's first Halloween as a family. I remember last Halloween I had just found out that I was pregnant with him and here he is a year later, cute as ever! I'm not getting him a costume since he will only be 3 months old, but he does have a "My First Halloween" onesie for the day time and a cute sleeper for the evening. I swear this kid is so stylish. Anyways, in the fall I usually like to bake everything pumpkin and butterscotch. It's the time for chili's and stews. I LOVE this time of year!!!

This recipe is just the same as my chocolate chip scones, but they taste even better with butterscotch! I have also tried white chocolate which are to-die-for good as well. These definitely will get you and your family into the fall mood and won't disappoint! I would venture to say that 90% of the time, we have a bag of these in the freezer. Yup, they're that good!

Chocolate Chip Scones
Adapted from: Annie's Eats, originally Hershey's
Makes: 6 scones

1½ cups plus 2 Tbsp all-purpose flour
¼ cup sugar
2 tsp baking powder
pinch of salt
1 cup butterscotch chips (6 oz)
1 cup heavy cream
2 Tbsp butter, melted
additional sugar for sprinkling (optional)

Preheat the oven to 375°F. Line a large baking sheet with grease or a silicone mat. In a medium bowl, combine flour, sugar, baking powder and salt and stir to mix well. Add in the chocolate chips and fully incorporate them into the mixture. Add the heavy cream to the mixture and mix until dough forms and the dry ingredients are just incorporated. I did this by hand instead of my stand mixer and it turned out phenomenal.

Knead dough very briefly with well floured hands on a clean surface. Scoop rounds onto baking sheet or roll a circle out of the dough about 1/2-inch thick. Cut into triangles (like you are cutting a pizza) and place dough pieces on the baking sheet. Brush lightly with melted butter and sprinkle with additional sugar. Bake 18-22 minutes, until edges are slightly browned and center is cooked (using toothpick method).

Note about freezing: Only bake the scones you wish to eat right away. The best way to enjoy these scones throughout the week is to freeze them. Once you have shaped the dough pieces, wrap them in plastic wrap and place in the freezer in a ziploc bag.

The morning you wish to have a scone for breakfast, preheat the oven to 375°F and cook on the baking sheet and silicone mat for 20-23 minutes. No need to brush the butter and sugar on top. The frozen ones actually tasted better than the fresh so doing this will ensure a warm, fresh breakfast.

Friday, September 9, 2011

Charred Corn Salad


Even though summer is coming to a close, I usually stock up on fresh corn on the cob for the winter. There is a local grower who I frequently purchase from at the farmer's market and their corn is substantially better tasting than any I've ever had before; hands down. I love fresh corn in the winter and the frozen and canned corn just isn't the same. Most of you are probably thinking I'm a little crazy for thinking this kind of corn is better, but when you bite into that juicy wonderful cob .. you know. Anyways, I saw this recipe on my new favorite show, Kelsey's Essentials, and just had to try it out. It looked amazing, but it tastes even better! This would be a great addition to any late summer hurrahs. Or it has made a wonderful side dish for my lunches lately. :)

Charred Corn Salad
Adapted from: Kelsey Nixon (Cooking Channel)
Yields: 4-6 servings

3 ears of corn, shucked
1-2 Tbsp canola oil
salt and pepper, for seasoning
3/4 cup packed, fresh basil leaves
1 clove garlic, grated
1/8 cup cider vinegar
1/8 cup extra virgin olive oil
8 oz cherry tomatoes, halved (almost a full 10-oz container)
1/4 small red onion, chopped

Preheat a grill pan, grill or broiler on high heat. I chose the broiler and it took a while, but it was a good alternative to grilling since it's so cold outside. Brush or rub the corn cobs in the canola oil and season with salt and pepper. Place the corn on the grill until charred, about 2-3 minutes, on each side (longer if using the broiler). Once the corn has charred, set aside to cool. Once cooled, stand each ear up inside of a wide, shallow bowl. Cut the kernels off of the cob with a sharp knife. Keep kernels in bowl and set aside.

Meanwhile, combine basil and garlic in a blender or food processor and pulse until it starts to chop up a little. Add vinegar, continue pulsing, and slowly add in the olive oil. Continue to pulse until mixture is smooth. Note: There will be small pieces of basil; this will not completely liquefy.

Add the basil mixture to the bowl with the corn kernels. Add onion and tomatoes and toss well to combine. Taste and season with salt and pepper as needed.

Monday, September 5, 2011

Berry Pie Pops


Happy Labor Day to everyone! I am enjoying a very relaxing day at home with my two-month-old son and husband. We had a lovely pancake breakfast, but we really needed something festive to snack on today. I have been watching more Cooking Channel lately and found my new favorite chef, Kelsey Nixon. I absolutely love her show and she makes the most wonderful things! I have only seen two episodes and have 3 foods already bookmarked! At any rate, this was one of the foods I just had to make right away.

With as many pies as I've made over the years, it's surprising that I have never thought to make these cute individual pies. Sometimes when I have to slice pie myself I get a little generous with the portion. These are perfect in that they will always be the perfect portion; no need for guessing! They were absolutely scrumptious, a beautiful presentation, and very easy to make. I wouldn't do the sticks again as I think they would make for fantastic "finger food" at our next family gathering. Hello, these little pies just SCREAM Fourth of July! You've got to try them. You won't be disappointed! The best part is that you can always change the filling to another fruit very easily, too.

Berry Pie Pops
Yields: 8 individual pies

Ingredients

For the dough
1 1/2 cup all-purpose flour, plus more for dusting
1/2 tsp salt
3/4 cup unsalted butter, cold, chopped into pea-sized cubes
5-6 Tbsp cold water

For the filling
1 1/2 cup strawberry & raspberry mix, large chopped
1/4 cup plus2 Tbsp sugar
1 1/2 Tbsp cornstarch
1 tsp lemon juice

1 egg beaten
1 Tbsp water
turbinado sugar, for dusting
8 lollipop sticks (optional)

Directions:

To make the dough, combine flour and salt in a stand mixer fitted with the paddle attachment. Mix briefly and while on low speed, add the butter pieces until a coarse mixture develops. Add the water 1 tablespoon at a time until dough forms and is slightly tacky. Roll dough into large ball and wrap in plastic wrap. Keep refrigerated for at least 30 minutes.

While the dough is cooling, make the filling by placing the berries in a small saucepan on medium-high heat. Stir in the sugar, cornstarch and lemon juice. Mix well until liquid forms. Bring mixture to a slight boil and reduce heat to low. Continue to stir mixture occasionally for about 10 minutes, or until a spoon is coated with the liquid. Remove from heat and allow to cool (or place in tupperware and refrigerate for faster cooling).

When ready to assemble and bake, preheat oven to 375°F. Line a large baking sheet with silicone mat or parchment paper. Roll out pie dough onto a well-floured surface. Cut out 16 circles with a large, round cookie cutter (or 28-ounce can). Place 8 rounds on baking sheet.

Mix egg and water in small bowl. Scoop 1 tablespoon of berry filling onto the center of the rounds on baking sheet being sure to leave a small 1/4-inch edge all the way around. Brush edges with the egg mixture. Place a lollipop stick in the middle, if using, and be sure the stick goes almost to the top of the inside of the pies.

Stretch out one of the extra rounds a little bit and then place on top of the round with filling. Press edges together. Using a clean fork, press the edges slightly to be sure they are sealed well. Take a paring knife and cut several slits in the top of the pies for ventilation. Repeat with remaining rounds making a total of 8 individual pies.

Brush the tops with the egg wash mixture and sprinkle the turbinado sugar on top. Bake, uncovered, for about 20 minutes or until golden brown on top. Allow to cool. Filling will be very hot!

Friday, September 2, 2011

Sausage Jumbalaya, revisited


Finally I'm starting to get back into a routine with the little one! Even though I still love to cook (bake, mostly) I seem to find little time for myself. Easy, week night dinners are high on my priority list. That and low-ingredient meals since going to the grocery is now a race to see whether I can make it home before bubba wakes up. ;) This meal has both few ingredients, is inexpensive, and utilizes the crock pot. It really couldn't get any easier unless you had a live-in cook! I have made (and posted) this recipe in the past, but now that I have a dslr camera, I'm motivated to repost old recipes that are hidden in the archives and give new life the previously dull pictures. Enjoy!

Sausage Jumbalaya
Adapted from: Easy Slowcooker Cookbook
Yields: 6 servings

Ingredients

1 lb cooked, smoked sausage links, chopped
1 red onion, chopped
1 green bell pepper, chopped
2 tsp minced garlic
1 lg can diced tomatoes (28 oz), undrained
1 Tbsp parsley flakes
1/2 tsp ground thyme
1 tsp cajun seasoning
1/4 tsp cayenne pepper
3/4 cup uncooked long-grain white rice

Directions

Spray slow cooker (or use liner) and combine all ingredients except rice. Cover and cook on low for 5-6 hours. Add the rice, mix well, and cook an additional 1 hour on low. Serve warm.