Showing posts with label vegetables. Show all posts

Tuesday, May 22, 2012

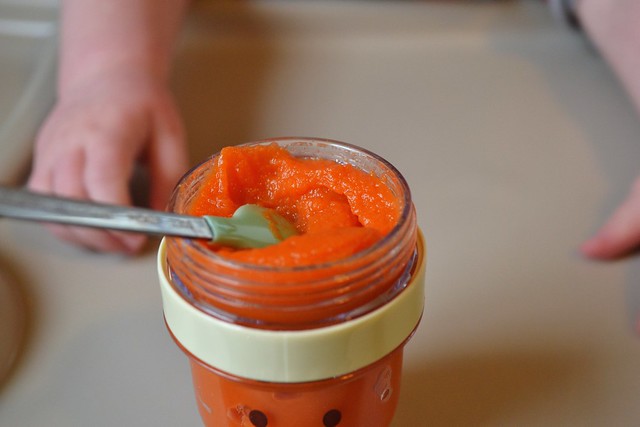
Baby Food - Carrots


Although my son doesn't like carrots (and is now almost 11 months old), I though I'd post this recipe anyways. I loved the puree carrots! I would highly suggest using organic carrots if you are going to make them for your young baby. There are certain fruits and vegetables that are just much safer to give to your little one when they are organic (not to mention, for yourself). We only really did puree foods for about 2 months and my son quickly learned to self-feed. (Boy, has that been messy.) These were so easy to make and I even still steam carrots for him today and he loves them!

Baby Food - Puree Carrots
Adapted from: Kelly's Kitch original

1 pkg organic carrots, peeled and chopped into 1-inch sized pieces
water

Steam the carrots stove top and allow to cool, reserving the liquid. Place carrots and 1/2 cup water from the pot into a food processor (you may have to do this in several batches). Puree until the carrots are the consistency you want for your baby. Keep adding liquid from the pot that you used to boil the carrots with until the perfect consistency. Pulse the carrots instead of pureeing if your baby is old enough for thicker foods.

Thursday, May 17, 2012

Grilled Corn on the Cob


Welcome back to my food blog! I apologize for being MIA the past few months, but there was just so much going on in my life that this was put on the back burner temporarily. Thanks for sticking with me!  In other news, I got a Nikon D3100 dSlr camera soon after my son was born last summer. I still didn't really know how to use it, other than Auto, so I have been attending workshops to learn my camera. Recently, I got a new lens for my first Mother's Day! I absolutely LOVE it; it's way better than the standard one my camera came with. Anyways, I hope you enjoy the improvement with the picture quality as much as I do.

Back to the food...

Corn on the cob is something I typically make at least 2-3 times per week in the summer time. I even freeze it on the cob for those middle-of-the-winter cravings. Everyone has their own way of grilling corn on the cob and I wanted to share my very easy and quick version. I've pre-boiled them, soaked them and this is by far the easiest and yields the best results.

Grilled Corn on the Cob
Adapted from: Kelly's Kitch original
Serves: 2-4

2-4 corn cobs, shucked
foil

Wrap the shucked corn, individually, in a piece of foil wrapping it like a burrito and sealing well. Simply grill on the top shelf (if you have one) or on medium heat for 8-10 minutes, flipping halfway. The corn will stay very hot if you keep it wrapped in the foil, so be sure to open it up about 5 minutes before you'd like to enjoy.

Also, we love buttered corn and growing up my mom would slather a ton of butter on a slice of bread and we could roll the corn cob on that to melt the butter. I highly suggest this!

Monday, December 26, 2011

Ants on a Log


Yes, I'm trying to make up for lost time. I know I'm not exactly posting the most amazing holiday food you've ever seen, but let's be real. We aren't going to eat ham, sugar cookies, and peppermint bark 7 days a week. I hope, anyways. Well this is a great little snack for your child or even the fun-seeking adult. I know there are the traditional ants on a log, but I had a lot of other leftover ingredients and I absolutely loved the result so I had to share!

Ants on a Log
Adapted from: Kelly's Kitch original
Yields: about 9 "logs", or 3-4 servings

4 long celery stalks
Creamy honey peanut butter (splurge, it's so good)
1/4 cup craisins

Start by chopping the celery into 3-inch long segments and filling them with the creamy peanut butter (this usually works best if you have an outside stalk so there is room to fill). Place the craisins on the peanut butter and press into it to make it stick. Voila! Easy as .. pie?

Thursday, October 20, 2011

Southwestern Stuffed Peppers, revisited


I've made these stuffed peppers in the past and this is a great dish that my husband and I always love to have for dinner. It's quick enough for a week night and easy enough to double if you're having some guests over. We love these as leftovers, too, since they keep well and reheat great. If you're in the mood for Mexican but don't want to spend an hour (or two) making a huge, fancy, complicated dish, then this is your recipe!

From this post forward, I've added a new tag on the right-hand side of the page: leftover-approved. This will be for any dinner (or meal-item) that is approved by myself and/or my husband to eat for leftovers. Some things really do not keep up well after being in the fridge and then the microwave. Hopefully this will help with week night meal selection!

Southwestern Stuffed Peppers
Adapted from: Homemade by Holman
Yields: 4 servings

1/2 lb ground beef
1 tsp ground cumin
1/2 tsp chili powder
1/4 tsp cayenne pepper
1 cup black beans, drained and rinsed
1 cup corn
1/2 cup red onion, diced
1 can diced tomatoes (option w/chiles), undrained
1/2 cup brown rice, uncooked
4 bell peppers, any color
1 cup cheddar cheese, shredded
1 lime
1/4 cup cilantro, chopped (optional)
sour cream, (optional)

Preheat oven to 350°F. Cook rice as directed and set aside. Meanwhile, brown ground beef in a large skillet on medium-high heat and crumble as it cooks. Add 1/2 tsp cumin, 1/4 tsp cayenne and 1/4 tsp chili powder. Mix well and add diced tomatoes, reducing heat to medium low. Add onions, black beans, corn and simmer until rice is cooked and softened.

Meanwhile, prepare peppers by cutting in half lengthwise (top to bottom) and removing stem, seeds, etc. Rinse and set in a large glass baking dish. Add 2 tbsp water to bottom of dish.

When rice has cooked thoroughly, add 1/2 tsp cumin and 1/4 tsp chili powder and mix well. Stir into the ground beef mixture and add half the cilantro, if using. Spoon filling into pepper halves. Squeeze lime juice on top of stuffed peppers. Cover pan with foil and bake for 20-25 minutes. Uncover (peppers should be softened) and sprinkle on cheese and continue cooking an additional 5 minutes until cheese is melted. Top with remaining cilantro and sour cream if desired.

Friday, September 9, 2011

Charred Corn Salad


Even though summer is coming to a close, I usually stock up on fresh corn on the cob for the winter. There is a local grower who I frequently purchase from at the farmer's market and their corn is substantially better tasting than any I've ever had before; hands down. I love fresh corn in the winter and the frozen and canned corn just isn't the same. Most of you are probably thinking I'm a little crazy for thinking this kind of corn is better, but when you bite into that juicy wonderful cob .. you know. Anyways, I saw this recipe on my new favorite show, Kelsey's Essentials, and just had to try it out. It looked amazing, but it tastes even better! This would be a great addition to any late summer hurrahs. Or it has made a wonderful side dish for my lunches lately. :)

Charred Corn Salad
Adapted from: Kelsey Nixon (Cooking Channel)
Yields: 4-6 servings

3 ears of corn, shucked
1-2 Tbsp canola oil
salt and pepper, for seasoning
3/4 cup packed, fresh basil leaves
1 clove garlic, grated
1/8 cup cider vinegar
1/8 cup extra virgin olive oil
8 oz cherry tomatoes, halved (almost a full 10-oz container)
1/4 small red onion, chopped

Preheat a grill pan, grill or broiler on high heat. I chose the broiler and it took a while, but it was a good alternative to grilling since it's so cold outside. Brush or rub the corn cobs in the canola oil and season with salt and pepper. Place the corn on the grill until charred, about 2-3 minutes, on each side (longer if using the broiler). Once the corn has charred, set aside to cool. Once cooled, stand each ear up inside of a wide, shallow bowl. Cut the kernels off of the cob with a sharp knife. Keep kernels in bowl and set aside.

Meanwhile, combine basil and garlic in a blender or food processor and pulse until it starts to chop up a little. Add vinegar, continue pulsing, and slowly add in the olive oil. Continue to pulse until mixture is smooth. Note: There will be small pieces of basil; this will not completely liquefy.

Add the basil mixture to the bowl with the corn kernels. Add onion and tomatoes and toss well to combine. Taste and season with salt and pepper as needed.

Wednesday, June 22, 2011

Corn Chowder


Usually chowder is a fall or winter recipe. Also, I'm not a big fan of soup. The recipe and picture just looked amazing from reading my new cook book and so I dog-eared it. It took a week of coercing myself to get the energy to make this, but in the end it really didn't take that long at all! If you're not really a soup fan like myself, then just give this a try; you won't regret it. If you love potatoes and corn, then you will absolutely love this recipe. The one complaint I think I had was that if you eat the soup by itself, it's sort of bland-tasting so I HIGHLY recommend adding cheese and even bacon pieces. I think next time I'll add a little more salt and pepper as well as melt in a little cheese. The recipe below is the original.

On a side note, I am about two weeks away from my due date. That is why the posts have been MIA lately and probably will continue to be. I have pictures, new recipes, and more, but what little energy I have is reserved for naps, cleaning and daily contractions. I apologize, but please do enjoy the rest of my blog posts in recent months for all of your recipe needs. I'll be posting my favorite summer recipes in the coming weeks to give you all a taste of what my summer will (hopefully) be like this year!

Corn Chowder
Adapted from: Simply Suppers
Serves: 8-10 *

2 Tbsp unsalted butter
1 Tbsp olive oil
1 cup yellow onion, finely diced
2 garlic cloves, minced
1/2 tsp dried thyme
1/4 cup all-purpose flour
6 cups chicken stock
4 large russet potatoes, peeled and diced
2 cups half-and-half
4 cups corn kernels, thawed if using frozen
kosher salt
finely ground black pepper
1/2 cup shredded cheddar cheese, for topping
1/4 cup cooked bacon, crumbled, for topping

In a large stockpot over medium-high heat, warm the butter and oil until a few droplets of water sizzle when sprinkled into the pot. Add onions, garlic and thyme. Cook, stirring occasionally until soft, about 4 minutes. Dust the onion mixture with flour and stir to coat. Cook for 1 minute and whisk in the chicken stock. Increase heat to high and bring the mixture to a boil.

Add potatoes and bring mixture back to a boil. Stir in half-and-half. Reduce heat to medium and simmer uncovered for 15 minutes, or until potatoes are tender.

Add the corn and simmer until the corn is softened, about 15 minutes. Season with salt and pepper to taste. Serve hot and garnish with cheese and bacon as desired.

* NOTE: This recipe makes a lot of soup. If you are a smaller family and don't want too many leftovers, then halve the recipe.

Monday, May 9, 2011

Green Monster Smoothie


Green food, okay. Green drinks, not okay? I have heard about and seen this Green Monster Smoothie just about everywhere in the past year or two. I've been afraid to try it for one reason: it's green. And guess what gives it that bright green color? Spinach leaves! Of all things that shouldn't be in drinks!! Or should it?

I wanted to try this drink because it had so many good ingredients that I love (minus the spinach of course). I made a slight adjustment and omitted the honey, but it was perfectly sweet with all the fruit in it. It turned out absolutely amazing! I guess I just want more go-to drink recipes because it seems like I have so few. Try this recipe and adjust it however you like, adding or omitting any ingredients you think it needs. Next time I might do half pineapple and half mango. That sounds delicious! And if you were wondering, you absolutely cannot taste the spinach!!

Green Monster Smoothie
Adapted from: Annie's Eats, originally une-deux senses
Serves: 3-4

1 banana, cut into 1-inch chunks
1 cup frozen, chopped pineapple
1 pear, peeled and coarsely chopped
1 1/2 cups orange juice
2 1/2 cups baby spinach leaves, rinsed and dried

Combine all ingredients into a blender and puree until completely smooth. Enjoy immediately or store in fridge for up to 3 days. Mixture will need a good shaking/stirring when not enjoyed immediately.

Wednesday, December 8, 2010

Baked Parmesan Asparagus


Asparagus is one of those vegetables that my mom tried to force on me as a child once and only once. I despised how it smelled and looked so much that I would have done (and probably did do) anything to avoid eating it. Luckily I have had some recipes recently that have called for asparagus and I can’t believe what I was missing out on! Asparagus is so healthy, delicious and extremely easy to make. If you need a side dish to your Christmas dinner, this would be a very easy and very beautiful display for the table.

Baked Parmesan Asparagus
Adapted from: All Recipes
Yields: 10 spears, about 3-4 servings

10 medium fresh asparagus spears, trimmed
4 tsp olive oil
1 Tbsp parmesan cheese, grated
1/8 tsp garlic salt

Toss the asparagus spears on a non-stick or greased cookie sheet with the oil. Bake in a preheated oven at 440˚F for 12 minutes, being sure to toss at the halfway point. Meanwhile combine parmesan cheese and garlic salt. When asparagus is done cooking in the oven and is tender, sprinkle with parmesan mixture and serve warm.

Friday, November 12, 2010

Spinach Artichoke Dip


If my husband and I are eating out at a restaurant, we typically splurge a little bit. Spinach and artichoke dip is one thing we never disagree on when it comes to ordering an appetizer. I never really thought I could replicate any dip recipe, but this is a healthier and just as tasty spinach and artichoke dip. I actually baked these in smaller ramekin's so that we could bring them in our lunches. My husband absolutely loved them! According to the website these little guys are about 100-110 calories per 1/4 cup (about the size of my rammekins). I added a tiny bit more cheese so it's a little over 100 calories.

Spinach Artichoke Dip
Adapted from: Food Network
Serves: 4-6

Pinch salt
10 oz baby spinach leaves
fresh basil (1 cup); or 4 Tbsp dry basil
¾ cup canned cannellini beans, drained and rinsed
6 oz Neufchatel cream cheese
1 garlic clove, minced
½ cup chicken broth
14 oz can artichoke hearts, drained, squeezed dry, and finely chopped
½ cup grated parmesan cheese
1 cup shredded mozzarella cheese
pinch cayenne pepper, to taste
2-3 dashes Worcestershire sauce
pinch ground pepper, to taste
chips, for dipping

Preheat the oven to 450-degrees. Boil water and salt stovetop. Prepare an ice water bowl while water is heating up by placing very cold water and lots of ice cubes into a large mixing bowl. Stir the spinach leaves into the boiling water and keep immersed for 30 seconds, until the leaves turn bright green. Remove spinach from boiling water and place into ice water bath. Drain and squeeze dry, then roughly chop.

Puree the beans, cream cheese, garlic and broth in a food processor until smooth. Transfer to medium mixing bowl and fold in the chopped spinach, artichokes, parmesan and ¾ cup of the mozzarella cheese. Add cayenne pepper, Worcestershire sauce, salt, and black pepper. Toss to combine.

Place mixture into oven-proof, greased individual ramekins or large serving bowl, about 1-quart. Top with remaining mozzarella cheese. Bake until bubbly, about 20-25 minutes at 450 degrees.

Wednesday, September 1, 2010

Carrot and Zucchini Bars


If you need to hide your vegetables to eat them, here is your recipe! I love my veggies, however, my husband will not eat anything green .. no matter what. This is such a delicious (albeit not the healthiest) way to get your vegetables in and dessert. I have always had a huge crush on carrot cake; I even insisted that I get a side sheet cake at my wedding just so I could have carrot cake. This is also a great recipe for carrot cake if you wanted to experiment around with it. The cream cheese frosting was the perfect amount of sweetness to top off the bars, too. I probably will make 1.5x the batch next time because I have a huge sweet tooth. The recipe below is the original amount.

Carrot and Zucchini Bars

For the bars:
1.5 cups all-purpose flour
1 tsp baking powder
1/2 tsp ground ginger
1/4 tsp baking soda
2 eggs, slightly beaten
1.5 cups shredded carrot
1 cup shredded zucchini
3/4 cup brown sugar, packed
1/2 cup dry cranberries (or raisins)
1/2 cup walnuts, chopped
1/2 cup cooking oil (I used canola)
1/4 cup honey
1 tsp vanilla

For the frosting:
8 oz cream cheese, softened
1 cup powdered sugar
1 tsp lemon zest

Preheat oven to 350 degrees. In a large mixing bowl, combine flour, baking powder, ginger and baking soda. In a separate bowl, mix remaining ingredients (for the bars) until well blended. Pour that mixture into the large mixing bowl with the dry ingredients. Mix until just incorporated. Spread batter evenly into an ungreased 13x9-inch baking pan. Bake for 20-25 minutes, until a toothpick comes out clean. Cool bars in the pan on top of a cooling rack.

While bars are cooking, mix cream cheese and powdered sugar together in a stand mixer on medium speed with the wire whip attachment. Whip frosting until fluffy and add the lemon zest. Mix batter for another minute and spread over cooled bars. Cut into bars and serve!

Thursday, July 15, 2010

Zuccini Bread


I will admit that as a child and even a young adult, I really did not like straying from my normal meals. I didn't even think I liked zucchini before making this recipe, but had never even tried it. I'm so sorry to all the delicious zucchini's out there for being so judgemental! I absolutely LOVED this bread! I have never tried a zucchini recipe nor tasted anything with zucchini in it before. This recipe really wowed. I think it's better than my banana bread recipe so I guess I will have to go back to the drawing board on that one.

Zucchini Bread
Adapted from: all-recipes

3 eggs
1 cup canola oil
2 cups sugar
2 cups grated zucchini*
2 tsp vanilla extract
3 cups all-purpose flour
3 tsp cinnamon
1 tsp baking soda
1/4 tsp baking powder
dash salt
1/2 cup chopped walnuts

Grease and lightly flour 2 small loaf pans, about 8x4 in measurement. Beat eggs in stand mixer with paddle attachment until frothy (3 minutes). Mix in oil and sugar and continue to mix on medium speed. Add in zucchini and vanilla.

In a separate bowl combine flour, cinnamon, baking soda, baking powder, salt and nuts. Slowly add to mixture in stand mixer on low speed. Continue to mix until well blended.

Divvy up the mixture into two equal batches and pour into greased loaf pans. Bake at 325 degrees for approximately 55-65 minutes. They will darken more than you think they should but don't worry!

* I looked up online how to grate zucchini (as I have never done so) and it is as simple as using a cheese grater. Just cut one end off and use the largest round holes on the grater; you don't even need to peel or de-seed the zucchini. Just grate it all! I got 4 cups+ from a large garden zucchini from a friend.

Friday, March 26, 2010

Homemade Salsa


If you are a fan of Annie's Eats (and I highly suggest that you become one if you already are not), then you will know this salsa as My Favorite Salsa. I always love going out to Mexican restaurants because of the chips and salsa. Now there is no need because this is so comparable to restaurant quality, but without all of the preservatives and salt. If you haven't guessed already, I don't really like much salt in anything. Well, anyways I went to the grocery store hoping to find big, beautiful jalapeno's like I normally do but this time they were all wrinkly and soft so I opted for getting a pepper that was a bit hotter and using one less. It's okay, I figured, since Brad loves spicy foods. This was great and I will most likely keep some on hand for guests and/or ourselves for snacking from now on! No more store-bought salsa!! If I can just find the perfect queso dip, we probably will never leave home again.

Homemade Salsa
Adapted from: Annie's Eats

1 jalapeno, seeded and coarsely chopped
1 marzano pepper, seeded and coarsely chopped
4 cloves garlic, minced
2 large vine-ripe tomatoes, cubed (large)
1 can diced tomatoes (28 oz), drained for chunky salsa
2 tbsp red wine vinegar
1 tbsp cumin
1/2 red onion, chopped
dash salt
1/2 tsp ground cayenne pepper
1/4 cup fresh cilantro
juice of one lime

In a large food processor, combine the peppers and garlic. Process until finely chopped. You might have to scrape the sides of the bowl to get the excess. Add remaining ingredients and pulse on low speed until salsa is at desired consistency. Transfer to airtight container and refrigerate 2 hours before serving to allow flavors to blend.

Note: I have a very small food processor and combined the first half of the ingredients in the first batch and then pulsed the canned tomatoes and sesasonings in the second batch. Then I mixed everything in a large bowl together.

Thursday, March 11, 2010

French-Style Potato Salad


When I think of traditional potato salad I have to admit that I begin to salivate a little and think of my mom's wonderful version with russet potatoes, mayonnaise, mustard, etc. It makes me think of summer and I really yearn for that sunny warmth right now. We are just itching for a reason to grill outside right now! Well if you are like me and winter weather has got you down, here is something to cheer you up!

This is a very light, cholesterol-free, high-fiber version of potato salad. Now per the usual I always try to make new things I haven't tried before to see what my husband will and will not eat. I made these as a side dish and found out that my husband usually doesn't like red potatoes. OKAY .. hold the phones .. who doesn't like red potatoes!?!? I couldn't believe my ears! Well he loved these so thank goodness for this recipe. I loved that these weren't so heavy with all the mayo and mustard either. My cholesterol doesn't need any help going in the wrong direction.

French-Style Russet Potato Salad

2lb small, round red-skinned potatoes
3 tbsp extra-virgin olive oil
2 tbsp red wine vinegar
1 tbsp dijon mustard
kosher salt and ground black pepper, to taste
1/2 cup celery, thinly sliced
1/4 cup cervil leaves, chopped (I substituted Parsley)

Place the potatoes in large saucepan with water to cover. Bring to a boil over high heat. Reduce heat to medium-low, cover and simmer until the potatoes are tender when pierced with a knife (about 15-20 minutes). Meanwhile, in a large bowl, whisk together olive oil, vinegar, mustard, 1/2 tsp salt and pepper to taste until blended well.

When potatoes are ready, drain them and allow to cool. Once cooled enough to handle, quarter them and add them to the dressing. Add celery and chervil (or parsley) tossing gently to combine. Serve salad warm or at room temperature.

Sunday, February 28, 2010

Tomato and Cucumber Salad


Well, it's Girl Scout Cookie season and guess what that means. I need some lighter, healthier recipes to make up for it. Here is a fantastic recipe that is low in calroies and high in fiber! I found this recipe in my Williams-Sonoma cookbook that has been collecting dust over the years. I rarely cook from it because I am very intimidated by it and also because a lot of the recipes are more summer/fall related. It is the winter right now: time for soups and stews. Well, I don't care! I needed something for lunch today and this absolutely satisfied. There are usually little tid-bits of information about the recipe's so I will include that here and keep in mind they are not my words. I also will include the original recipe that I loosely adapted my recipe from (i.e. I don't like olives so I discluded those and added a few more cucumbers and tomatoes as well as using dry basil instead of basil leaves). Keep in mind I made it in a smaller quantity than the orignial recipe too.

"This salad is reminiscent of the deli-style Greek versions made with iceberg lettuce, but instead of lettuce, it uses lots of juicy ripe tomatoes and crunchy cucumbers. A medium tomato only has 35 calories but is high in vitamins C and A, lycopene, and flavonoids that fight cancer and some types of heart disease. Very red tomatoes are richest in lycopene." - Williams-Sonoma, Essentials of Healthful Cooking

Tomato and Cucumber Salad

1.5 lb ripe tomatoes, chopped
1/2 cup torn fresh basil leaves (I used dry basil)
2 tbsp olive oil or peanut oil
1/2 tsp minced garlic
kosher salt
6 inch piece English cucumber (I used about 3/4 of a regular cucumber from my local supermarket)
1/2 sweet onion
1/2 cup crumbled ricotta cheese
2 tbsp sliced, pitted Kalamata olives (I ommited this)
1 tsp red wine vinegar
freshly ground pepper

Combine tomatoes, basil, oil, garlic, pinch salt and toss gently to combine. Let stand 5 minutes. Then cut the cucumber in half discarding the seeds and cut into 1/2-inch cubes. Next, dice the onion. Add the cucumber, onion, cheese, and olives to the mixture, then sprinkle with the vinegar and toss to mix. Season with pepper and stir. Serve at room temperature.

Monday, February 8, 2010

Southwestern Stuffed Peppers


This was the very first recipe in our new home! My husband and I both put this on our to-make-often list of recipes. It was a huge hit and we almost couldn't stop eating them. Moving has been really hard on both of us but this was a very simple and rewarding recipe. He loves mexican food and could eat it daily if I made it every day. 

I cut two peppers lengthwise and two just with the tops off and ended up halving them because it was much easier to stuff them that way. Whenever my mom makes stuffed peppers she doesn't make them like this .. I don't think. This is the first stuffed pepper recipe I have eaten or made. Next time I might double the recipe and make it for some guests we have over. I know it will be a huge hit!

Southwestern Stuffed Peppers
Adapted from: Homemade by Holman 

1/2 lb ground beef
1 tsp ground cumin
1/2 tsp chili powder
1/4 tsp cayenne pepper
1 cup black beans
1 cup corn
1/2 cup red onion, diced
1 can diced tomatoes (option w/chiles)
1/2 cup brown rice, uncooked
4 bell peppers, any color
1 cup cheddar cheese, shredded
1 lime
1/4 cup cilantro, chopped (optional)
sour cream, (optional)

Preheat oven to 350 degrees. Cook rice as directed and set aside. Meanwhile brown ground beef in large skillet on medium-high heat and crumble as it cooks. Add 1/2 tsp cumin, 1/4 tsp cayenne and 1/4 tsp chili powder. Mix well and add diced tomatoes, reducing heat to medium low. Add onions, black beans, corn and simmer until rice is cooked and softened.

Meanwhile prepare peppers by cutting in half lengthwise (top to bottom) and removing stem, seeds, etc. Rinse and set in a large glass baking dish. Add 2 tsp water to bottom of dish. 

When rice has cooked thoroughly, add 1/2 tsp cumin and 1/4 tsp chili powder and mix well. Stir into the ground beef mixture and add half the cilantro. Note: I didn't use cilantro because per the norm I didn't have one of the ingredients on hand. They still turned out WONDERFUL without it. Spoon filling into pepper halves. Cover pan with foil and bake for 20-25 minutes. Uncover (peppers should be softened) and sprinkle on cheese and continue cooking an additional 5 minutes until cheese is melted. Top with remaining cilantro and sour cream if desired.

Sunday, December 6, 2009

Broccoli Cheddar Soup


I have been trying to find time to make this recipe all week. I was afraid it would take a ton of time and that is a luxury I don't have these days. The recipe is actually very quick and relatively easy. My wonderful husband decided to help with both the dishes (oh yes, the dishes) and with the food preparation. This helped tremendously and allowed me to concentrate on following the directions very carefully. Something I am notorious for not doing.

This is embarrassing to say, but I didn't know how to use my Cuisinart Food Processor we got for our wedding. I didn't read the directions nor had I ever owned one before. I usually slice, chop or grade stuff myself. Yeah, that is really old-school and takes a lot of time. Well, I asked him to read them and show me how to use it. It is so simple. I don't know how anyone can cook .. or even live without one of these things. They are a time and life saver! We sliced, shredded and pureed with it tonight just to see what it could do.

My husband liked the cheese base of the soup but he isn't a huge vegetable fan. I thought this would be a great recipe to have him try since whenever we go to Panera for lunch he always gets the Broccoli and Cheddar soup there and loves it. Well, I think I must have pureed it too much for him so I think I will just have to take more time to make smaller chunks of broccoli and not puree it in the end. I personally loved it. It was the most magnificent blend of broccoli, cheese, and carrot. I couldn't even really taste the onion which I was originally worried about too. The recipe I used was from Annie's Eats and I adapted one ingredient only because .. per the norm .. I neglected to read them all beforehand and realized when I was making it that I didn't have it on hand.

Broccoli Cheddar Soup

6 tbsp butter, divided
3/4 cup onion, chopped (I used yellow)
1 cup carrot, shredded
4 cups small broccoli florets (approximately 1 head)
3 cups chicken broth
1/2 tsp onion powder
dash salt
1/2 tsp garlic powder
4 tbsp flour
2 cups milk
2 cups shredded sharp cheddar cheese
freshly ground black pepper, to taste

In large stockpot, melt 2 tbsp butter over medium heat. Add the onion to the pan and saute until tender, about 5 minutes. Add the carrots and cook a few minutes more. Stir in the broccoli, chicken broth, onion powder, salt, and garlic powder. Bring the mixture to a boil and reduce heat to low to simmer.

Meanwhile, in a medium saucepan melt the remaining 4 tbsp butter on medium heat and add the flour. Whisk together and cook until golden, about 1-2 minutes (mixture will be chunky). Whisk in the milk and cook until it thickens and bubbles, about 5 minutes. Then, add the cheese and whisk until completely melted which shouldn't take too long. Add this cheese mixture to the stockpot. Allow to simmer until warmed and broccoli is at desired consistency. Season with pepper if desired.

You can also add the mixture to a food processor to blend and chop the broccoli up a bit more, but it all depends on preference.

Tuesday, October 6, 2009

Spaghetti Squash Casserole


Having lots of leftover spaghetti squash I had no idea what to do with it. Someone on The Nest website's What's Cooking board had posted this recipe. Two words: easy and delicious. Neither of those words does it justice. Just make it!!

I used extra cheese just because I love cheese. I also omitted the water (totally by accident) so I just didn't include it on my recipe below. Turned out perfect anyways! The girl on the website that gave me the recipe said that she omitted all the cheese and added a little parmesan to the top. Make it your own...

Spaghetti Squash Casserole:

1 small spaghetti squash, cooked
1 lb ground beef
1/2 C chopped onion
1/4 C chopped green pepper
1/2 C chopped red pepper
1 clove garlic, minced
1 can diced tomatoes, undrained
1/2 tsp oregano
2 1/2 C shredded cheddar cheese
salt & pepper to taste

In large skillet, cook the beef, onion, peppers and garlic until meat is browned. Drain fat, return to pan with tomatoes, oregano, salt, pepper and squash. Continue cooking 2 minutes or until liquid is absorbed.

Transfer mixture to large casserole dish and mix in 1.5 cups of the cheese. Bake at 350 (conventional) for 25 minutes. Top with additional 1 cup of cheese and bake until melted.

Spaghetti Squash

So I went to the pumpkin patch with my mom last week and the owner and my mom convinced me that making this huge spaghetti squash is something that I just had to do. Needless to say, it was amazing. I have tons of leftovers so I got another recipe I will try tonight and review and post.

Spaghetti Squash:

Cut squash in half and place on baking sheet flat side down. Add a little water to baking sheet. Bake at 350 (conventional oven) for 30-35 minutes for large squash. It is done when you can easily get the spaghetti-like strings inside.