Monday, September 19, 2011

Southwest Lasagna


I've never really been one to be that adventurous when eating out at a restaurant (of any kind). I find something I like and I get it. Every time. I'm starting to try new things as my tastes "mature" so to speak. For example, I have always hated disliked meatloaf and lasagna when my mom made it for us growing up. I'm not sure why but I think it was just because they looked so gross and messy. At any rate I've grown to love them both. Partly because they are very inexpensive meals and have lots of delicious leftovers. Also, I think they are very flavorful and the type of dish you can change almost any aspect of and it would still turn out wonderfully. Hence why I chose a lasagna theme.

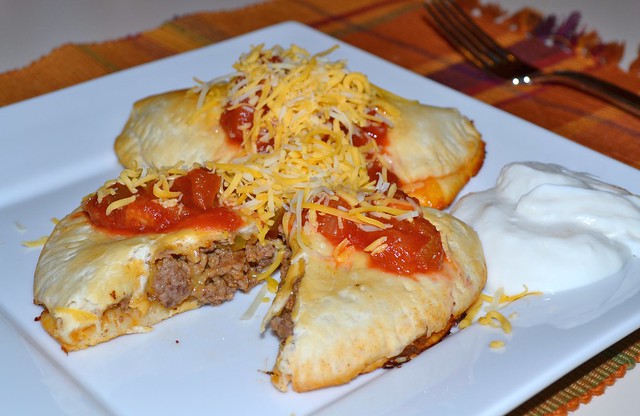
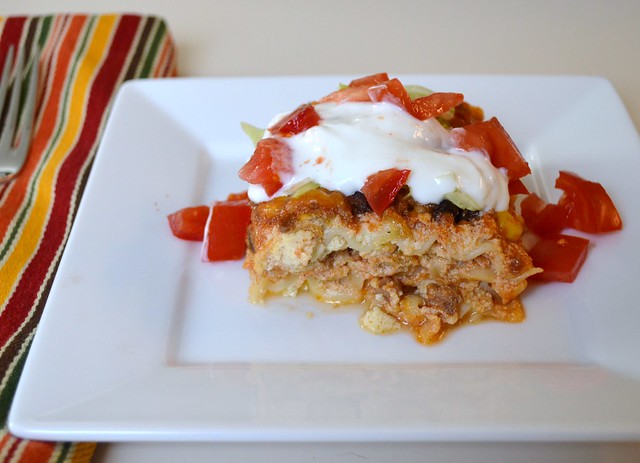
I saw this recipe in an old magazine (yes, I've been digging up oldies here lately). I just had to try it because it sounded amazing. A combination of two amazing things: Mexican food and lasagna!! It turned out amazing and I even took it for leftovers my first day back to work since Camden came into our lives. It was just as tasty as when I pulled it out of the oven! You can top it with chopped lettuce, tomato and sour cream but it really doesn't need them if you don't have any on hand.

Southwest Lasagna
Adapted from: Pillsbury
Yields: 8 servings

9 uncooked lasagna noodles
1lb ground beef
1 package (1.25oz) taco seasoning mix
3/4 cup water
1 jar tomato pasta sauce (28oz)
1 can black beans, drained and rinsed
9 oz frozen corn, at room temperature
2 tsp ground cumin
1 container ricotta cheese (15oz)
1 can chopped green chiles (4.5oz)
2 eggs
3 cups shredded Monterey Jack cheese

Preheat oven to 375°F and place a large, rimmed cookie sheet on the rack below middle oven rack. Spray a 13x9 casserole dish with cooking spray (use a deep dish if you have one). Cook and drain lasagna noodles per package directions. Rinse with cold water and drain well.

Meanwhile, cook ground beef in a large skillet over medium-high heat until brown. Drain and return to pan. Stir in taco seasoning mix and water. Reduce heat and simmer, stirring occasionally. Sauce should be thickened, about 5 minutes. Stir in pasta sauce, beans, corn, and cumin. Cook about 5 minutes longer, stirring occasionally, until heated throughout.

In a small bowl, combine ricotta, chiles and eggs.

To assemble lasagna, arrange 3 cooked and cooled lasagna noodles along the bottom of the greased casserole dish. Spoon and spread 1/3 of the ricotta mixture over noodles. Top with 1/3 of the meat mixture and then 1/3 cheese. Repeat layers topping with the cheese. Place dish on middle oven rack and bake, uncovered, 25-30 minutes, or until cheese is melted and bubbly. Let stand 10 minutes before serving.

Friday, September 16, 2011

Mexican Beef Melts


I don't know why I really have never thought to make a mexican type of calzone. I guess I'm not much of a risk taker in the kitchen when it comes to making up new dishes. I did, however, stumble upon this recipe in a booklet that was 6 years old and thought it would be a great week night dinner. With just a few ingredients and easy directions, I was determined to make this (even if I do have an 11-week-old). They turned out great even though I was somewhat skeptical of the lack of ingredients inside of the melts; or calzones. I think I might add some peppers to the meat mixture to give it a little more kick. They are still fabulous as-is and make for a quick dinner!

Mexican Beef Melts
Adapted from: Pillsbury
Yields: 4 servings

1 lb ground beef
1 package (or 3-4 Tbsp) taco seasoning mix
1/3 cup water
1 1/2 cups chunky salsa
1 can homestyle biscuits (16.3 oz)
1 cup shredded monterey jack cheese
1 cup sour cream, optional

Heat oven to 375°F and lightly spray a cookie sheet with cooking spray (or use silicone mat). In a large skillet, brown the meat. Drain and return meat to warm skillet on medium-low heat. Add water, salsa and seasoning. Mix well to combine and continue to cook until thickened, about 4-5 minutes.

Separate dough into 8 biscuits and roll out to a 6-inch diameter circle. Spoon about 1/4 cup beef mixture into biscuit rounds on cookie sheet. Top with a tablespoon of cheese and close by folding over. Press the edges with a fork to ensure a good seal. Bake 10-14 minutes, or until golden brown. Allow to cool slightly and serve by topping with salsa and cheese. Serve with sour cream if desired.

Monday, September 12, 2011

Butterscotch Scones


It's starting to feel more like fall and you all know what that brings; cooler weather and pumpkin, well, everything! I am so excited this year to be spending Camden's first Halloween as a family. I remember last Halloween I had just found out that I was pregnant with him and here he is a year later, cute as ever! I'm not getting him a costume since he will only be 3 months old, but he does have a "My First Halloween" onesie for the day time and a cute sleeper for the evening. I swear this kid is so stylish. Anyways, in the fall I usually like to bake everything pumpkin and butterscotch. It's the time for chili's and stews. I LOVE this time of year!!!

This recipe is just the same as my chocolate chip scones, but they taste even better with butterscotch! I have also tried white chocolate which are to-die-for good as well. These definitely will get you and your family into the fall mood and won't disappoint! I would venture to say that 90% of the time, we have a bag of these in the freezer. Yup, they're that good!

Chocolate Chip Scones
Adapted from: Annie's Eats, originally Hershey's
Makes: 6 scones

1½ cups plus 2 Tbsp all-purpose flour
¼ cup sugar
2 tsp baking powder
pinch of salt
1 cup butterscotch chips (6 oz)
1 cup heavy cream
2 Tbsp butter, melted
additional sugar for sprinkling (optional)

Preheat the oven to 375°F. Line a large baking sheet with grease or a silicone mat. In a medium bowl, combine flour, sugar, baking powder and salt and stir to mix well. Add in the chocolate chips and fully incorporate them into the mixture. Add the heavy cream to the mixture and mix until dough forms and the dry ingredients are just incorporated. I did this by hand instead of my stand mixer and it turned out phenomenal.

Knead dough very briefly with well floured hands on a clean surface. Scoop rounds onto baking sheet or roll a circle out of the dough about 1/2-inch thick. Cut into triangles (like you are cutting a pizza) and place dough pieces on the baking sheet. Brush lightly with melted butter and sprinkle with additional sugar. Bake 18-22 minutes, until edges are slightly browned and center is cooked (using toothpick method).

Note about freezing: Only bake the scones you wish to eat right away. The best way to enjoy these scones throughout the week is to freeze them. Once you have shaped the dough pieces, wrap them in plastic wrap and place in the freezer in a ziploc bag.

The morning you wish to have a scone for breakfast, preheat the oven to 375°F and cook on the baking sheet and silicone mat for 20-23 minutes. No need to brush the butter and sugar on top. The frozen ones actually tasted better than the fresh so doing this will ensure a warm, fresh breakfast.

Friday, September 9, 2011

Charred Corn Salad


Even though summer is coming to a close, I usually stock up on fresh corn on the cob for the winter. There is a local grower who I frequently purchase from at the farmer's market and their corn is substantially better tasting than any I've ever had before; hands down. I love fresh corn in the winter and the frozen and canned corn just isn't the same. Most of you are probably thinking I'm a little crazy for thinking this kind of corn is better, but when you bite into that juicy wonderful cob .. you know. Anyways, I saw this recipe on my new favorite show, Kelsey's Essentials, and just had to try it out. It looked amazing, but it tastes even better! This would be a great addition to any late summer hurrahs. Or it has made a wonderful side dish for my lunches lately. :)

Charred Corn Salad
Adapted from: Kelsey Nixon (Cooking Channel)
Yields: 4-6 servings

3 ears of corn, shucked
1-2 Tbsp canola oil
salt and pepper, for seasoning
3/4 cup packed, fresh basil leaves
1 clove garlic, grated
1/8 cup cider vinegar
1/8 cup extra virgin olive oil
8 oz cherry tomatoes, halved (almost a full 10-oz container)
1/4 small red onion, chopped

Preheat a grill pan, grill or broiler on high heat. I chose the broiler and it took a while, but it was a good alternative to grilling since it's so cold outside. Brush or rub the corn cobs in the canola oil and season with salt and pepper. Place the corn on the grill until charred, about 2-3 minutes, on each side (longer if using the broiler). Once the corn has charred, set aside to cool. Once cooled, stand each ear up inside of a wide, shallow bowl. Cut the kernels off of the cob with a sharp knife. Keep kernels in bowl and set aside.

Meanwhile, combine basil and garlic in a blender or food processor and pulse until it starts to chop up a little. Add vinegar, continue pulsing, and slowly add in the olive oil. Continue to pulse until mixture is smooth. Note: There will be small pieces of basil; this will not completely liquefy.

Add the basil mixture to the bowl with the corn kernels. Add onion and tomatoes and toss well to combine. Taste and season with salt and pepper as needed.

Monday, September 5, 2011

Berry Pie Pops


Happy Labor Day to everyone! I am enjoying a very relaxing day at home with my two-month-old son and husband. We had a lovely pancake breakfast, but we really needed something festive to snack on today. I have been watching more Cooking Channel lately and found my new favorite chef, Kelsey Nixon. I absolutely love her show and she makes the most wonderful things! I have only seen two episodes and have 3 foods already bookmarked! At any rate, this was one of the foods I just had to make right away.

With as many pies as I've made over the years, it's surprising that I have never thought to make these cute individual pies. Sometimes when I have to slice pie myself I get a little generous with the portion. These are perfect in that they will always be the perfect portion; no need for guessing! They were absolutely scrumptious, a beautiful presentation, and very easy to make. I wouldn't do the sticks again as I think they would make for fantastic "finger food" at our next family gathering. Hello, these little pies just SCREAM Fourth of July! You've got to try them. You won't be disappointed! The best part is that you can always change the filling to another fruit very easily, too.

Berry Pie Pops
Yields: 8 individual pies

Ingredients

For the dough
1 1/2 cup all-purpose flour, plus more for dusting
1/2 tsp salt
3/4 cup unsalted butter, cold, chopped into pea-sized cubes
5-6 Tbsp cold water

For the filling
1 1/2 cup strawberry & raspberry mix, large chopped
1/4 cup plus2 Tbsp sugar
1 1/2 Tbsp cornstarch
1 tsp lemon juice

1 egg beaten
1 Tbsp water
turbinado sugar, for dusting
8 lollipop sticks (optional)

Directions:

To make the dough, combine flour and salt in a stand mixer fitted with the paddle attachment. Mix briefly and while on low speed, add the butter pieces until a coarse mixture develops. Add the water 1 tablespoon at a time until dough forms and is slightly tacky. Roll dough into large ball and wrap in plastic wrap. Keep refrigerated for at least 30 minutes.

While the dough is cooling, make the filling by placing the berries in a small saucepan on medium-high heat. Stir in the sugar, cornstarch and lemon juice. Mix well until liquid forms. Bring mixture to a slight boil and reduce heat to low. Continue to stir mixture occasionally for about 10 minutes, or until a spoon is coated with the liquid. Remove from heat and allow to cool (or place in tupperware and refrigerate for faster cooling).

When ready to assemble and bake, preheat oven to 375°F. Line a large baking sheet with silicone mat or parchment paper. Roll out pie dough onto a well-floured surface. Cut out 16 circles with a large, round cookie cutter (or 28-ounce can). Place 8 rounds on baking sheet.

Mix egg and water in small bowl. Scoop 1 tablespoon of berry filling onto the center of the rounds on baking sheet being sure to leave a small 1/4-inch edge all the way around. Brush edges with the egg mixture. Place a lollipop stick in the middle, if using, and be sure the stick goes almost to the top of the inside of the pies.

Stretch out one of the extra rounds a little bit and then place on top of the round with filling. Press edges together. Using a clean fork, press the edges slightly to be sure they are sealed well. Take a paring knife and cut several slits in the top of the pies for ventilation. Repeat with remaining rounds making a total of 8 individual pies.

Brush the tops with the egg wash mixture and sprinkle the turbinado sugar on top. Bake, uncovered, for about 20 minutes or until golden brown on top. Allow to cool. Filling will be very hot!

Friday, September 2, 2011

Sausage Jumbalaya, revisited


Finally I'm starting to get back into a routine with the little one! Even though I still love to cook (bake, mostly) I seem to find little time for myself. Easy, week night dinners are high on my priority list. That and low-ingredient meals since going to the grocery is now a race to see whether I can make it home before bubba wakes up. ;) This meal has both few ingredients, is inexpensive, and utilizes the crock pot. It really couldn't get any easier unless you had a live-in cook! I have made (and posted) this recipe in the past, but now that I have a dslr camera, I'm motivated to repost old recipes that are hidden in the archives and give new life the previously dull pictures. Enjoy!

Sausage Jumbalaya
Adapted from: Easy Slowcooker Cookbook
Yields: 6 servings

Ingredients

1 lb cooked, smoked sausage links, chopped
1 red onion, chopped
1 green bell pepper, chopped
2 tsp minced garlic
1 lg can diced tomatoes (28 oz), undrained
1 Tbsp parsley flakes
1/2 tsp ground thyme
1 tsp cajun seasoning
1/4 tsp cayenne pepper
3/4 cup uncooked long-grain white rice

Directions

Spray slow cooker (or use liner) and combine all ingredients except rice. Cover and cook on low for 5-6 hours. Add the rice, mix well, and cook an additional 1 hour on low. Serve warm.

Sunday, August 28, 2011

Penne and Smoked Sausage


Ever get into a slump when it comes to weeknight meals? I know I usually do. When it comes to smoked sausage I have two recipes. Two. How sad is that?! I can make hundreds of things with ground beef, chicken, etc. Why should smoked sausage get ignored? Not anymore! I was inspired by some recent commercials of a woman making a pasta dish with her smoked sausage. Seemed like a great idea. This pasta turned out better than I'd expected, but my husband wasn't totally impressed. It was good enough for dinner, but not for leftovers. You can decide for yourself, but I think it was rather tasty. It has very few ingredients and is a quick weeknight dinner for those with a family!

Penne and Smoked Sausage
Adapted from: Taste of Home
Yields: 6-8 servings

Ingredients

2 cups uncooked penne pasta
1 lb cooked smoked sausage, halved and diced
1 1/2 cups milk
1 can cream of celery soup (10.75 oz)
1 1/2 cups french fried onions, divided
1 cup shredded mozzarella cheese, divided
1 cup frozen corn

Directions

Cook pasta according to package directions. Meanwhile, preheat oven to 375°F. Grease a 13x9 casserole dish and set aside. In a large bowl, combine milk and soup. Mix well and add 1/2 cup french fried onions, 1/2 cup shredded cheese, corn and sausage. Mix until well incorporated.

Transfer contents of bowl to the greased baking pan. Flatten slightly with a spoon. Cover with foil and bake for 25-30 minutes, or until bubbly. Remove foil and top with remaining 1 cup of french fried onions and 1/2 cup cheese. Bake, uncovered, for an additional 3-5 minutes, or until cheese has melted. Enjoy!